What is Reverse Charge Mechanism?
In the Forward Charge, the supplier of goods or services is responsible to pay tax to the government. However, under reverse charge mechanism the buyer or the recipient is liable to pay the tax to government. The main difference between Forward Charge and Reverse Charge is that the buyer of goods or services is responsible to pay tax to government instead of the supplier. Also, the tax under reverse charge mechanism is considered as non-refundable tax.
How is Reverse Charge Mechanism used in Kpi.com?
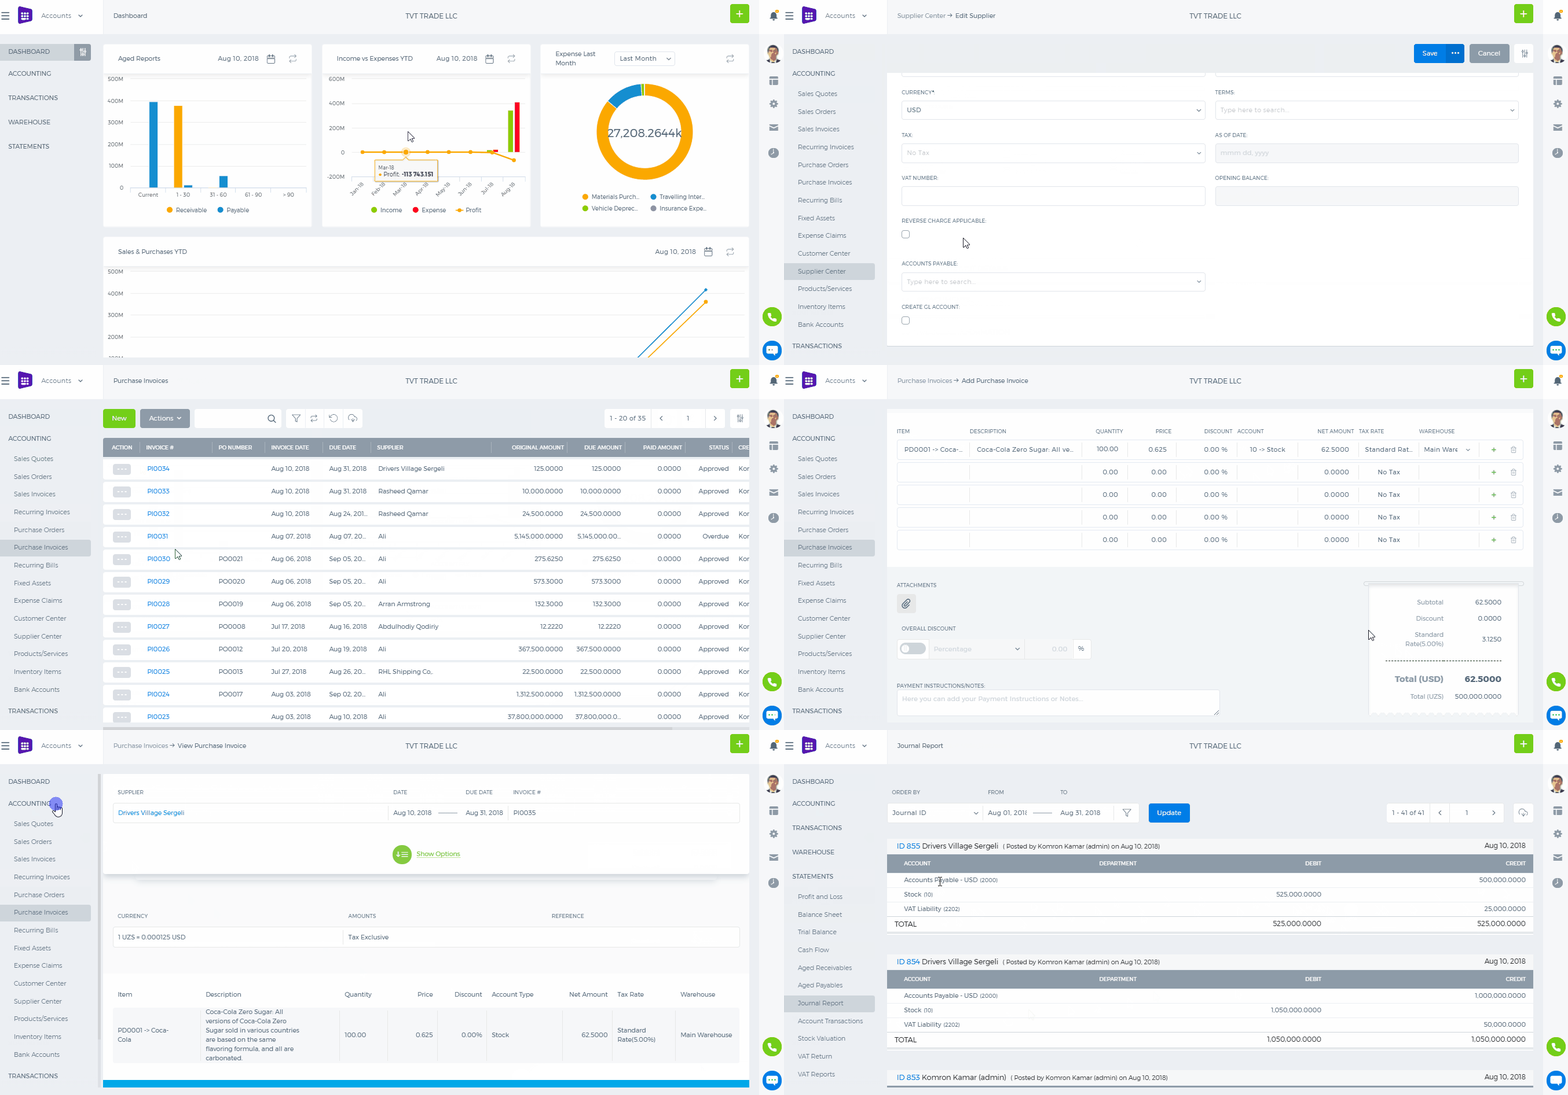
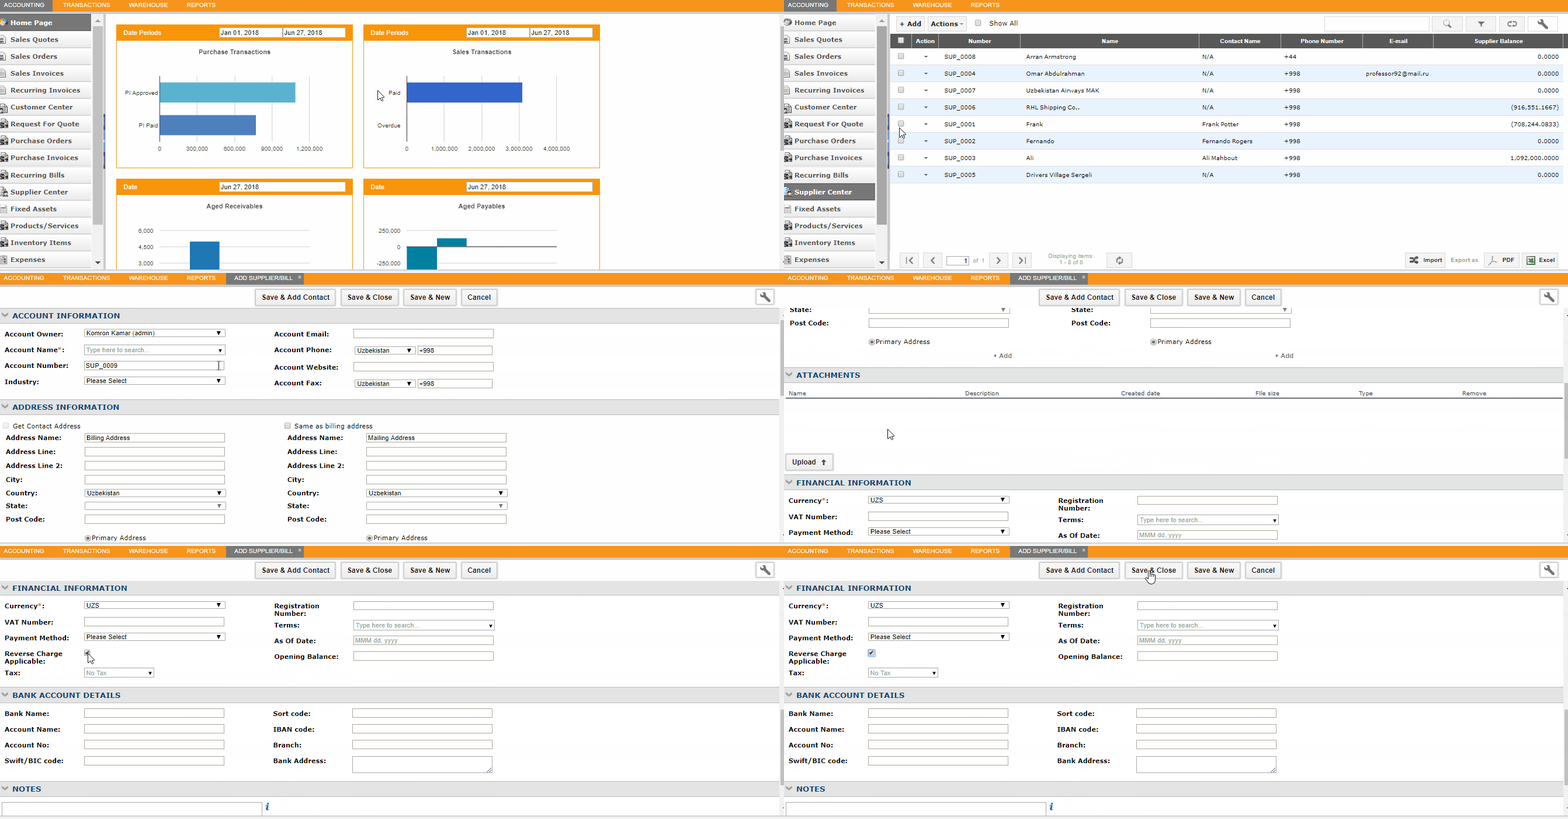
In Kpi.com, the only thing that you should do is to tick “Reverse Charge Applicable” in Financial Information of the supplier in Supplier Center. All Purchase transactions related to this supplier will be recorded under reverse charge mechanism.


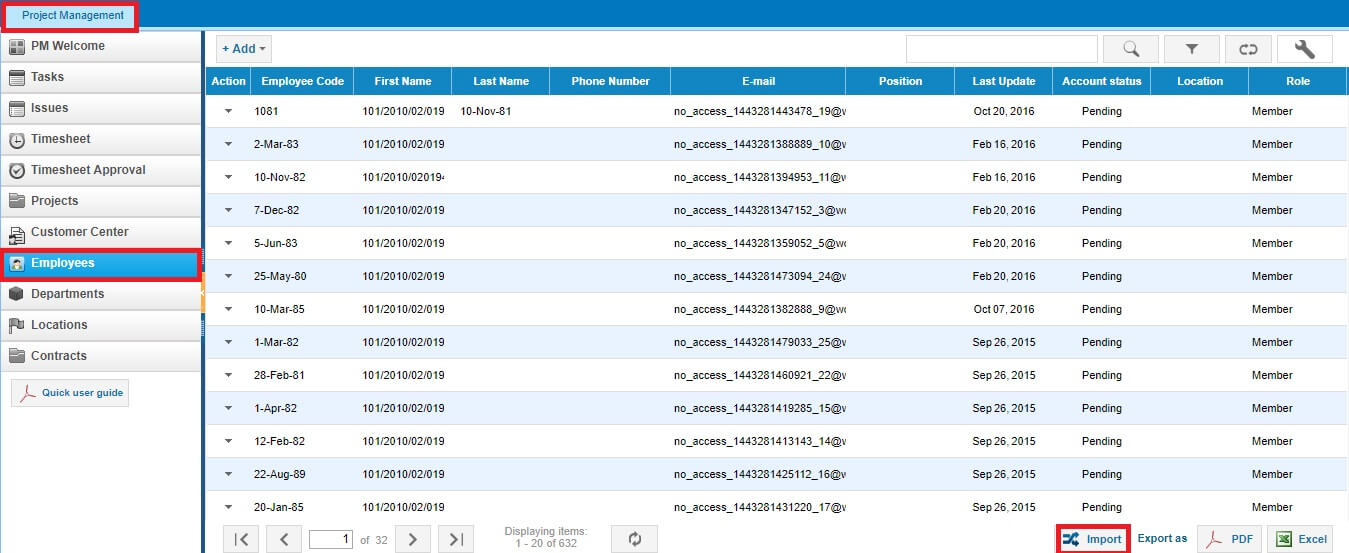
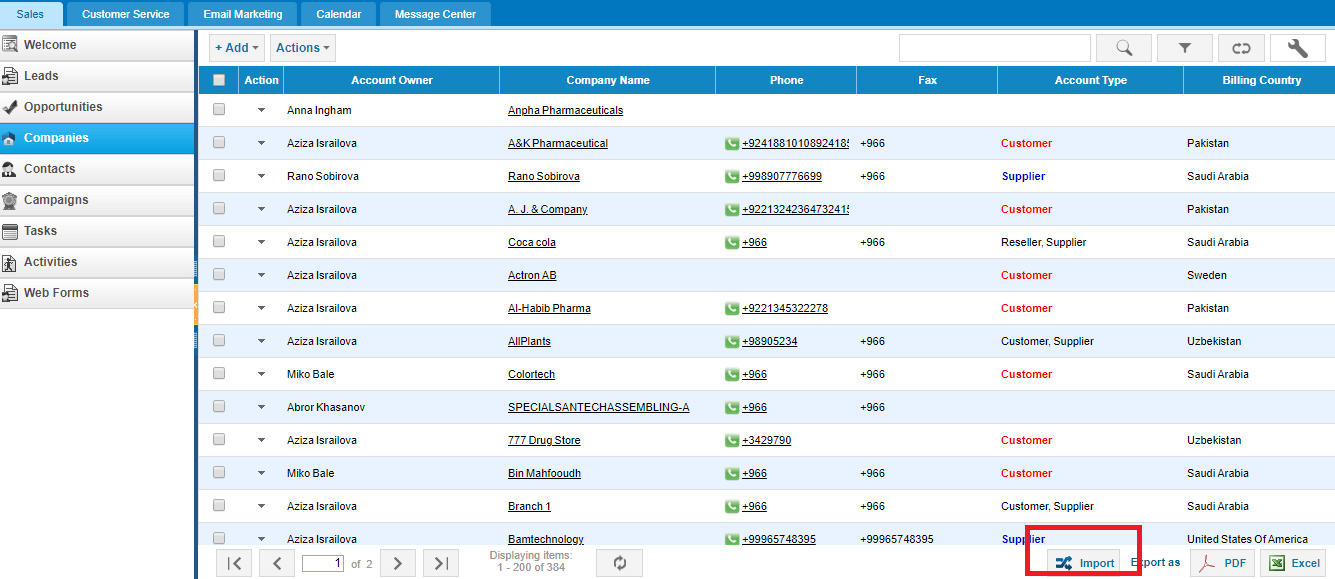 In the new user interface the import button is available on top of each setion:
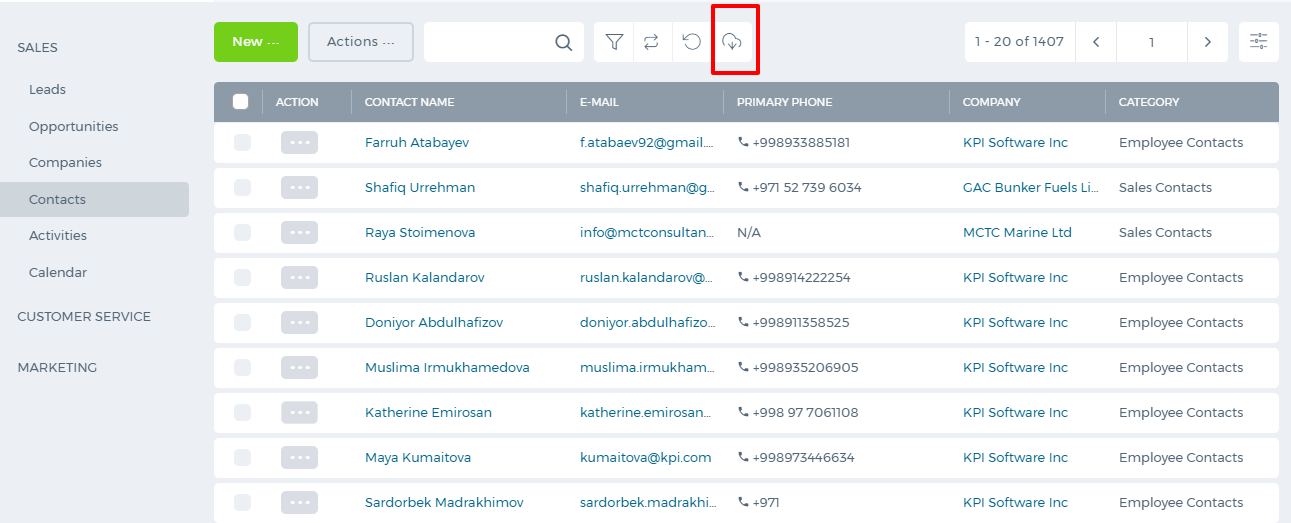 The sample .csv file is available for downloading which helps you to view how the format should be in order to successfully upload your data.
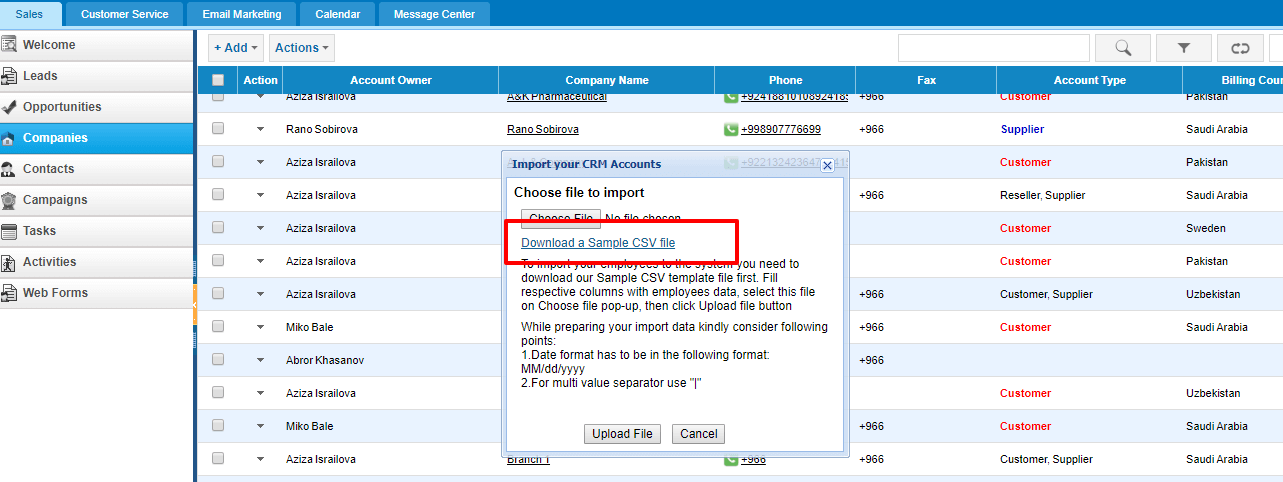
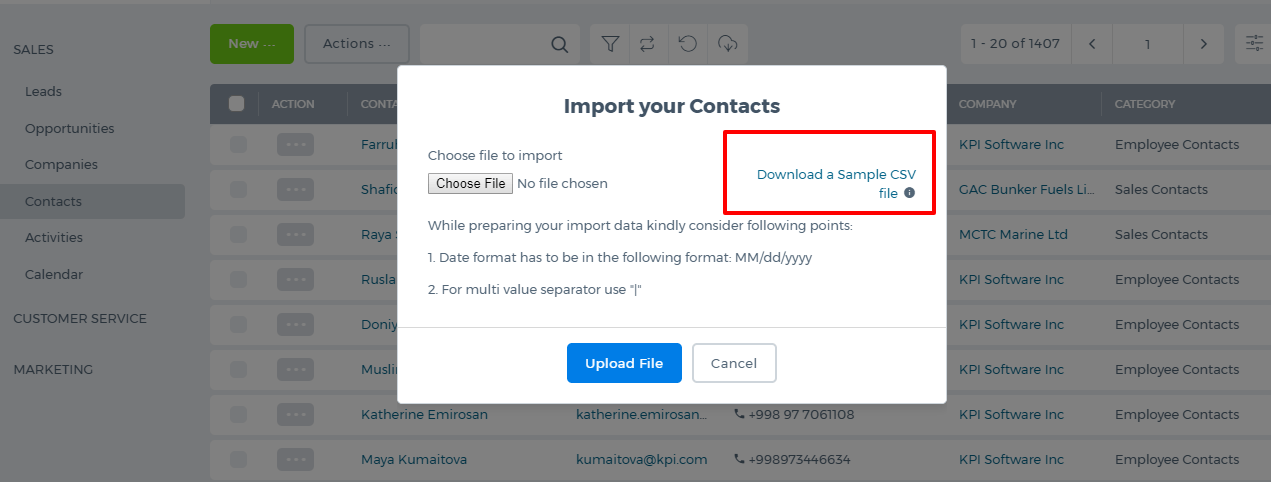 If your data is in an excel file, you need to save it as a .csv file first.
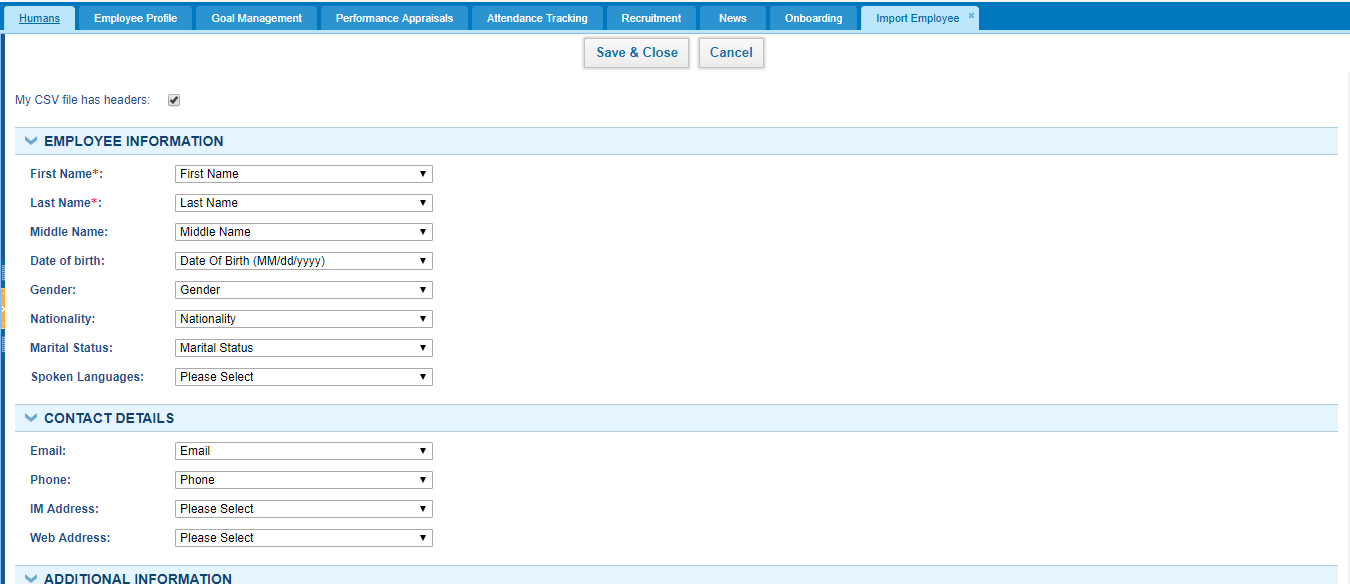
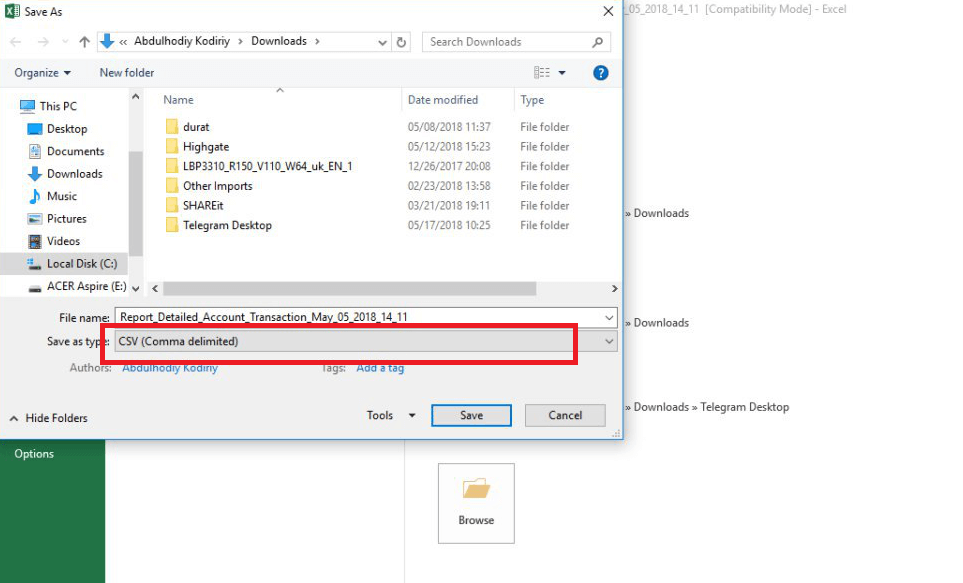 Then you can upload the file. After you have uploaded the file, the system will ask you to map the columns of your file with the system's columns.
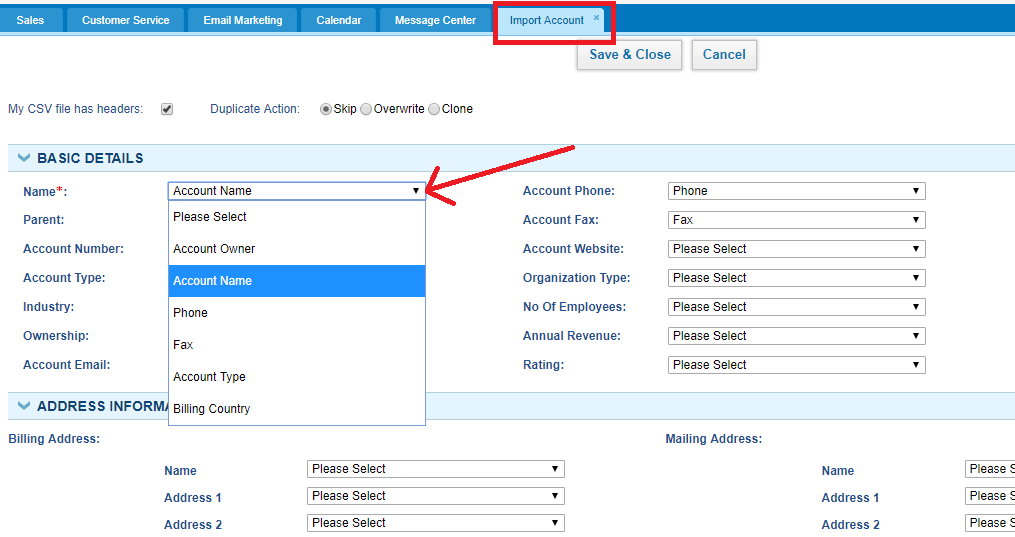
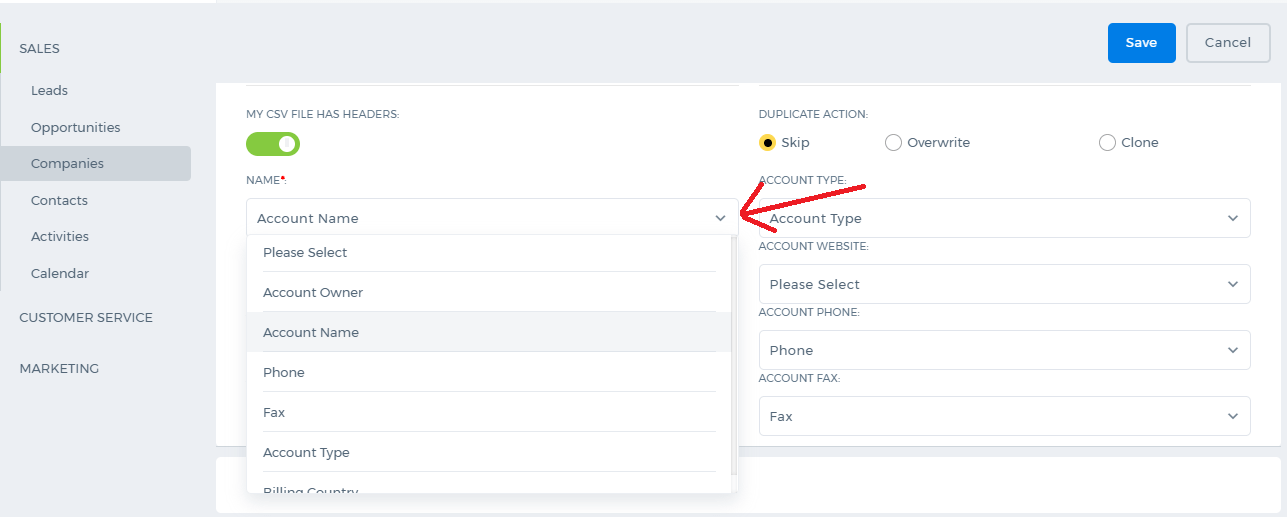 Once you have matched all the necessary columns, save it. The file items will appear in the list after some seconds. The upload time depends on the size of your file. The bigger the file, the longer it will take.
Upon the completion of the import, you will receive an email notification about it.
You can also track the upload process from Settings>>System Logs>>Import Logs:
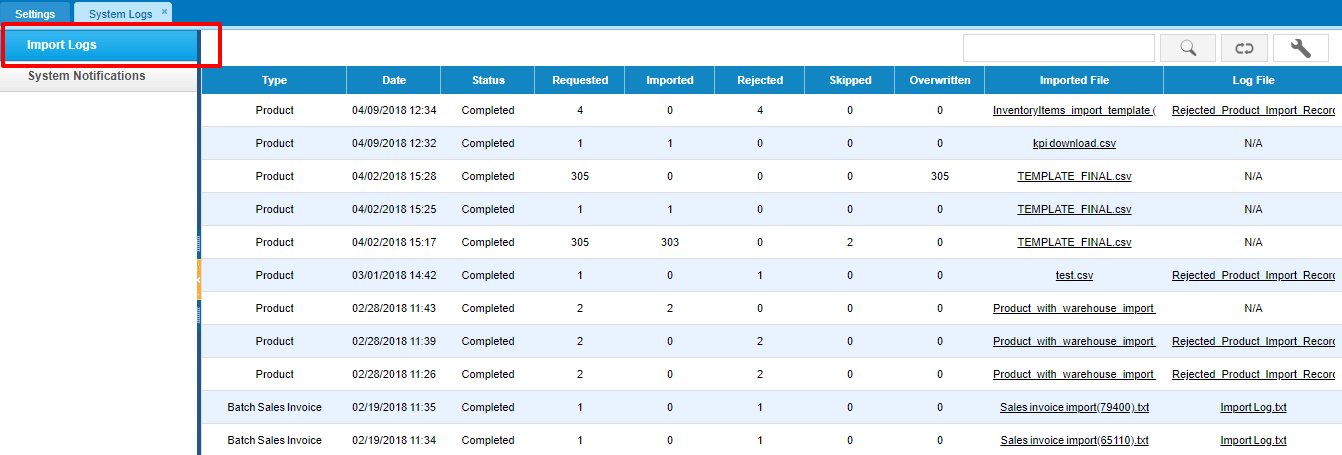 Using the Log File you can find out why some of the items were not imported. Using the instructions in the log file, you can correct the file and upload again.
If you still need more assistance on uploading files, please contact Support Team at support@kpi.com.
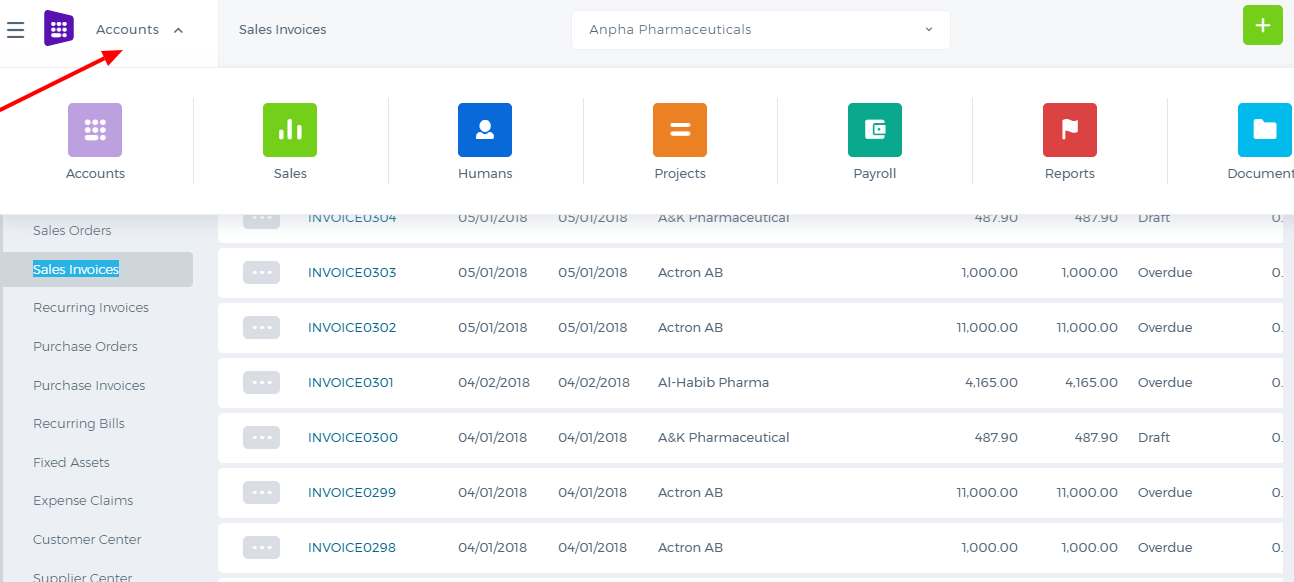 The Tabs under each module are now located on the left side menu, clicking which populates the main functions.
 The pages and the import options are on top of each section.
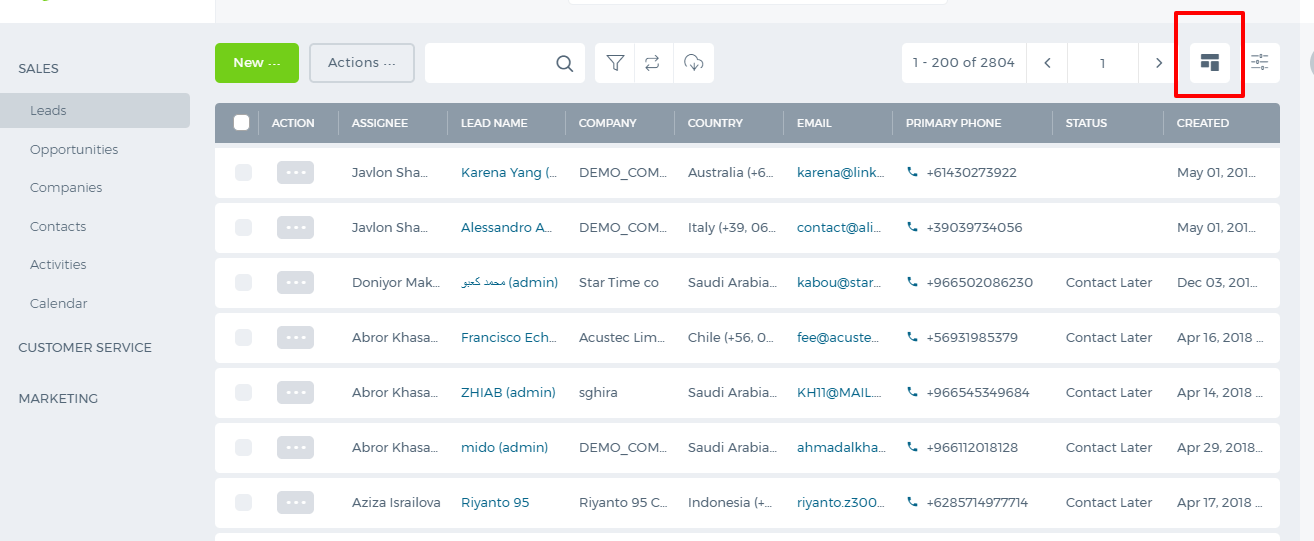
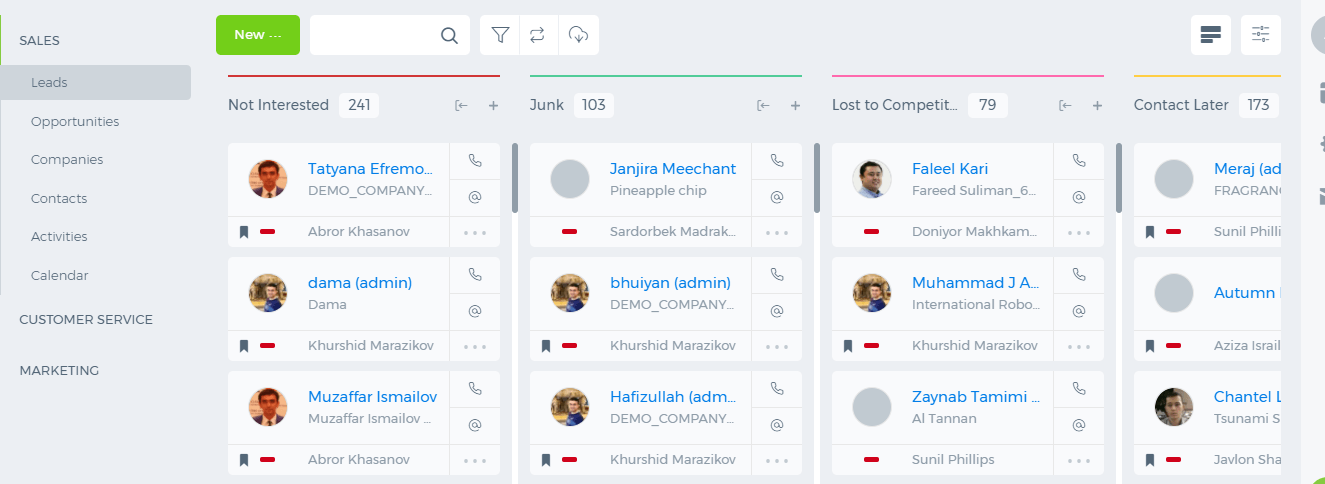
 The best part of the new kpi.com is that it supports the Kanban View now. Click the icon shown in the screen shot and enjoy the lists.
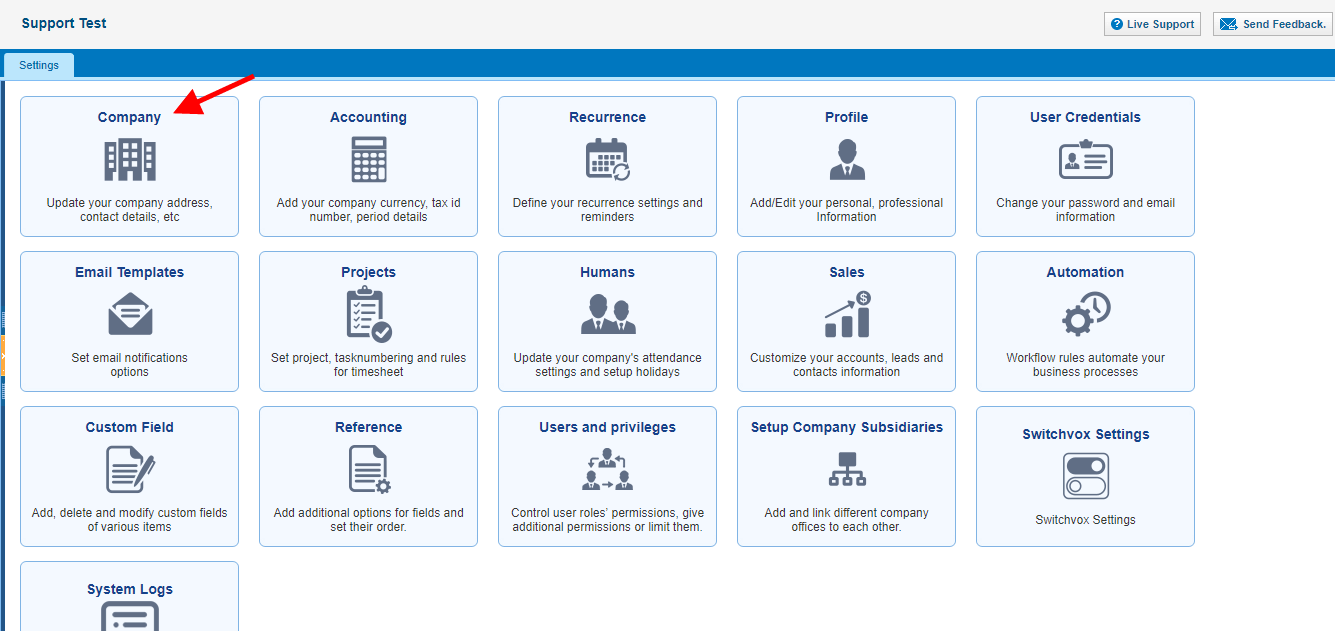
 Settings in on the right side, clicking which will show you which settings to choose.
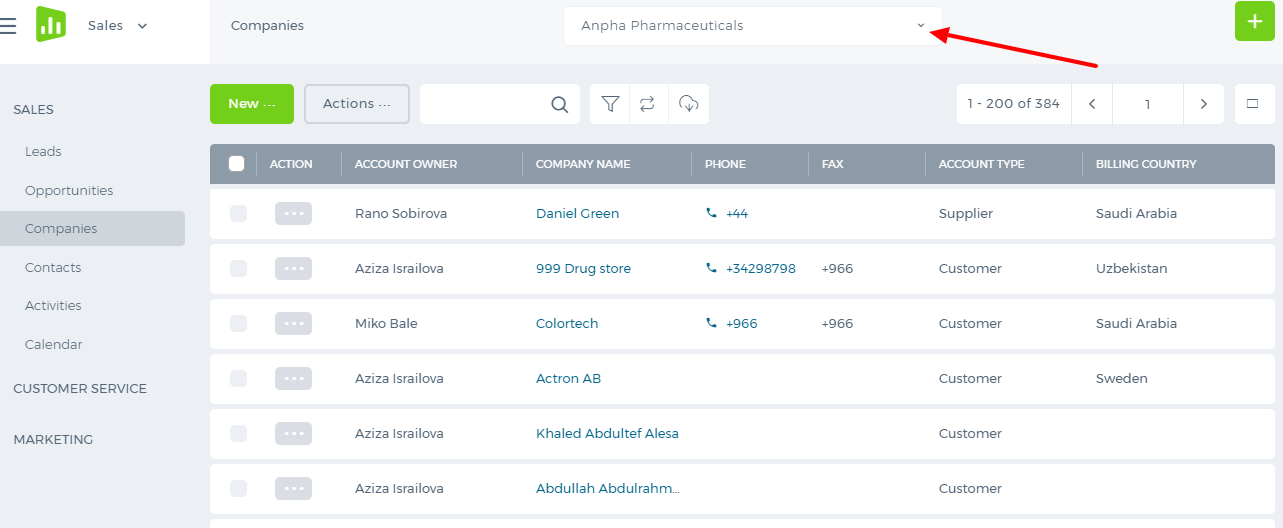
 If you have multiple companies, you can switch to them using the dropdown shown in the screen shot.
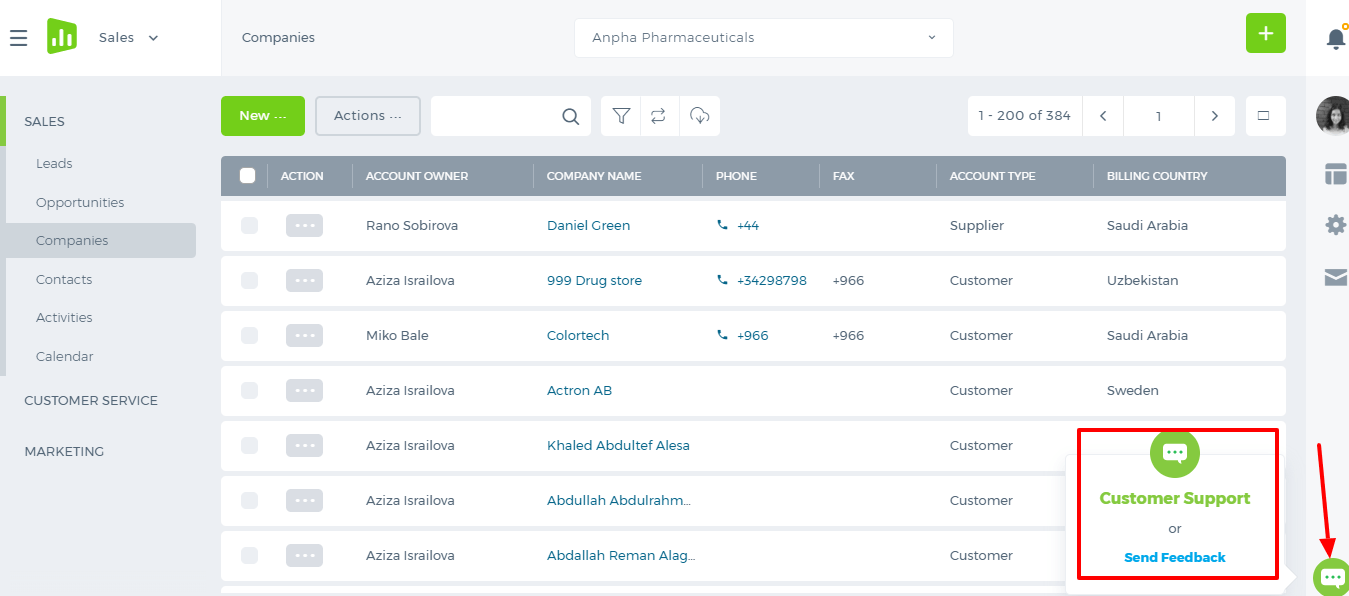
 The live chat support and send feedback option are available through the icon shown below:
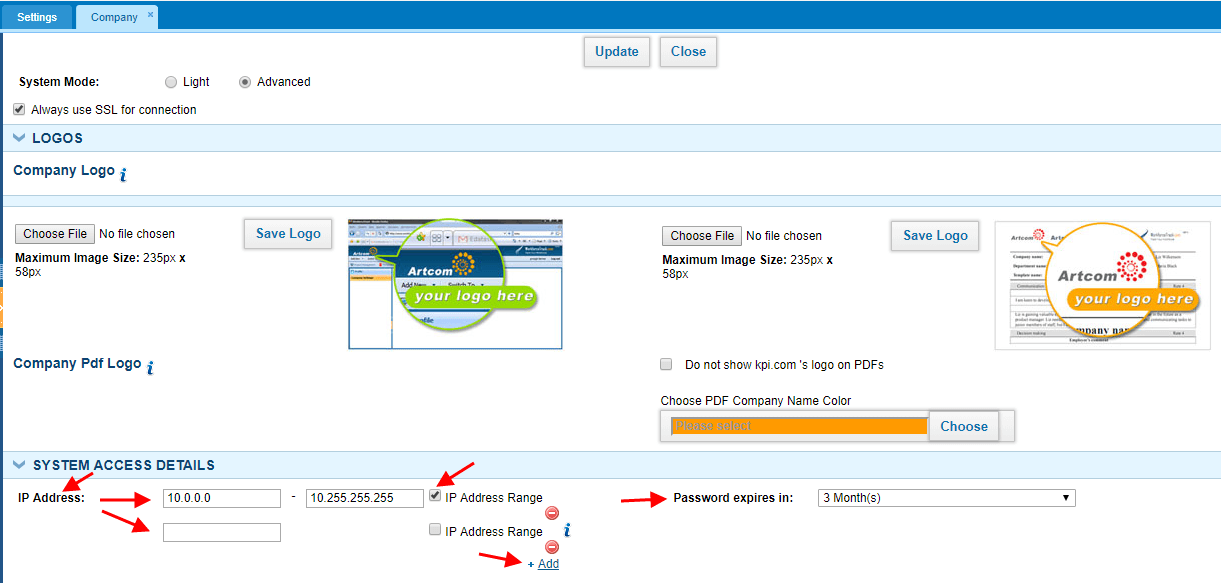 While you set up IP Address (or IP Address Range), company users can access the system only from the indicated IP Address (or IP Address Range).
Moreover, you can set up Password expiration period in order to make your company account more secure.
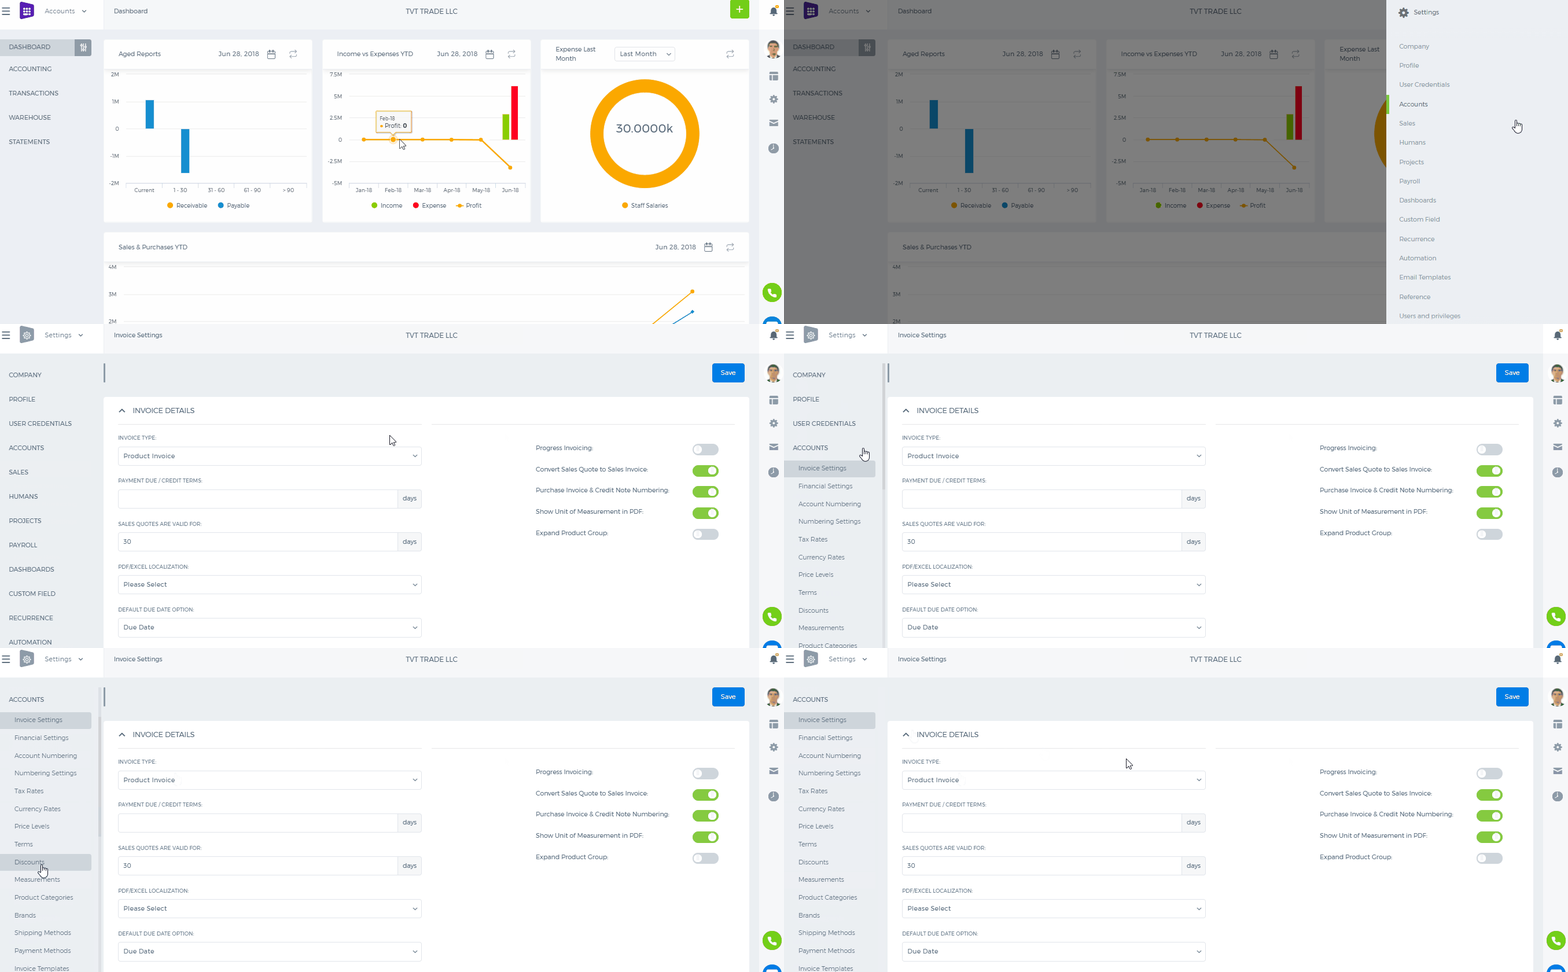
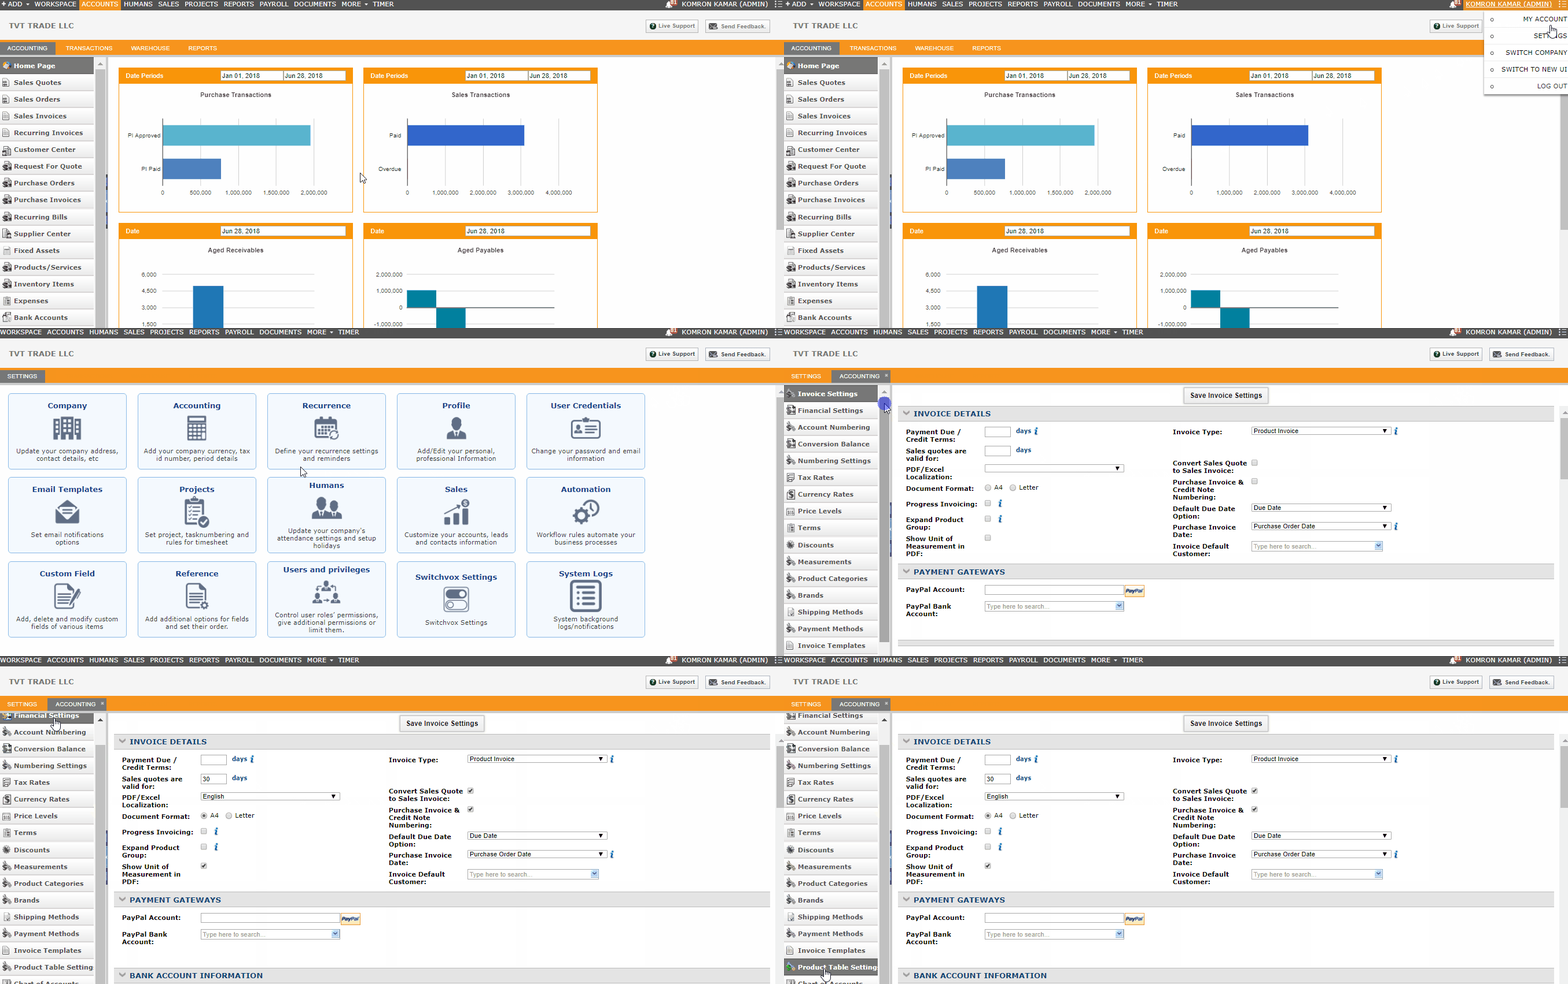 Accounting Settings lets you view and change the majority of the most important settings ranging from seeing your invoice templates and giving different discounts to your products and services to creating shipping methods and working with your charts of accounts.
Invoice Settings
Here you can change the format of your invoices, choose payment gateways like giving your PayPal account, your bank accounts, choose whether they are tax inclusive or tax exclusive and also choose your company logo which will be seen in your invoices.
Financial Settings
Here you can enter your financial settings like the currency you work with, whether they are fixed, choose the number of floating point rates for your calculations, choose whether you need VAT return report and create certain sales taxes with their proper names, percentages, period they should be calculated and so on.
Account Numbering
Here you can provide starting and ending numbers of your Assets, Revenue, Expenses, Liabilities and Equity.
Numbering Settings
Here you can give the numbers of all your documents including product numbering, sales quotes, transaction numbers, bank payments, receipts, stock adjustments, invoice numbers and others. The system is built such that every time when new document is being created, its number is generated by incrementing the previous number and thus documents will be sequentially sorted. You can also give certain date of the year from which all numberings will restart count again
Tax Rates
In this part of the Accounting Settings, you will be able to see your tax names and rates and also create new one by providing necessary details.
Currency Rates
Here you can see and manually enter your currencies and their exchange rates.
Discounts
Here you can view, create and set up your discounts and provide the list of products and services they apply to.
Measurements
You can create and change units of measurements that are used for calculation of your products.
Product Category
Different categories for your products and services can be created here. You can categorize your items by their color, audience they are made for, such as age group, sex, region and so on.
Brands
Brands of your products can be added and viewed in this section of the Accounting Settings.
Shipping Method
Here you can add different shipping methods by providing their names, price, which account they are charged from and their tax rates.
Payment Methods
In this section, you can specify methods of payments such as Bank transfer, Cash, Cheque, Credit/Debit card, Wire Transfer.
Invoice Templates
Here you can see templates for invoices and buy them if you wish.
Chart of Accounts
In this section, you can find the chart of accounts which is a listing of all accounts used in the general ledger of an organization. The charts are usually sorted in order by account number, to ease the task of locating specific accounts.
 Here you can see button Send notification to suppliers which informs suppliers about that quote request by email.
 Next, you have to fill an item, quantity, supplier and other fields and then approve it.
SQ number - optional field, related to sales quote.
Receipts – here you can upload documents for that quote.
When you have approved Request for Quote, there is an option to Send Quote to supplies or convert it to Purchase Order.

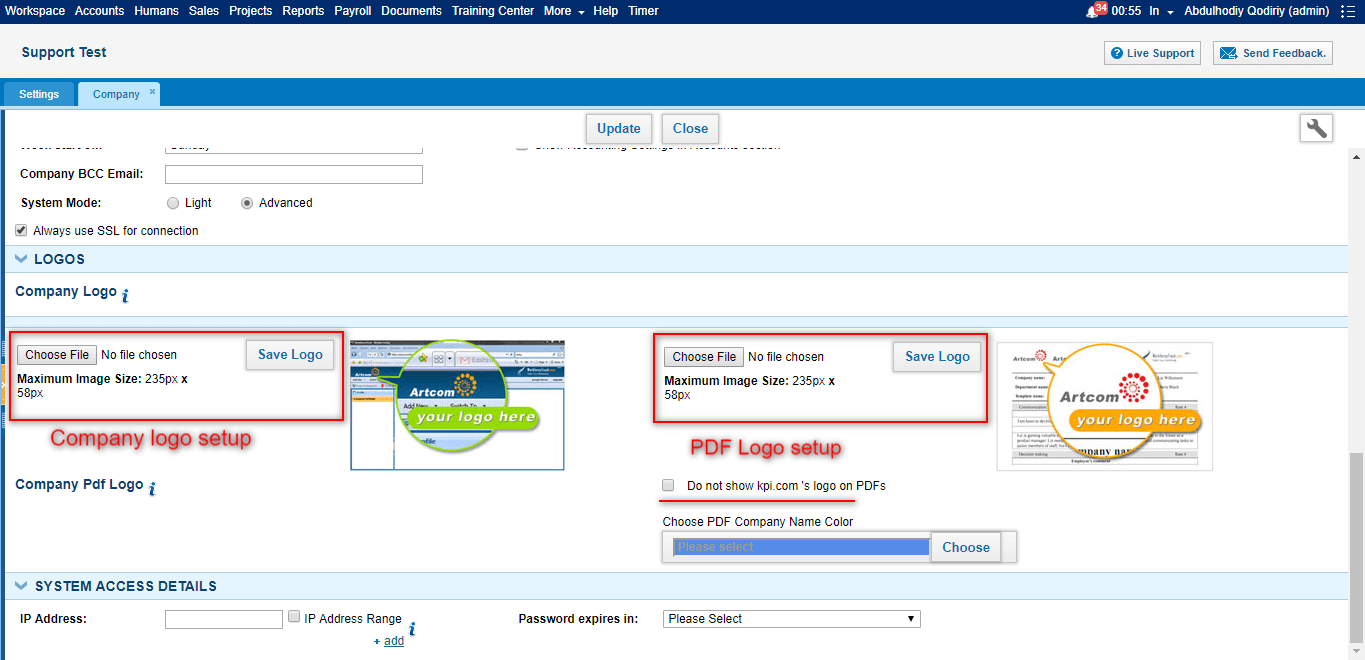
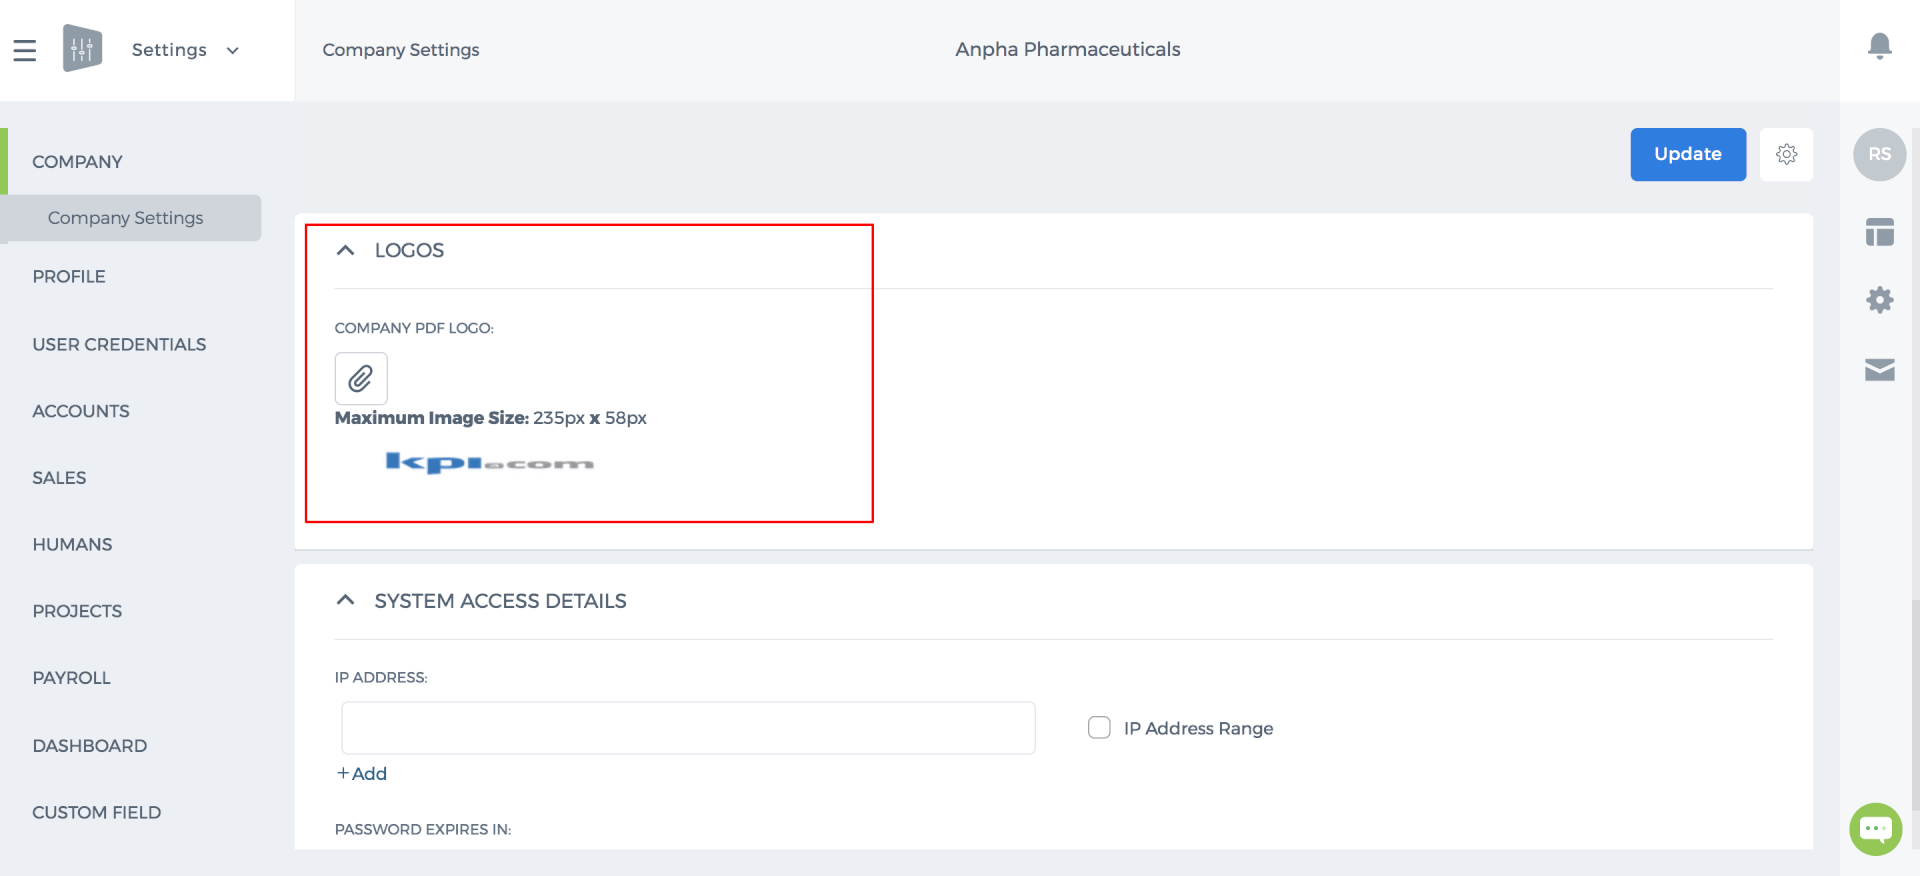 PDF Logo modification
PDF logo modification is next to Company Logo settings as indicated above where you can easily save your company logo to be shown in all default PDF templates in your company account. Additionally, you can make kpi.com logo invisible on your default PDFs.
At the last, you can update the company settings in order to save all performed modifications.
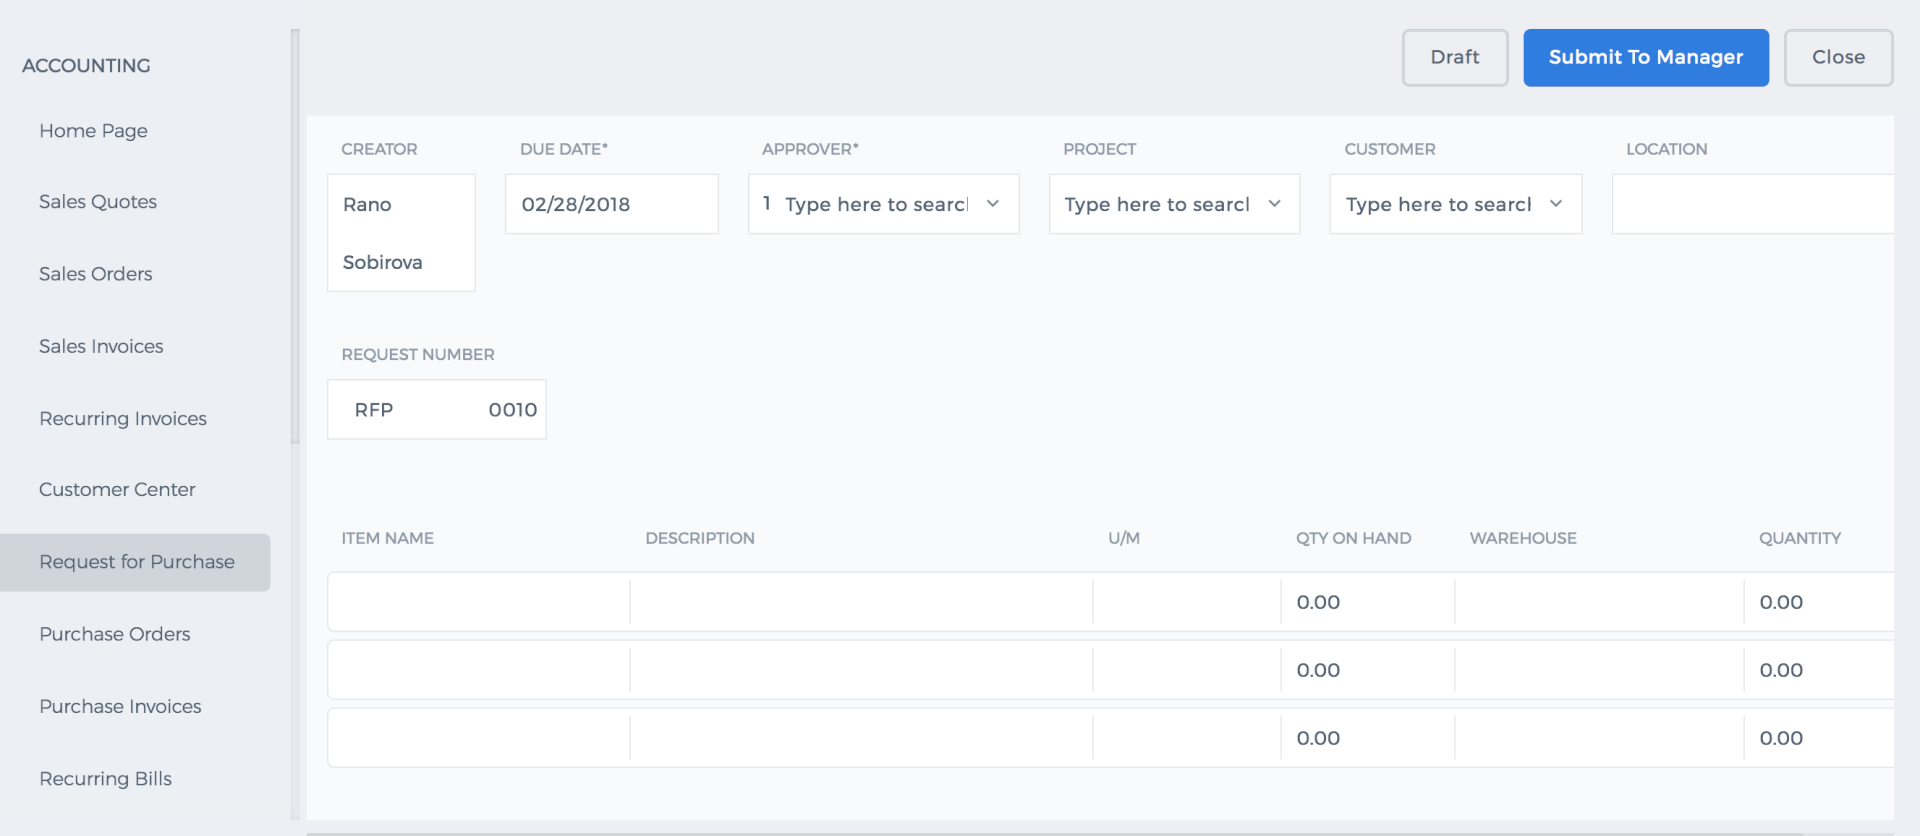 Creator – the person who creates request for purchase
Due Date – required field to fill, date until that particular request is active
Manager – a responsible person, also required field to fill
Project – to which project this request is related
When you fill all the fields, click Submit to Manager – it will automatically send the request to responsible Manager and if manager approves it will show the status Approved. If you are the manager, system shows Save and Approve automatically :

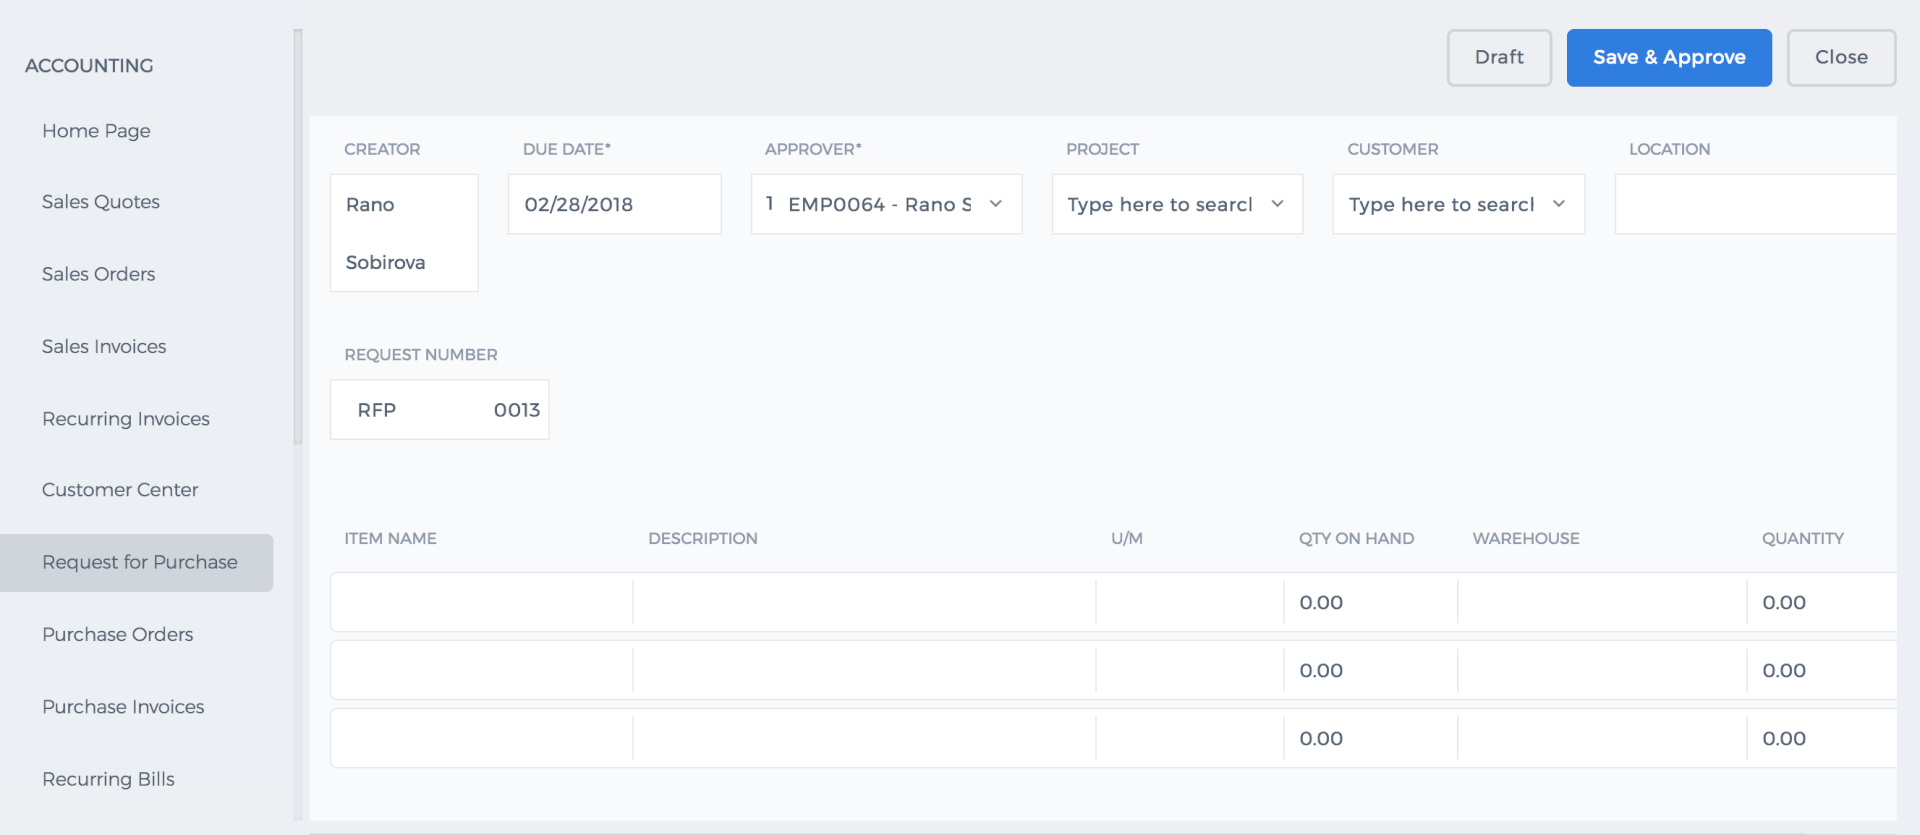 When the request is already approved by the manager, you can convert your request to PDF version or convert to Purchase Order, RFQ, Stock Adjustment:

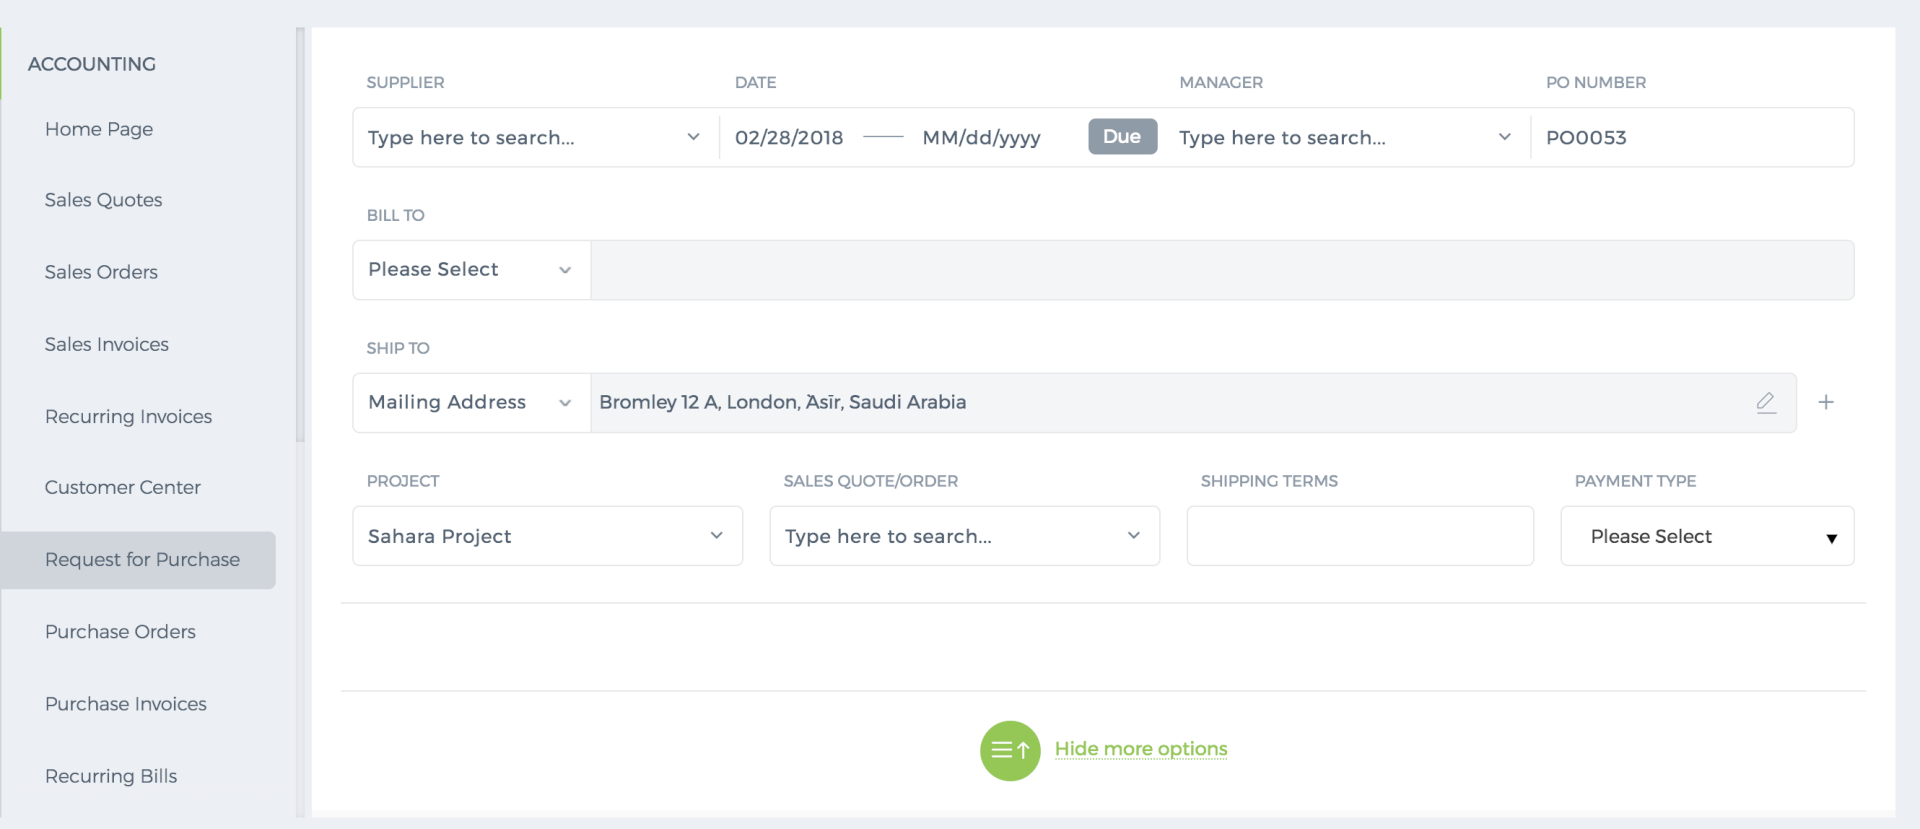
 If you click Convert to the Purchase Order, it will show you new Purchase Order table with an already selected project and date, you can fill other information by yourself and then convert it to Purchase Invoice.
A warehouse is an additional feature, activated by per request and also the place to store products in different locations.
You can find a warehouse in Accounts >> Warehouse >> Warehouses
You can add a warehouse by pressing “Add” button and fill the information of warehouse.
There are searching and customization features in the top right corner.
In addition, all warehouse can be exported in PDF or Excel format. You can do it in the bottom right corner.
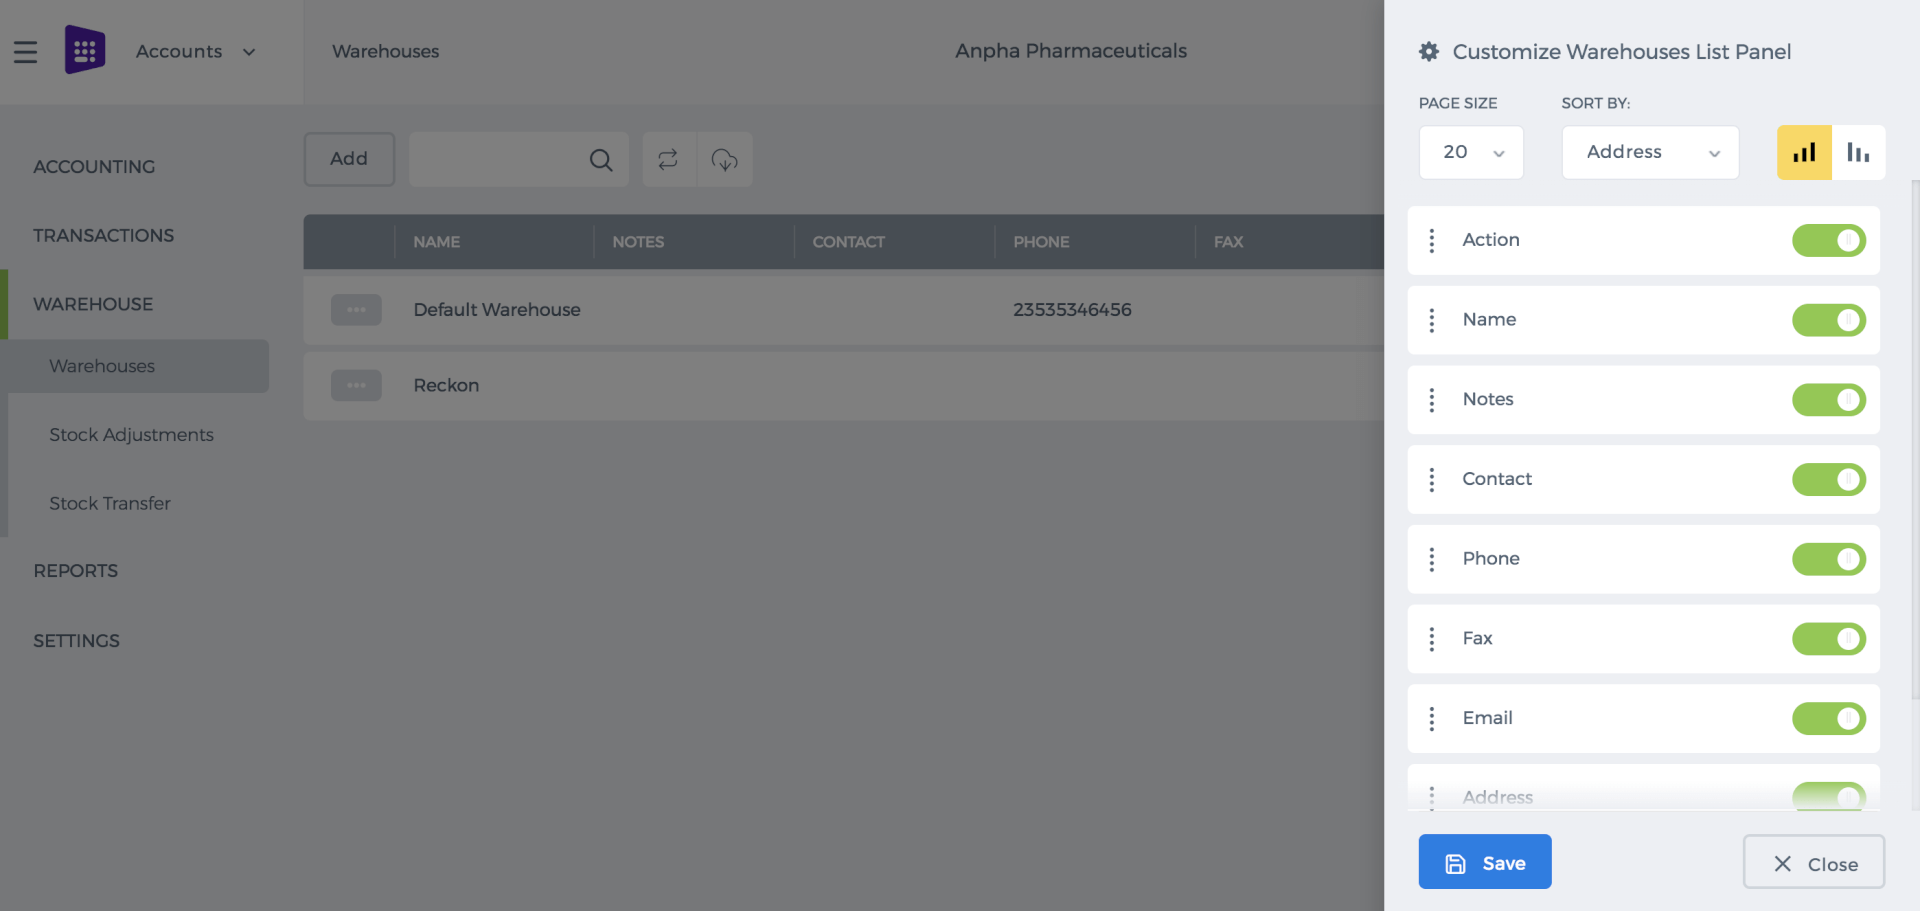
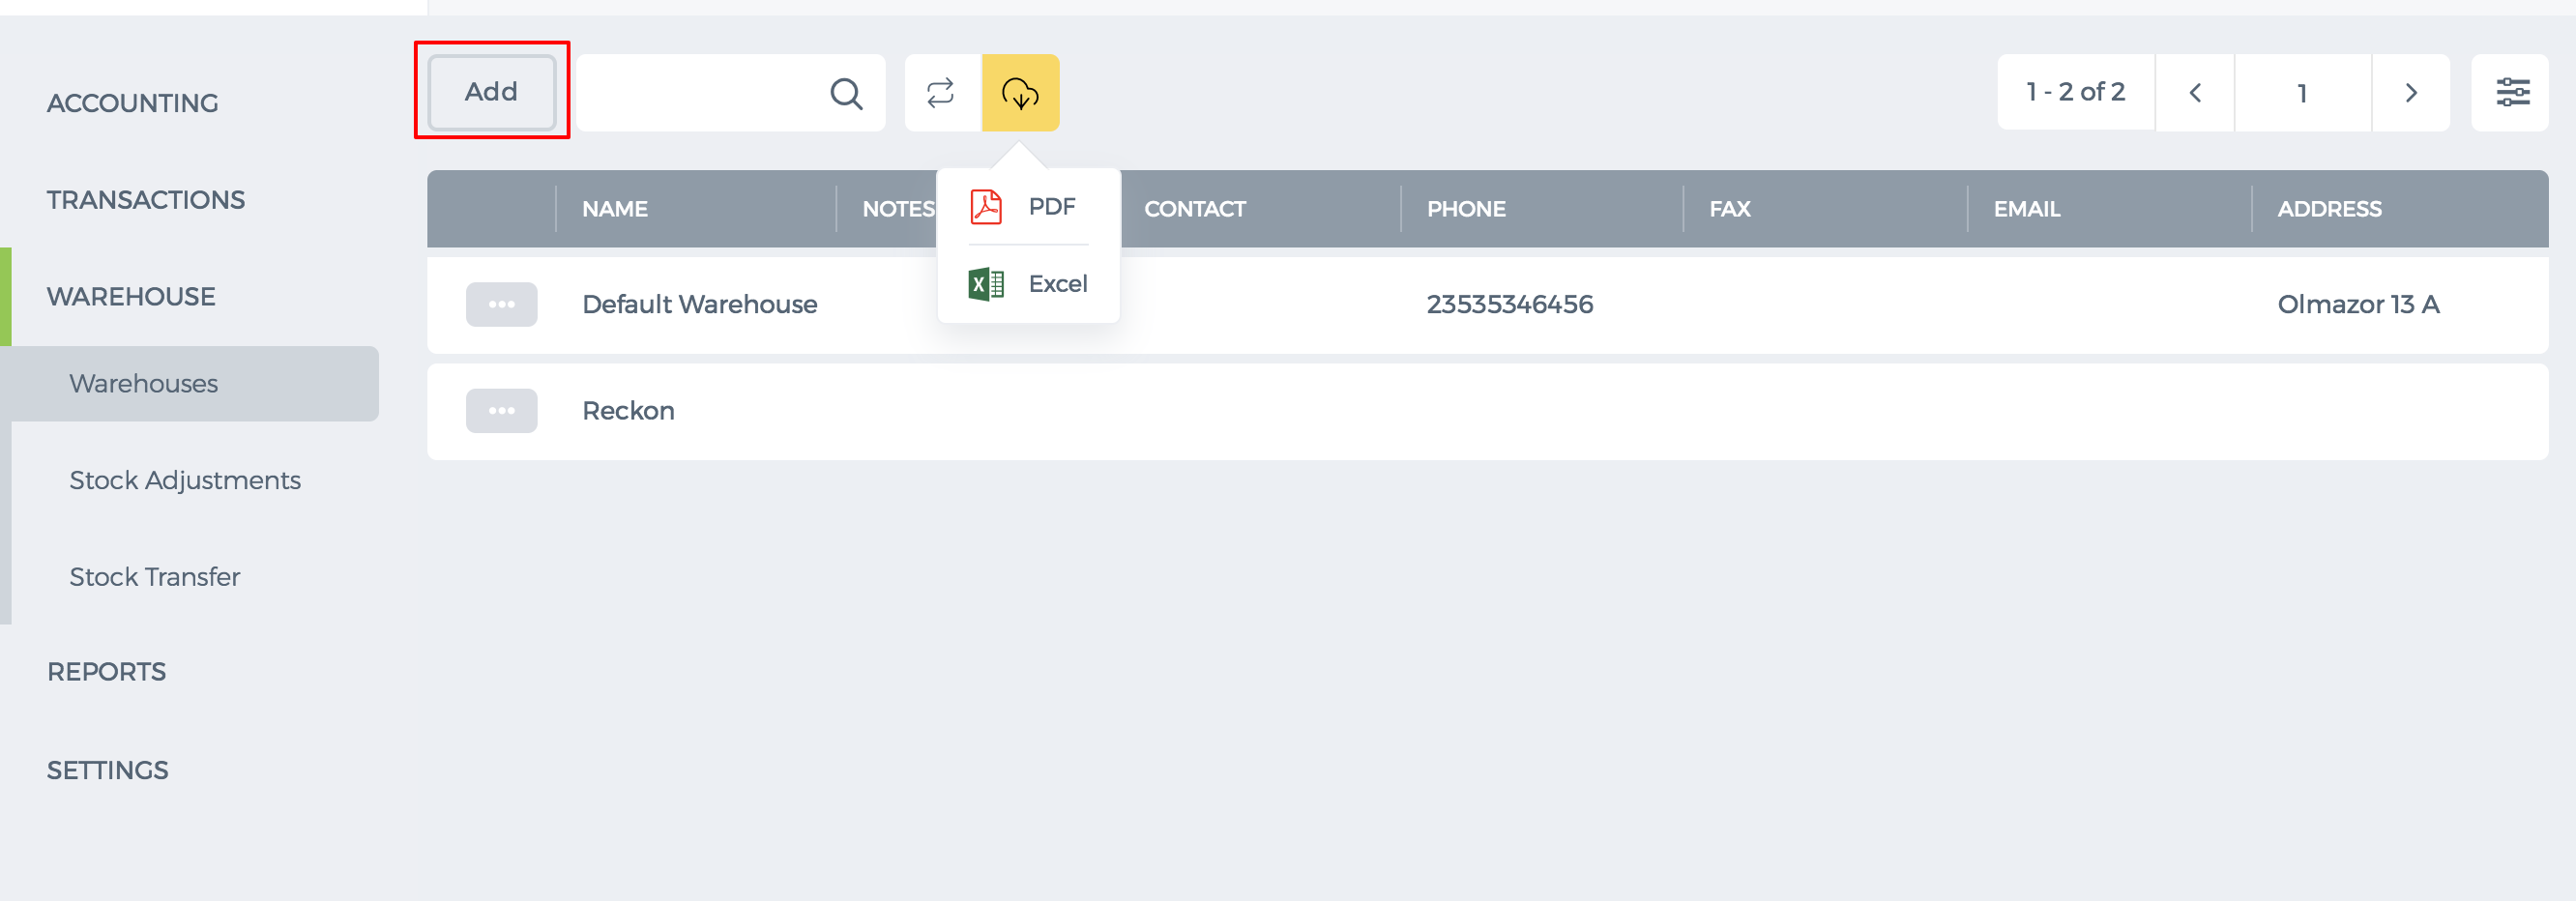 In new User Interface, to customize Warehouse List Panel press on indicated below button.

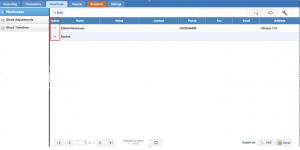
By clicking Action button you can edit the info of warehouse or see the products.

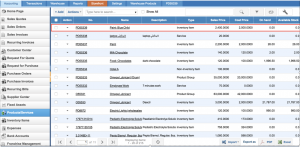
To add a product to the warehouse, go to Accounts >> Accounting >> Products/Services. Choose any product and open it.
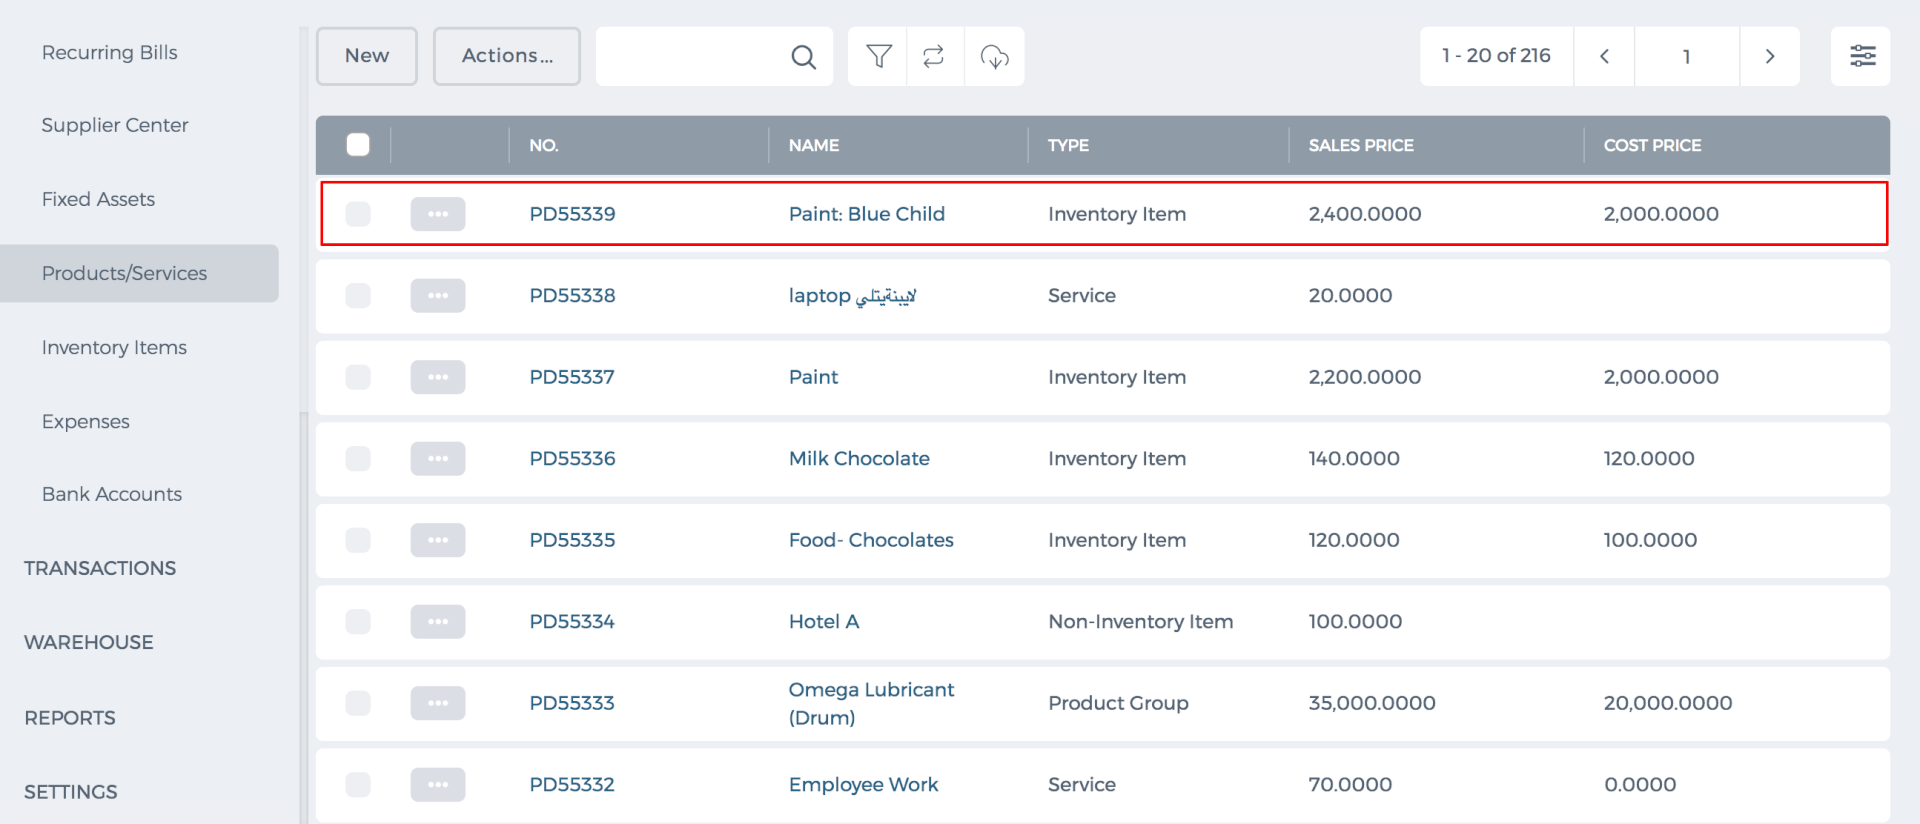
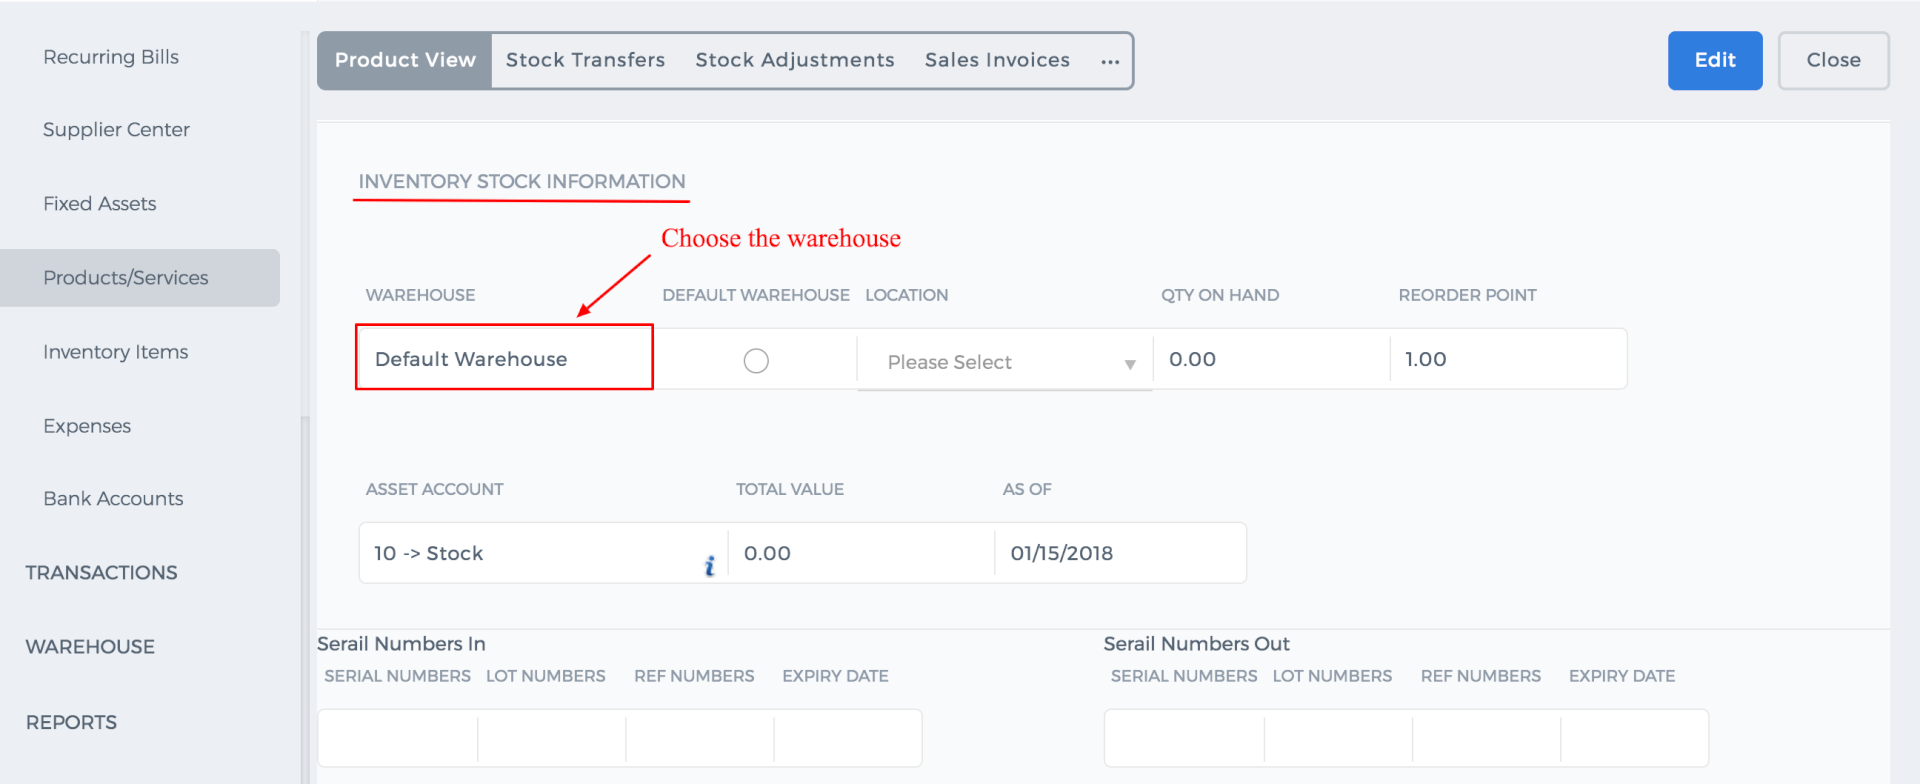
After that, find the Inventory Stock Information and select the warehouse, in which the chosen product should be placed.
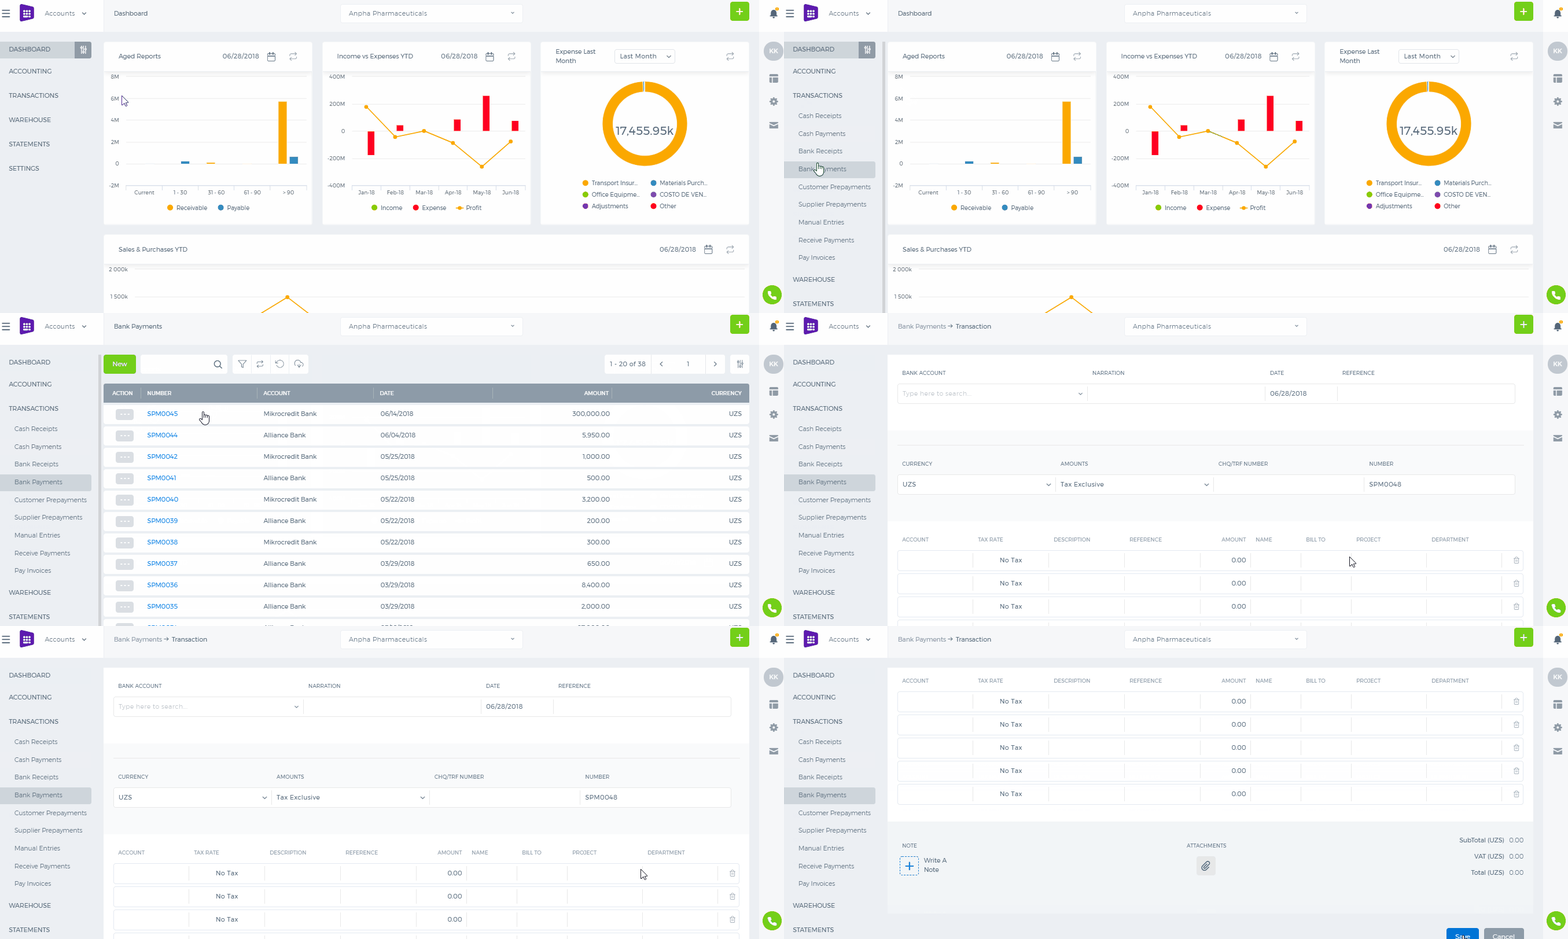
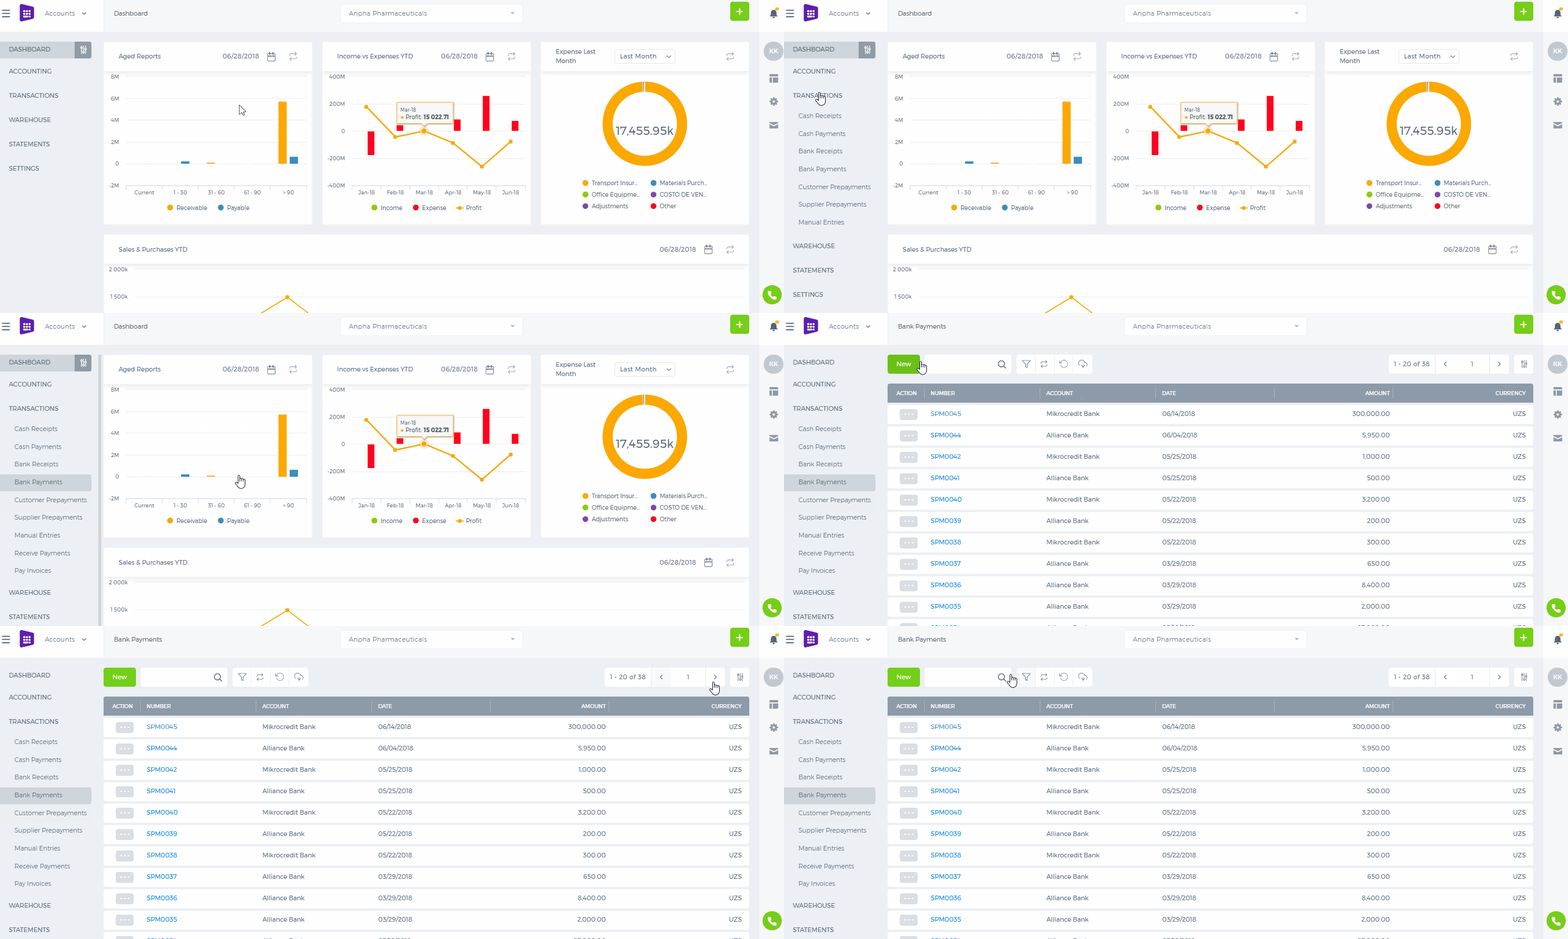
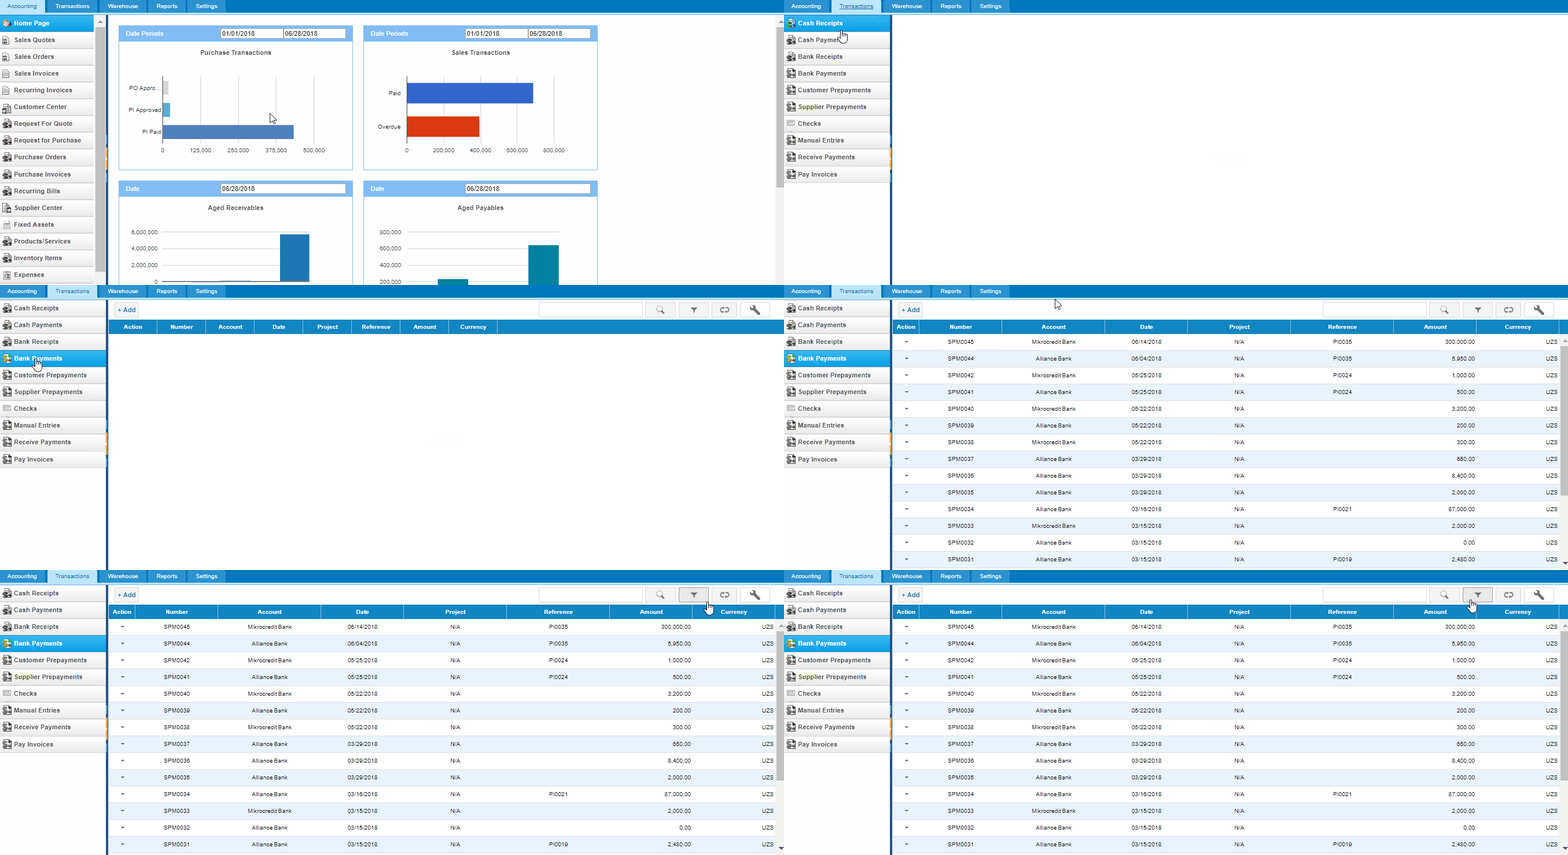
Accounts >> Transactions >> Bank Payments
You can add a bank payment by clicking the button “Add”, after that indicate the bank account, narration, reference, project and fill the given table. At the end, press button “Save”, a new bank payment will appear in the list. Another way to add bank payments is to import them.
You can also get all your payments by exporting them in Excel or PDF format.
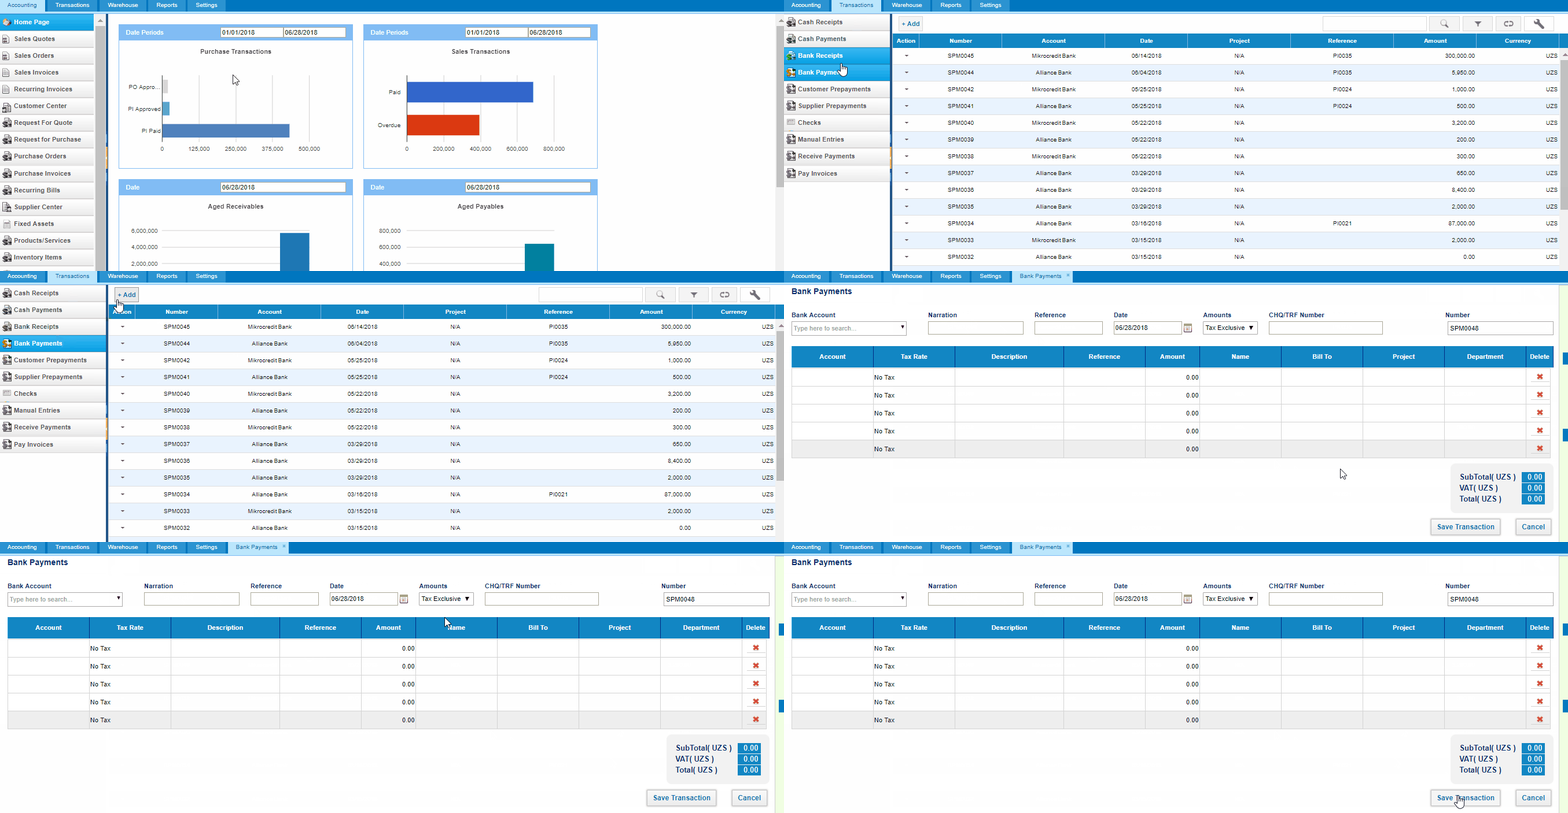
You can find a bank payment by pressing the search button. In addition, you can filter them by project, creator and data period. After filtering, you are able to reset by clicking the third button. While the fourth button is required for customization columns.
Action column provides options such as view, edit, delete and print pdf bank payment.

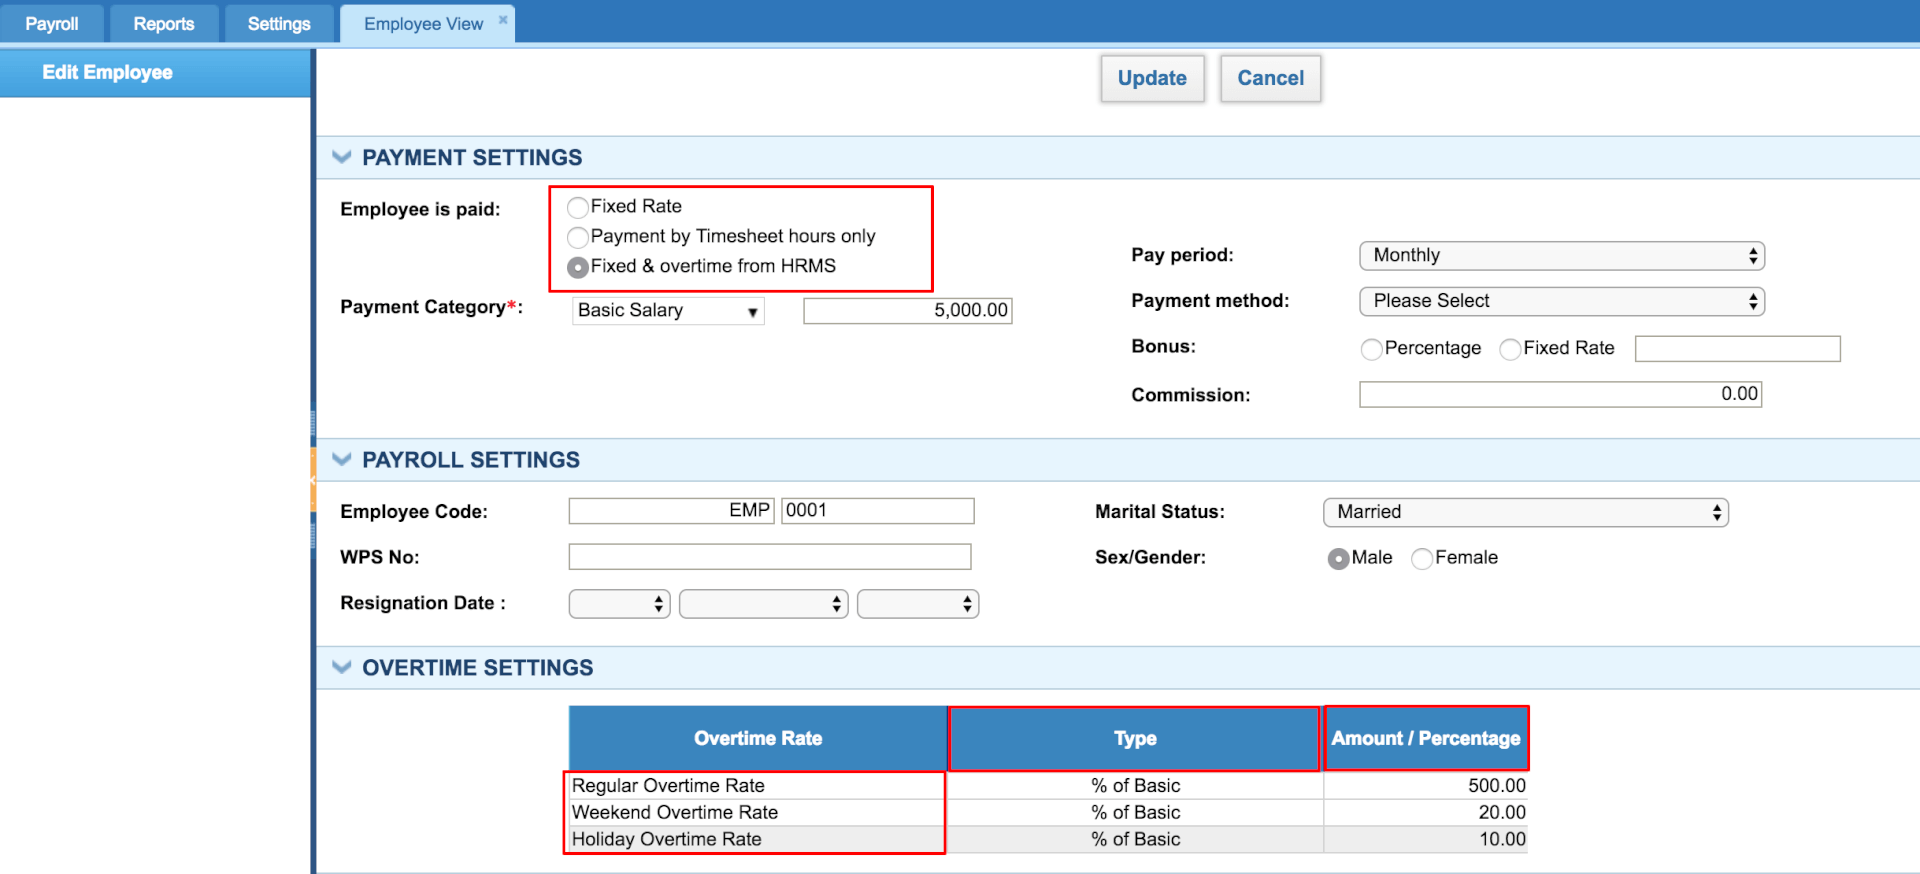

 Under the payment settings, "Fixed & Overtime from HRMS" should be chosen, if the company employees should be paid for their overtime hours. There are three types of Overtime rates:
Regular Overtime Rate - it is paid when the employee works overtime during the working days.
Weekend Overtime Rate - it is paid when the employee works on day offs.
Holiday Overtime Rate - it is paid when the employee works on holidays.
There are two types of payment rates: Percentage-Based or Fixed.
When the fixed rate is chosen, the employee overtime hours will be multiplied by the amount set up under the Amount/Percentage column.
When the percentage is chosen, the employee overtime hours will be calculated based on the basic salary multiplied by the percentage.
The rates are per hour.
The employee worked hours can be checked from Humans>>Attendance Tracking>>Attendance report. The application records hours either from Biometric Device (if integrated) or from the login/logout total hours.
Weekend overtime hours are highlighted in grey. The employee also worked on the Weekend - 50 hours. When the managers generate payrun for the employee, the overtime payments will be automatically calculated and applied to the payments table.
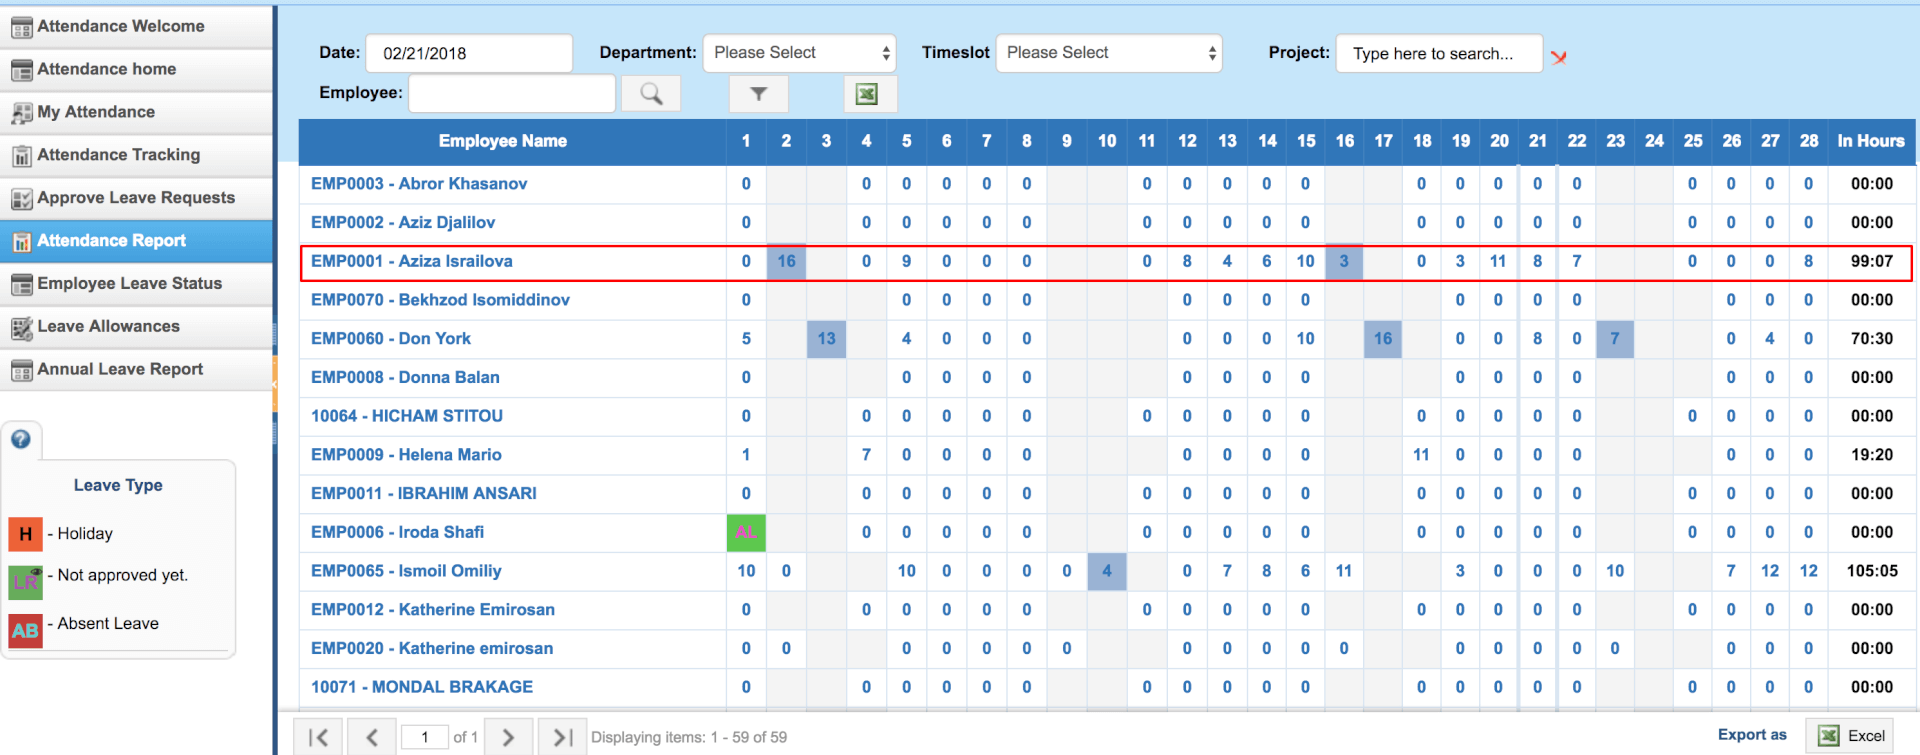

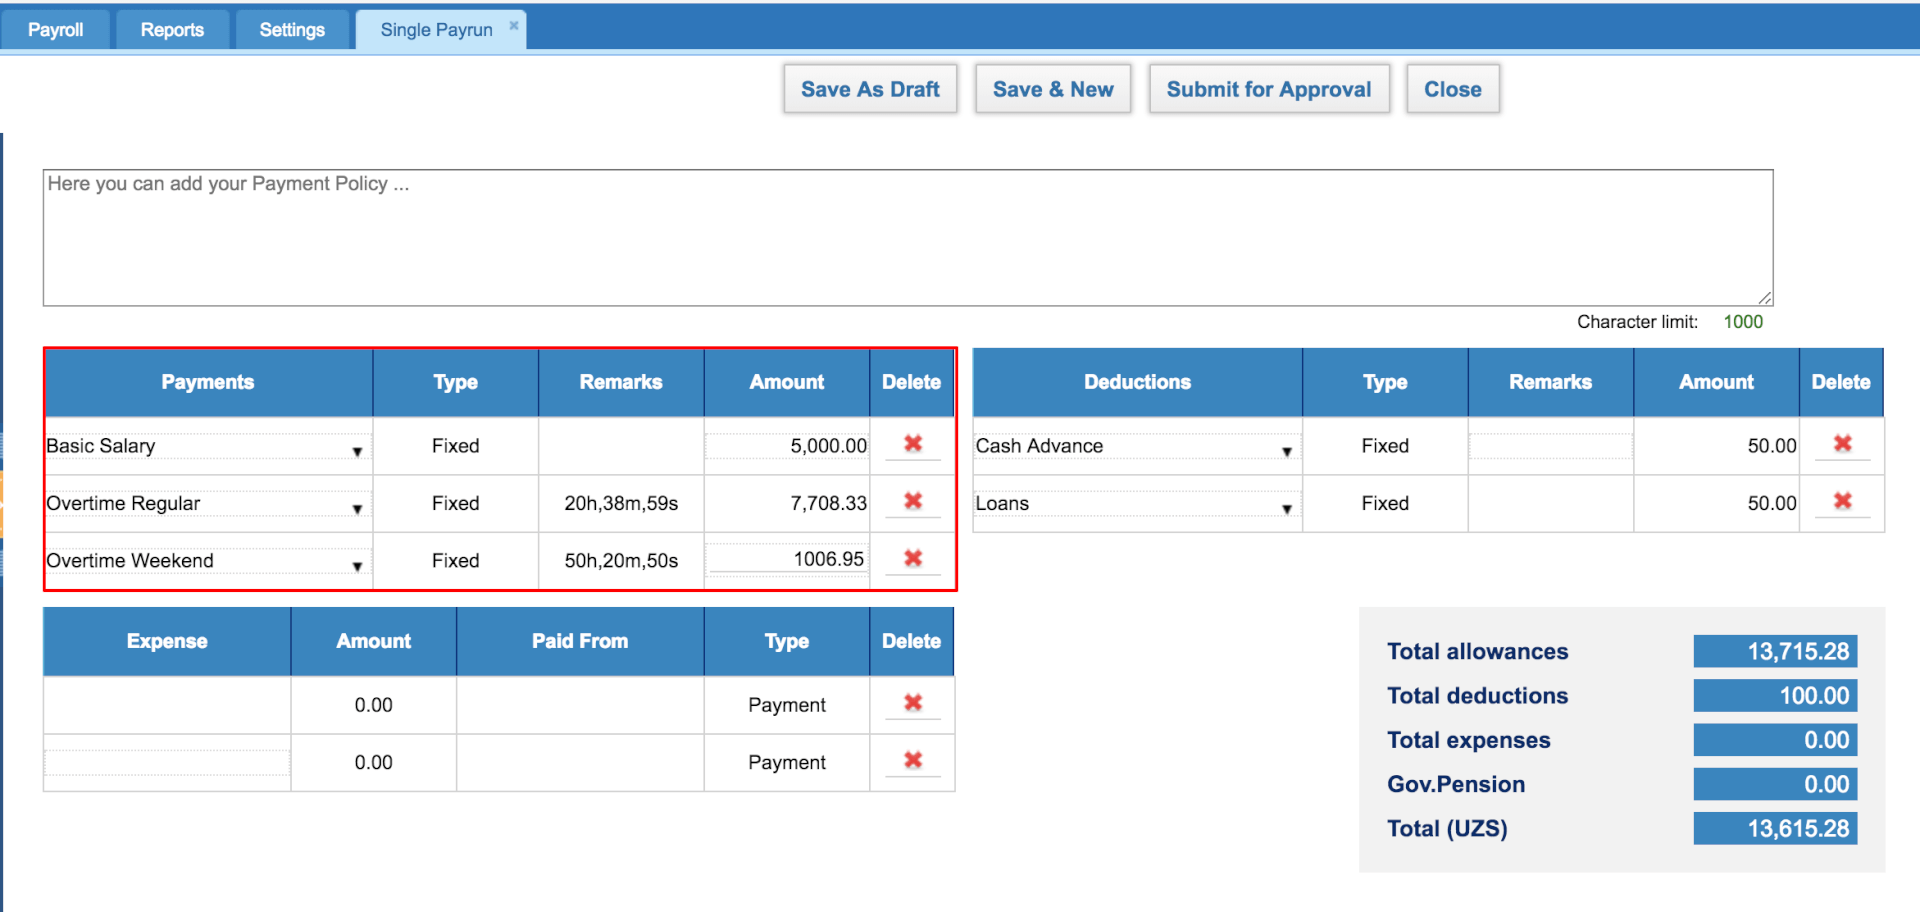
 The above overtime calculations are based on fixed rates. For example, during the weekend the employee worked 50 hours and his/her rate for the Holiday Overtime is 20 (UZS). So the payrun is 1,006.95 (UZS).
The percentage based (% of basic salary) overtime hours calculation is as follows:
salary / working days*8 = hourly rate
overtime based % hour * ((hourly rate /100) * overtime based)
 Then, you need to get a URL of that uploaded file, go to Action menu and copy the URL of chosen file.
 Afterwards, go to the Settings>>Email Templates>>Signature, where you can Add New Signature or Edit existing one. You can add a picture by pasting your copied URL link, like in this example:
 After Save&Close you will get a view like in this example, depending on what did you add and write.

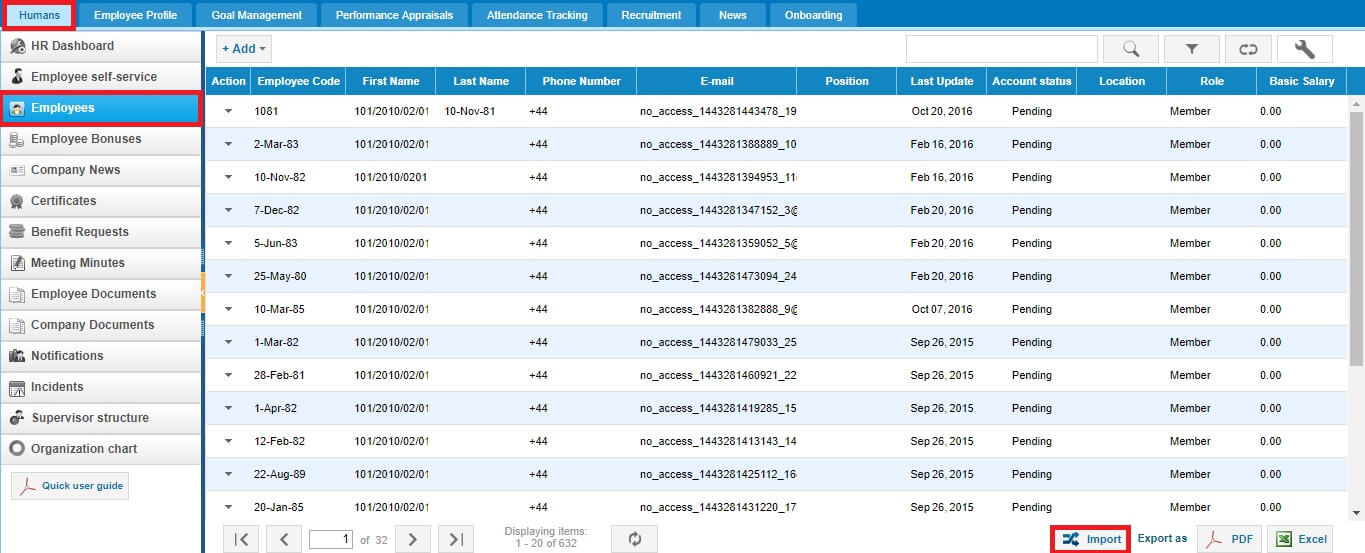
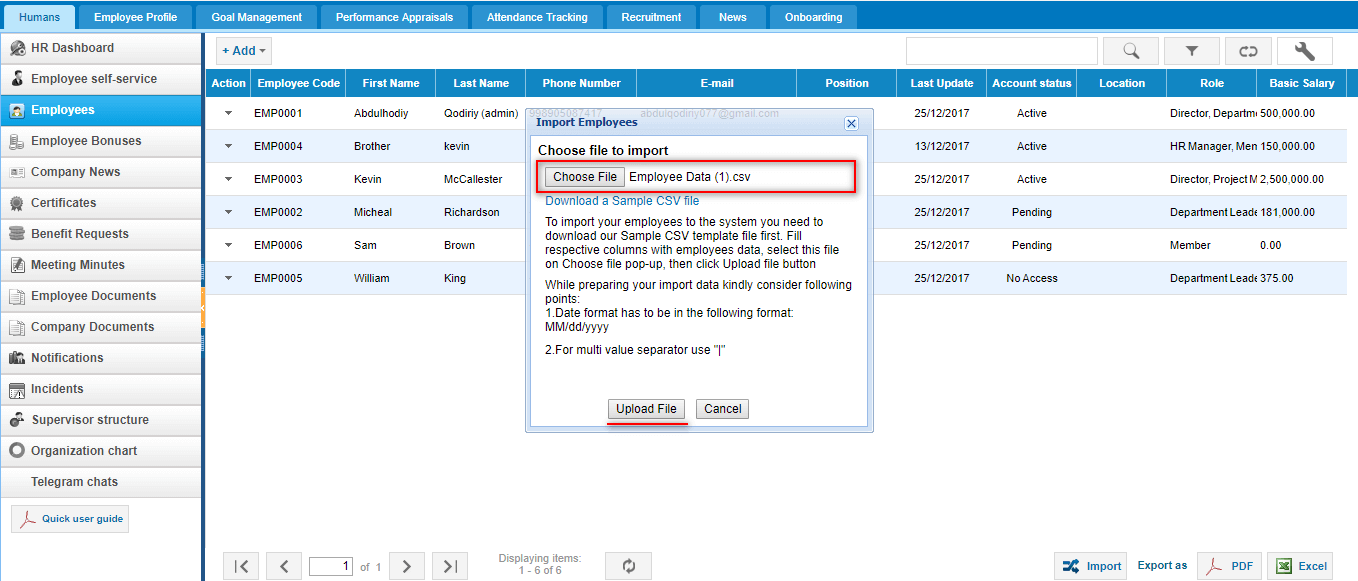
 For the Projects (Project Management Section)>>Employees>>Import, same steps would be taken as in the Humans.
 CSV Excel Sheet should look like as in the Example:
 After checking the all information is presented in CSV file. Now you can upload it to the system. Moreover, pay attention to following Two main points:
 After uploading the file following page will appear. In these page, you have to check all system fields matching correctly. Once you complete checking, press the Save&Close button:
 If Employees are not uploaded, you should check Settings>>System Logs>>Import Logs:


 Annual Leave Report shows each employees current leave balances as of date chosen.

 The formula for the Current Balance is as follows: Number of Worked Days( Leave allowance days/365 ) - Taken Days.
For example, Aziz Djalilov's Hire Date is September 18, 2017 and till December 26, 2017 he has worked 99 days in total. He is Allowed to take 30.6 days as an annual leave in 2017. So his current balance is: 99(30.6/365) - 0 = 8.3
Opening Balance Date for Leaves
An administrator can set an opening balance date for all employees leave balances, which means that the leave balances are effective starting from that date. The opening balance can be set from Settings>>Humans>>General Settings
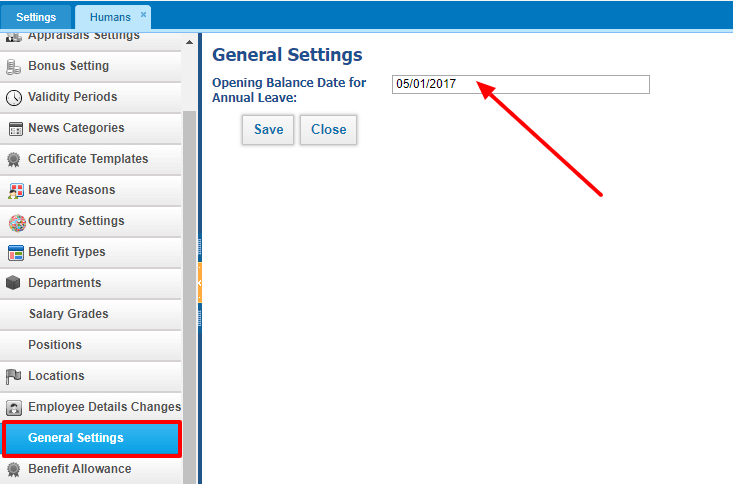
 This date is also shown in the Annual Leave Report.
If the Hire Date is before the Opening Balance date, then the balances effective date is going to be the Opening Balance Date. If the Hire Date is after the Opening Balance date, then the balances effective date is going to the Hire Date.
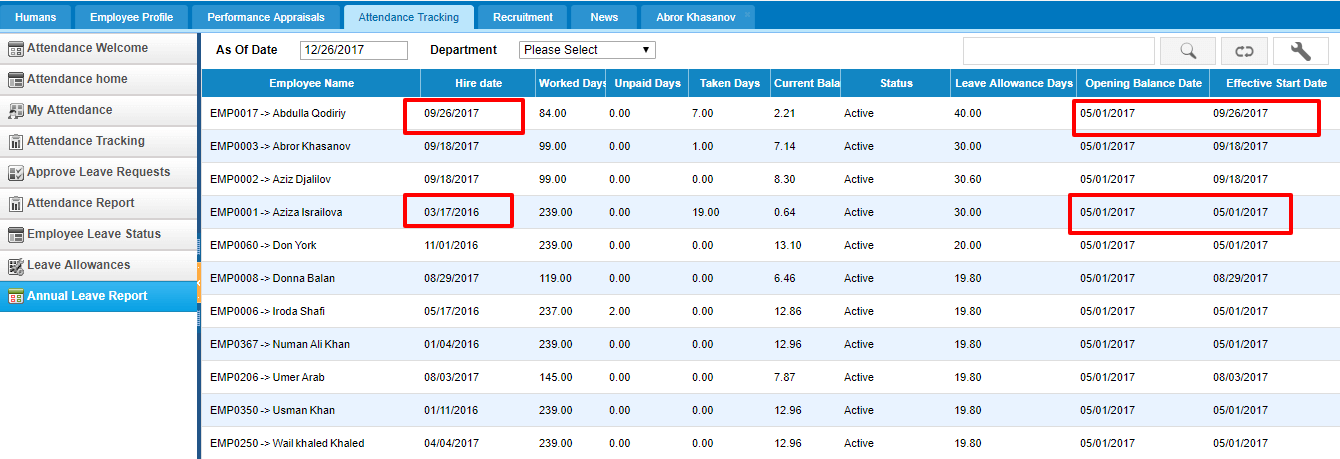
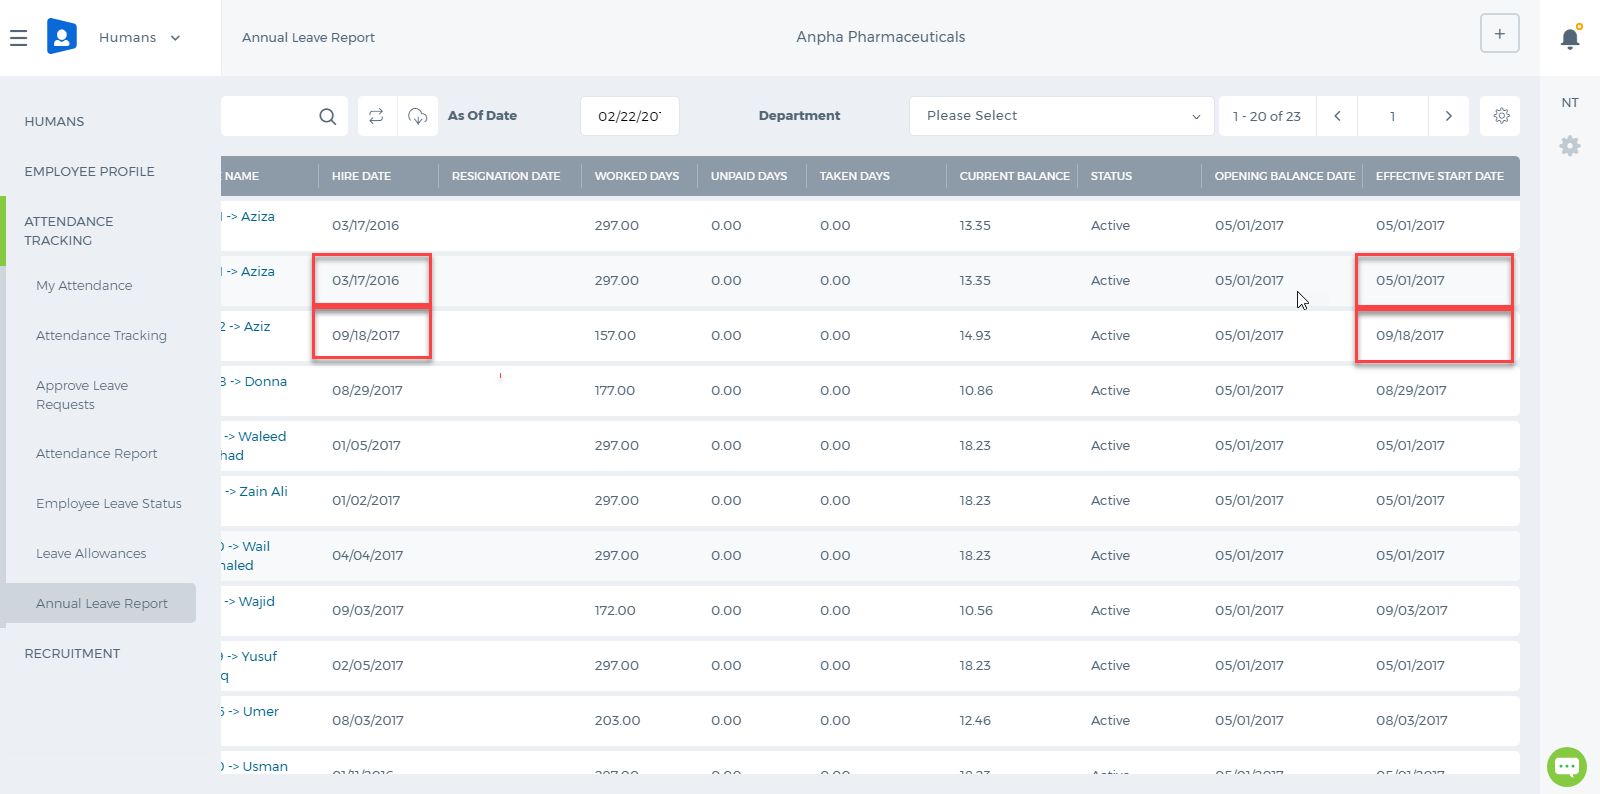 So the number of worked days depends on the Effective Start Date.
Opening Balance Days
If the employees already have the balances as of the opening balance date, then the opening balances are just added to the current balance, so the formula is as follows: Number of Worked Days( Leave allowance days/365 ) - Taken Days + Opening Balance Days.
The Opening Balance Days column can be enabled from the Customize icon on the right hand side corner of the report.
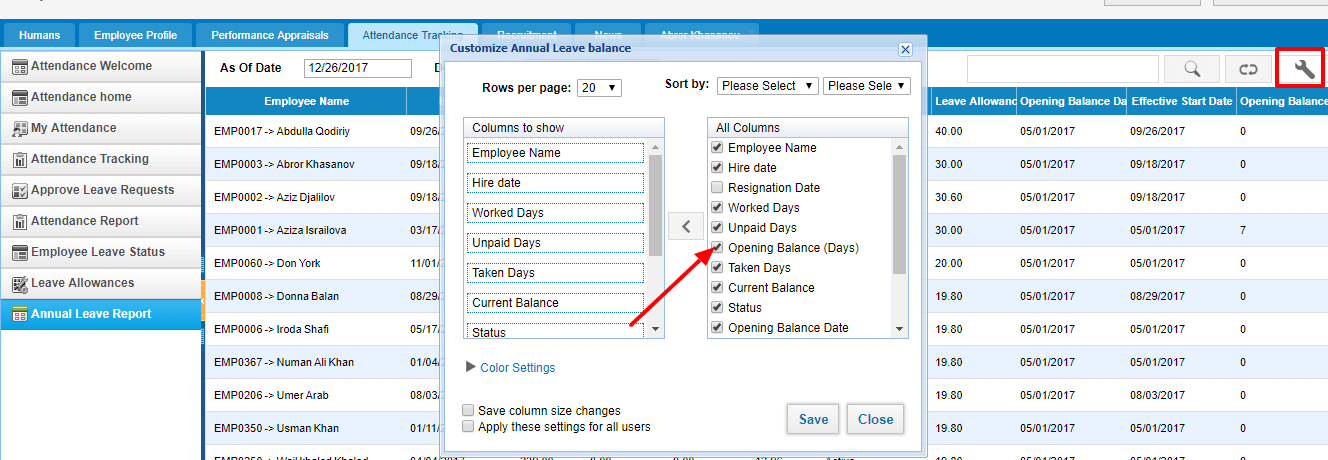
 After the column is enabled, a double click helps you to enter opening balance days for each employee.

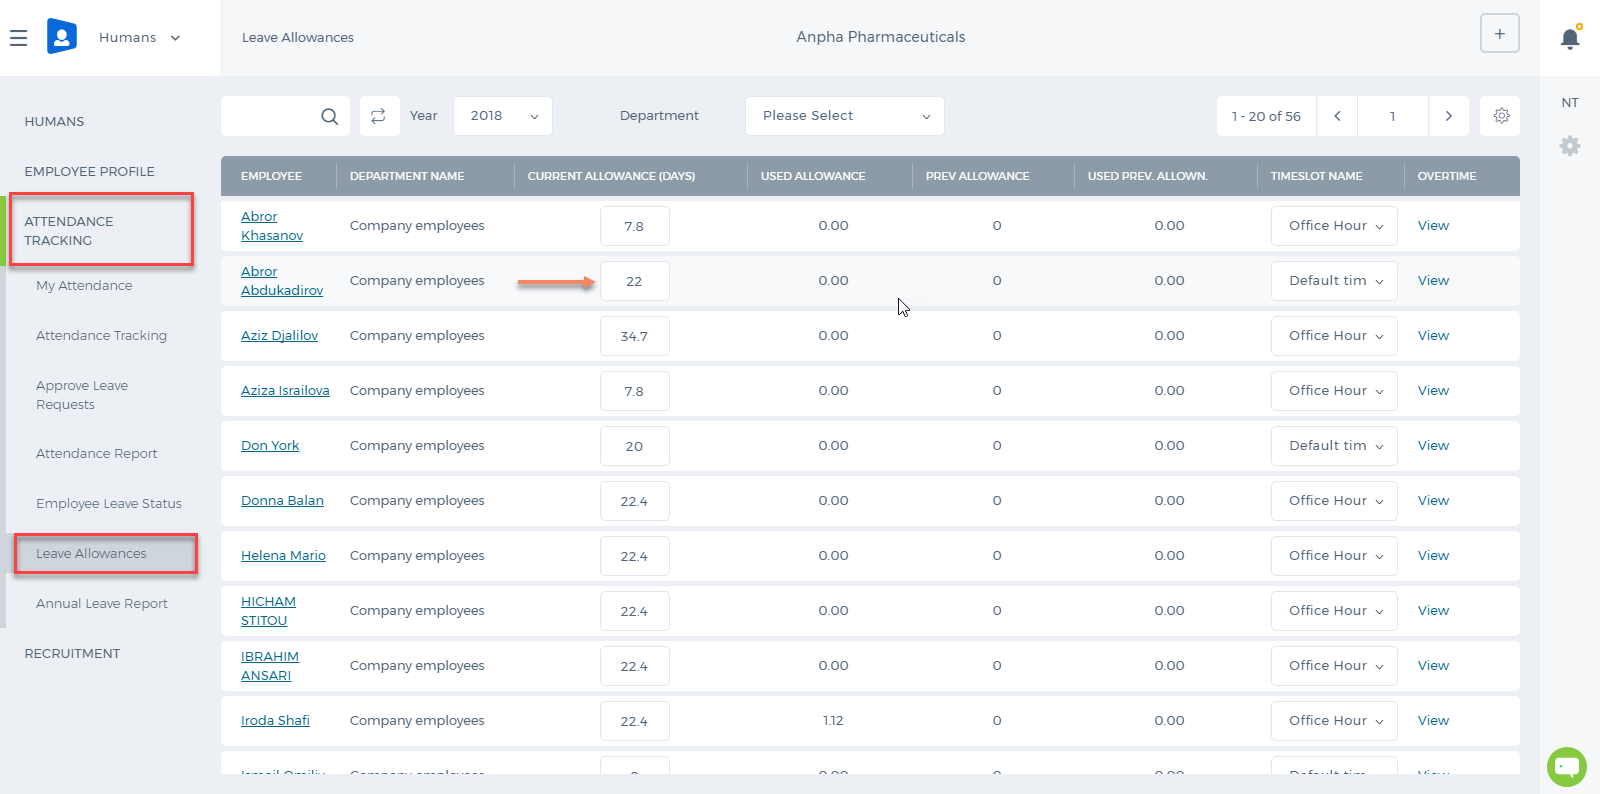 Leave Reasons other than Annual are available at Settings>>Humans>>Leave Reasons page. On the same page, you can add more leave reasons too.

 The balances for each leave reasons can be set up by editing the Leave Reason from the actions dropdown.
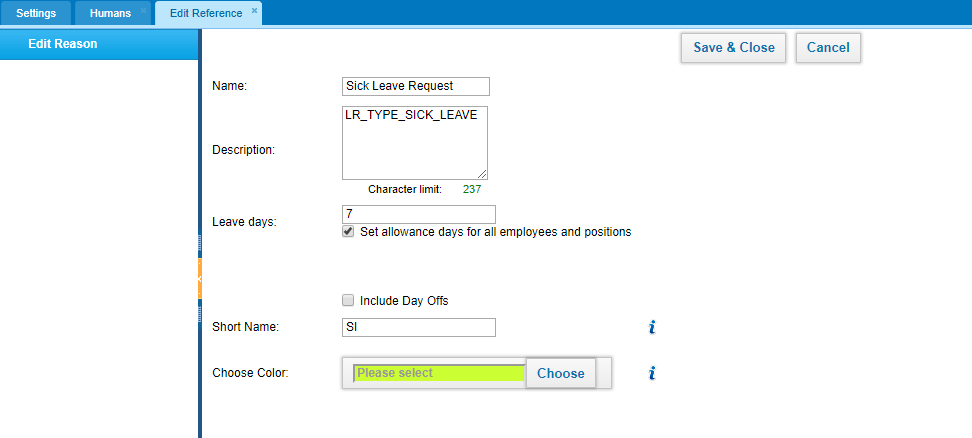
 After the days have been set to the leave reasons, the balances show up in the add Leave Request form too, so that the employee knows how many days are allowed per year and how many days are left/taken.
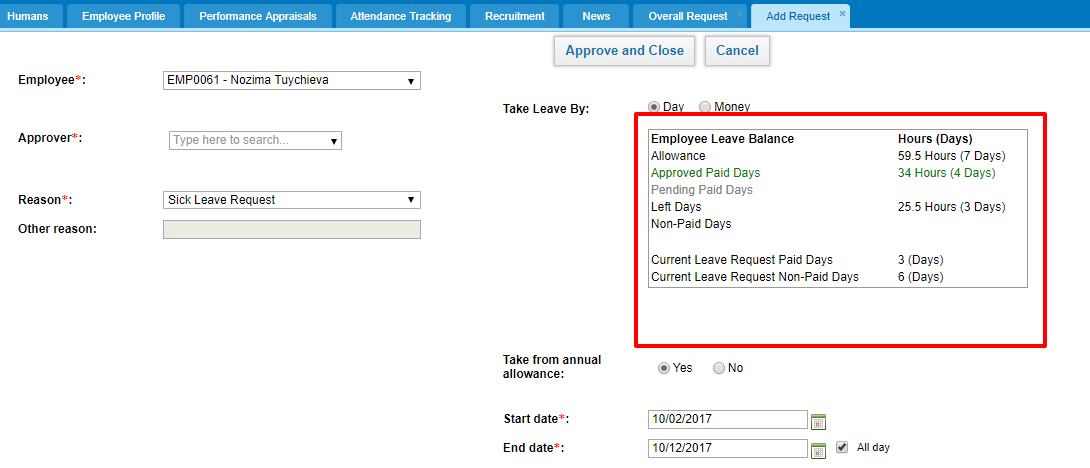
 For example, the company employees are allowed to take 7 days as a Sick Leave in a year. Sick Leave days totaling to 7 have Paid type. If the employee takes more than 7 days, the Sick Leave type becomes Non-Paid automatically, meaning that he/she is taking more than allowed.
Leave Requests can be taken by Day or Money. If it is a Day type Leave Request, it will be deducted in employees monthly payrun, if it is a Money type Leave Request, it will not be deducted from employees monthly payrun. Money type assumes that employee is still working for those allowed days and therefore, the payrun will not show the deduction for the period.
Setting Barcode for a Product
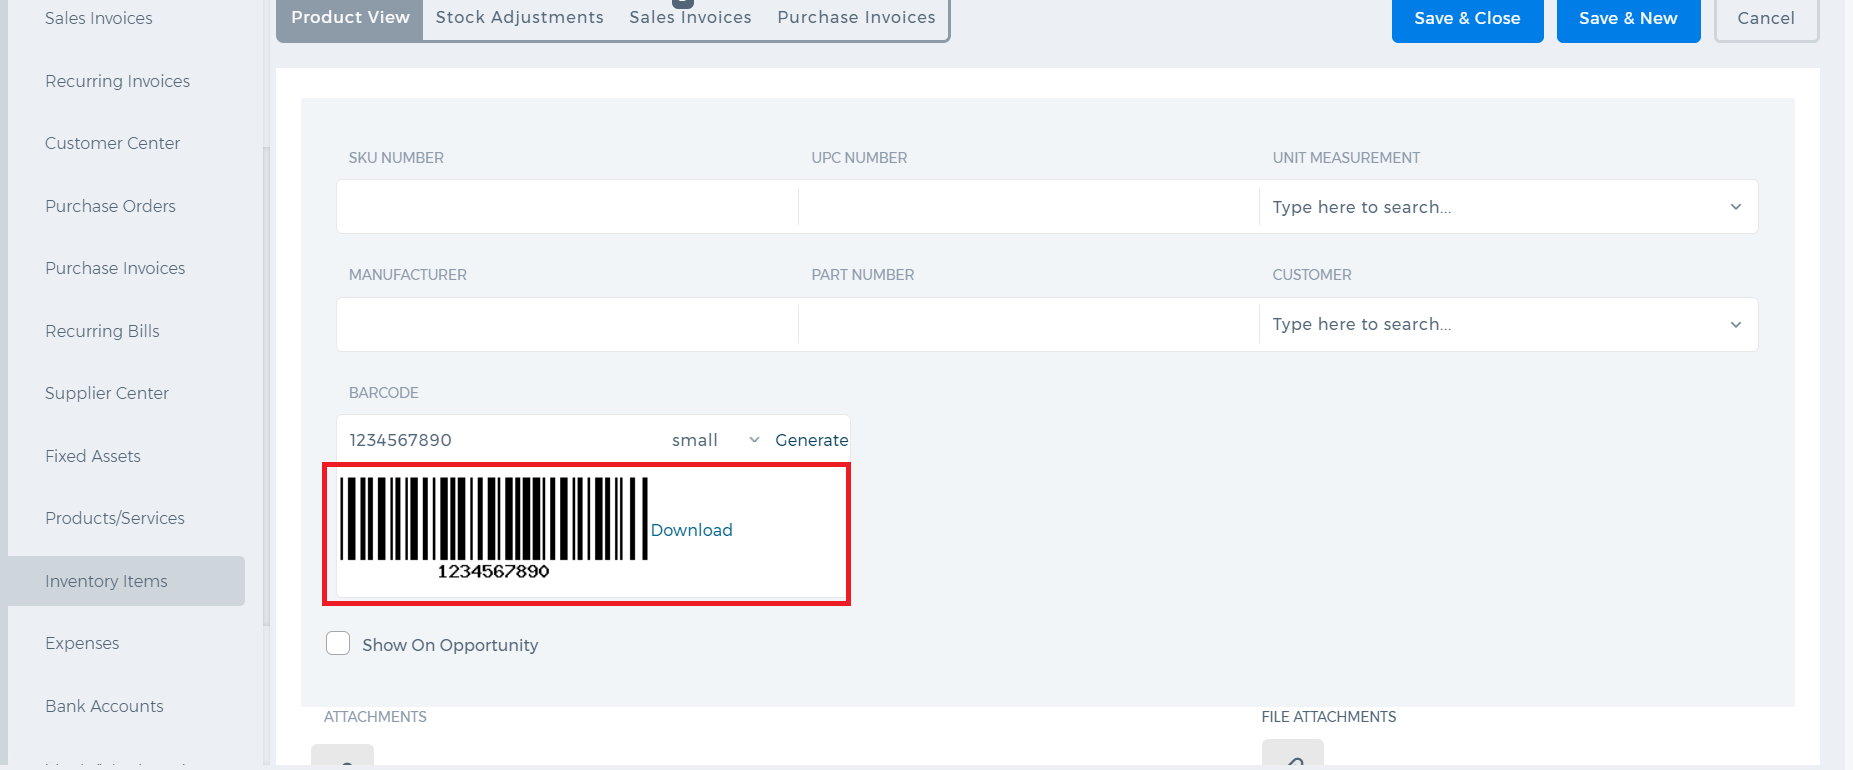
In order to generate a Barcode for the particular product, go to Add / Edit Product form through Accounts >> Inventory Items >> Choose particular product. You should check for Show more options button. Once you click on it, additional fields such as SKU Number, UPC Number, Unit Measurement, Manufacturer, Part Number, Customer, Barcode will appear. Here, you can fill the Barcode field by entering your Barcode Number:
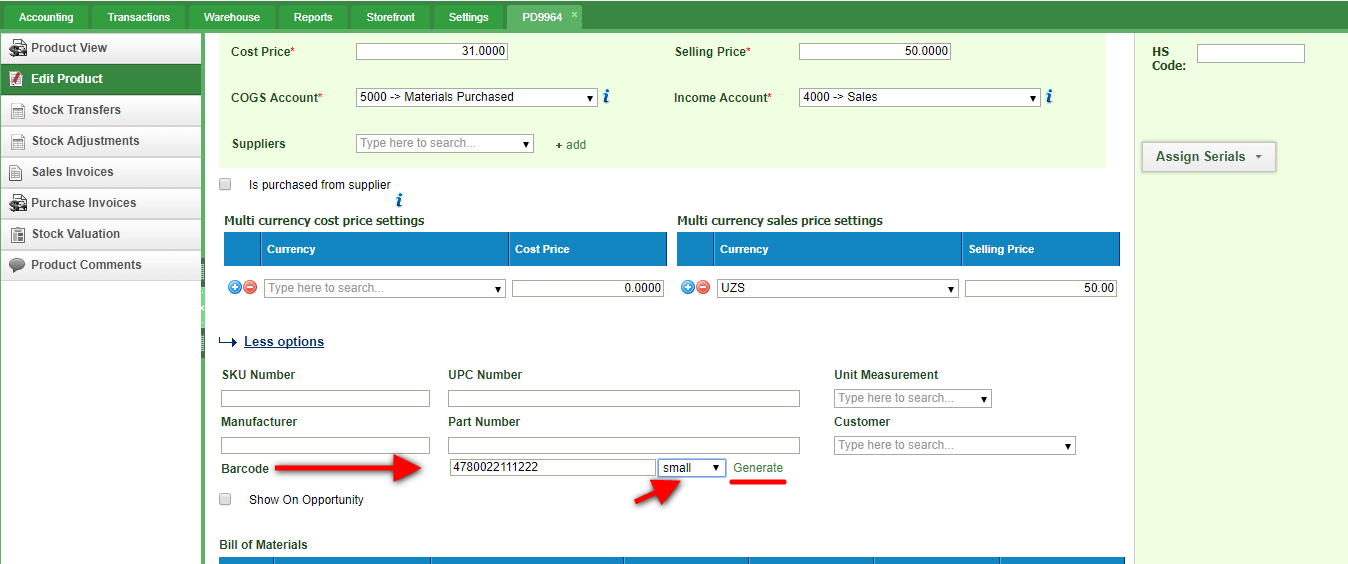
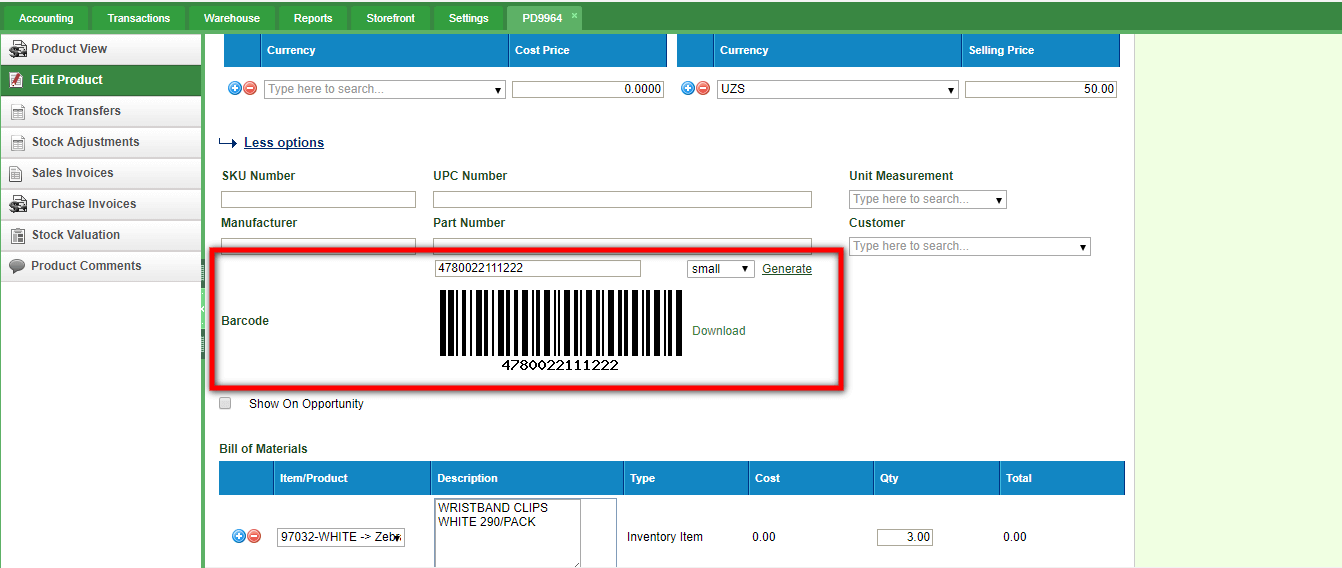
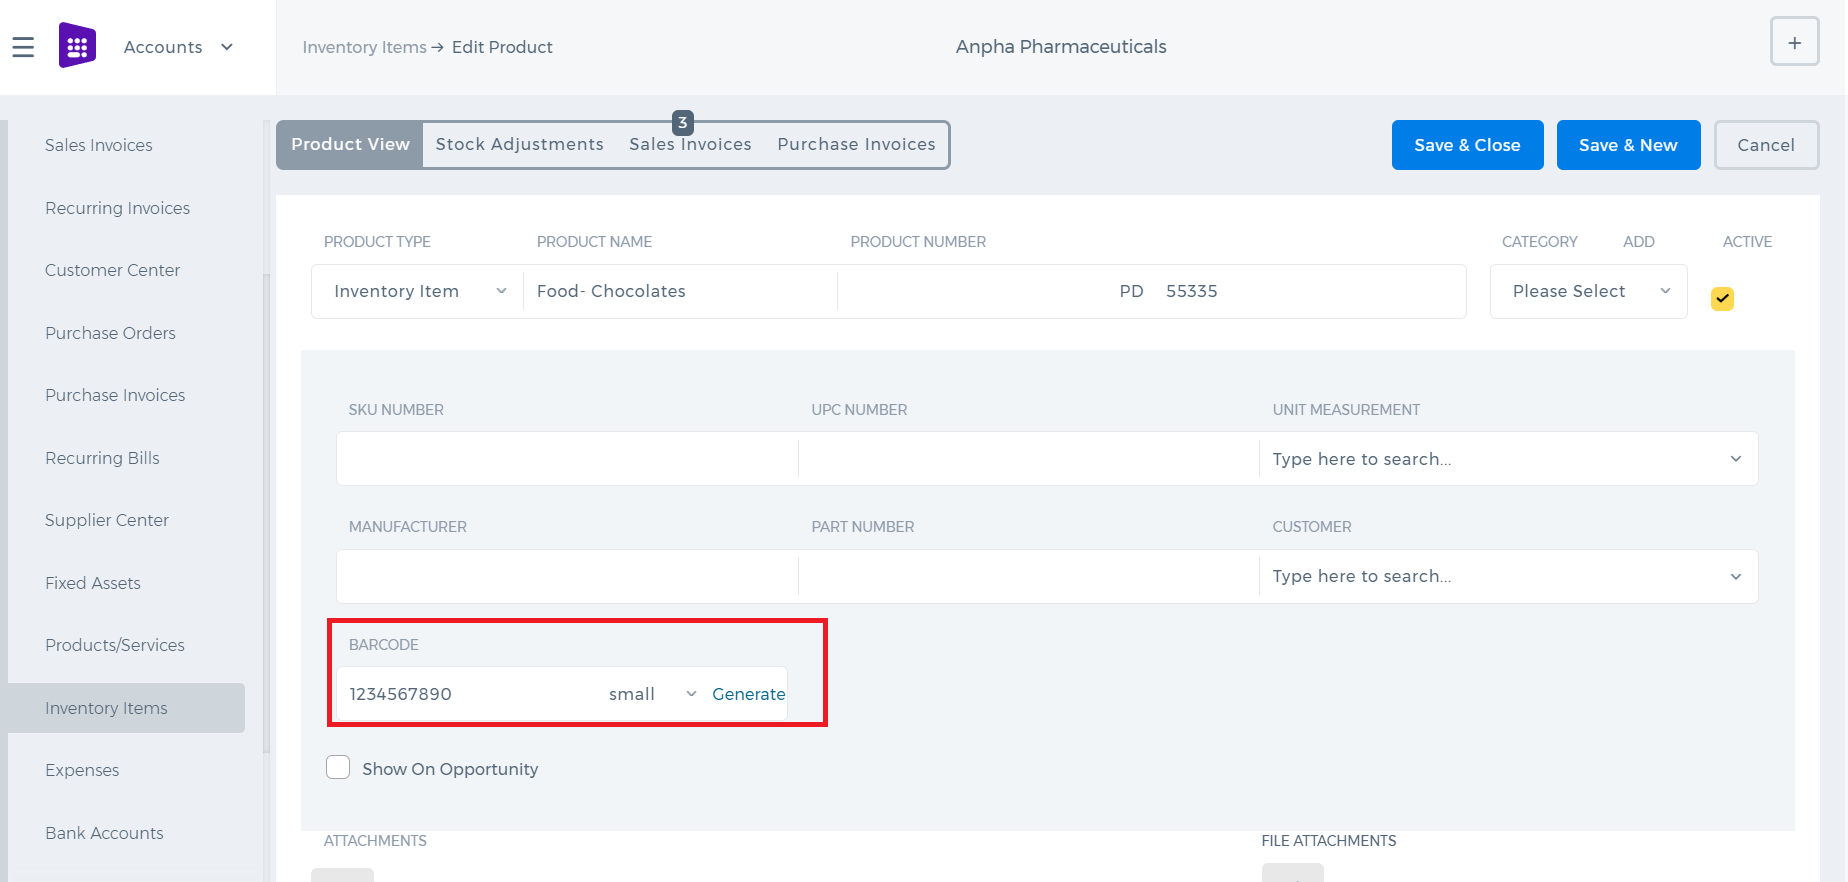 Then, choose the type of Barcode (small, medium, large) and click on Generate button and Save changes. Once you finish, you can download the generated barcode.
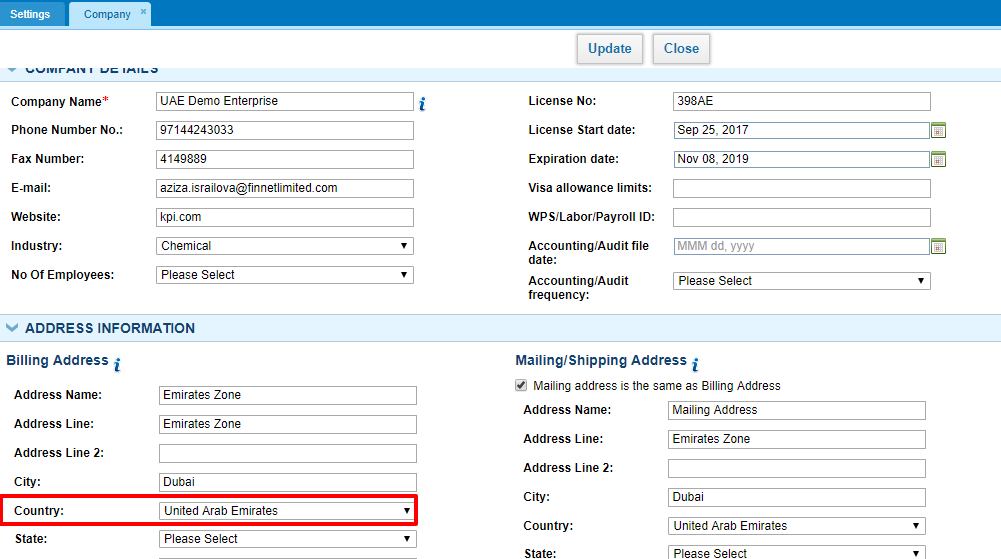


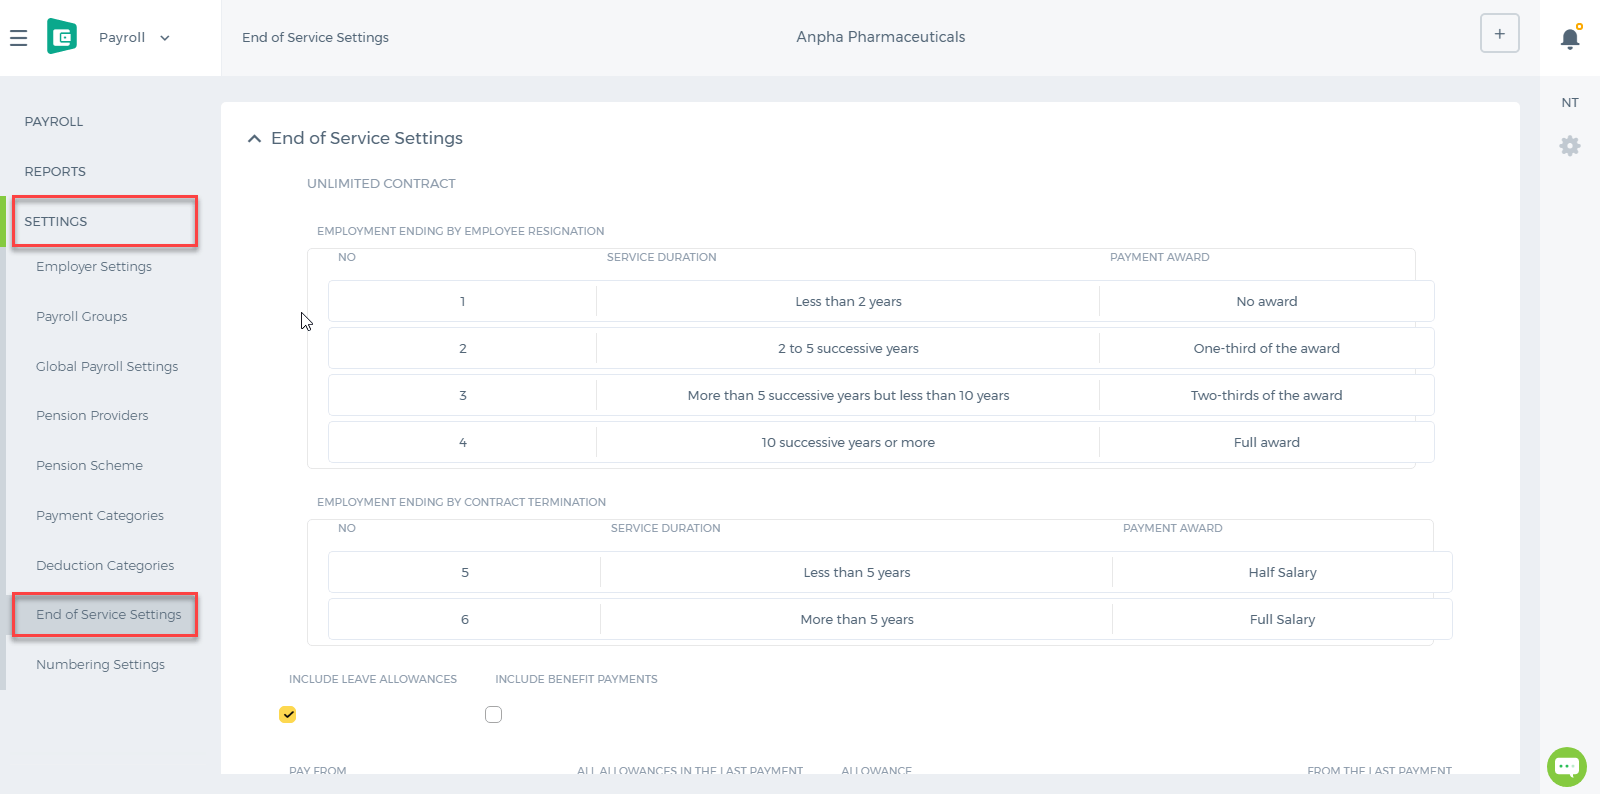 There are two types of Contracts: Limited and Unlimited Contract.
If the employee has the Contract Start and End dates set in their profile, then the employee is said to get an end of service payment based on the limited contract calculations. If the employee doesn't have the Contract Start and End dates set in their profile, then the system will recognize them as Unlimited Contract employees.
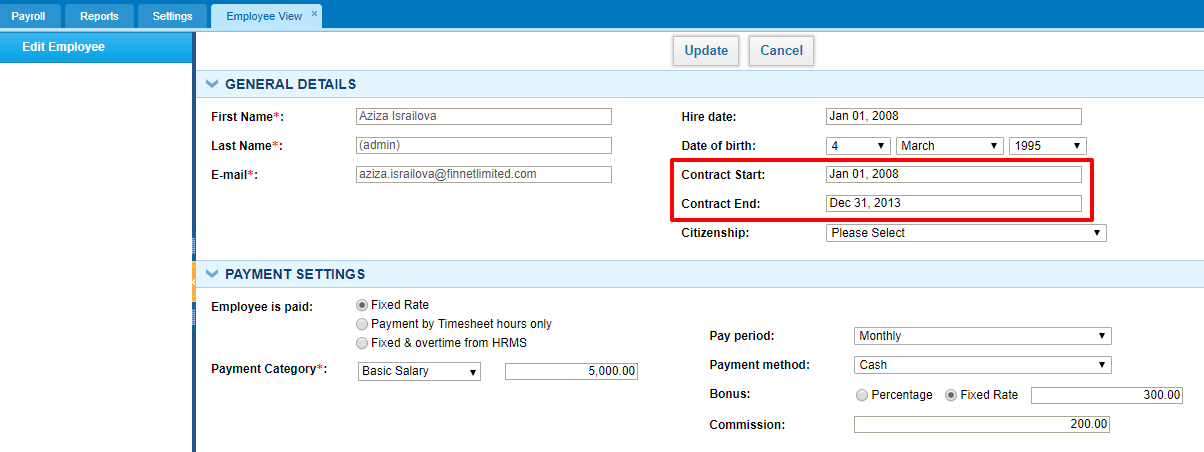 The system calculates end of service gratuity either by Resignation or by Termination. Let's calculate the end of service gratuity of an employee who has a limited contract.
If the employee has completed more than 5 years of continuous service with your company and has resigned, then for the first 5 years he/she is eligible for 21 day’s basic salary and for service above 5 years, he/she is eligible for 30 day’s basic salary for every year of service.
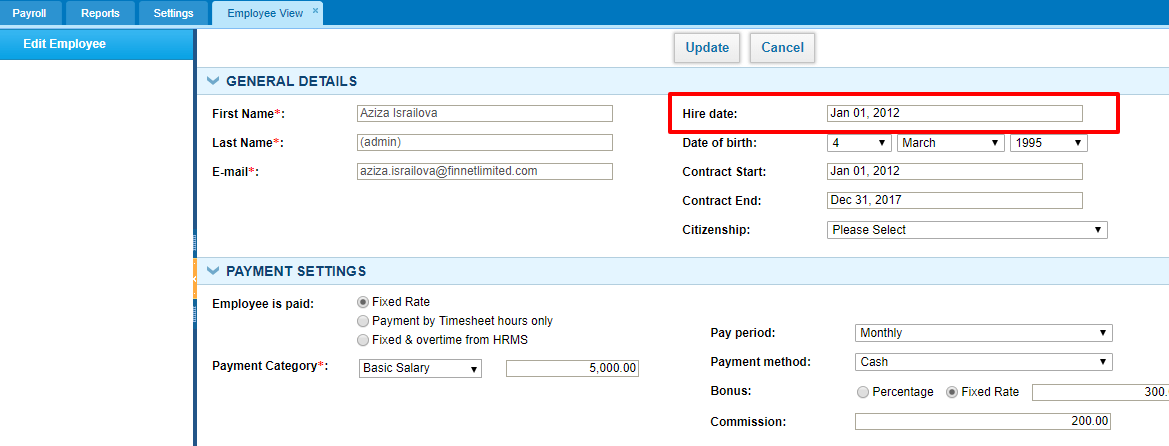 Calculation:
Hire Date: Jan 01, 2012
As of Date: Dec 15, 2017
Basic Salary: 5000 per month
Basic Salary per Day: 5000*12/365 = 164.3836
Total Number of Days Worked: Hire Date - As of Date = 2176
Total Number of Years Worked: 2176/365 = 5.96164
21 Days Basic Salary: 164.3836*21 = 3452.055
30 Days Basic Salary: 30*164.3836*(5.96164-5) = 4742.353 (for above 5 years).
Total Gratuity: 5*3452.055 + 4742.353 = 22002.63
The end of service calculates the gratuity total according tot he reason you choose and date you choose.
 Other calculations are made according to the End of Service Settings in your account using the same formula.
Resigned Employees
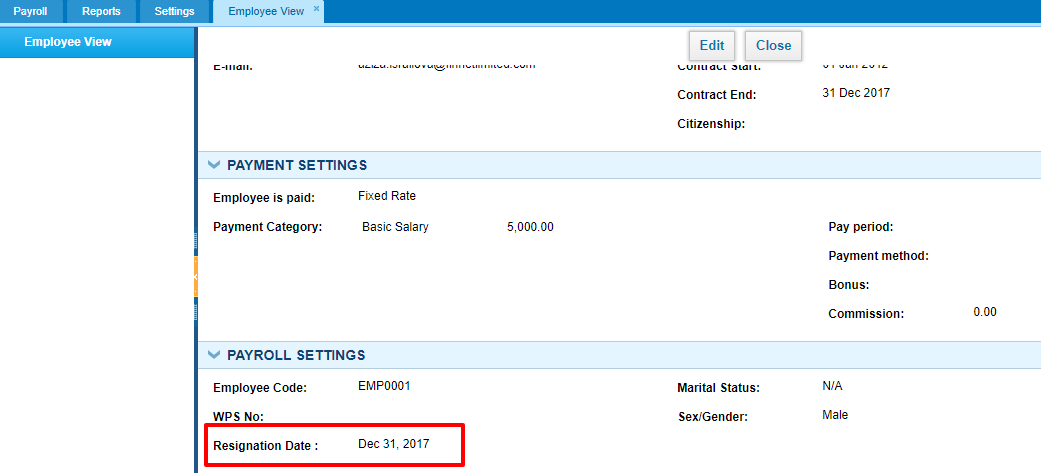
If the employee is already resigned, the gratuity can be added from the End of Service Gratuity page. In order to add it, the employee should have the Resignation Date set in his/her profile.

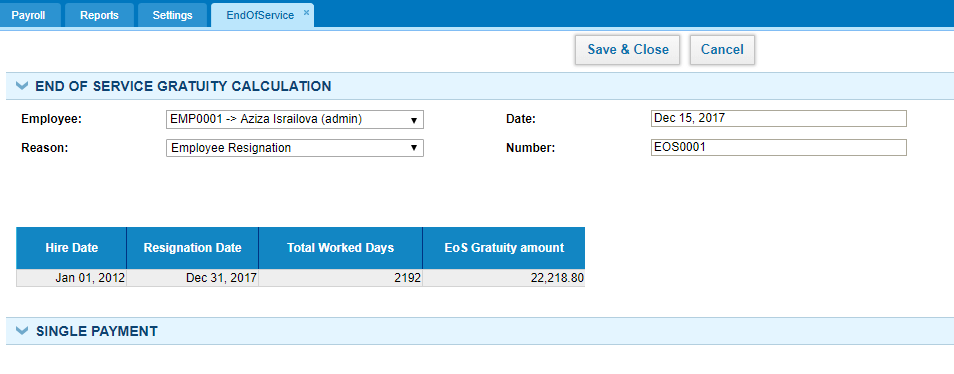 Once the End of Service Gratuity is added for the resigned employee, a single payrun will be automatically added in the Single Payrun list with a draft status.
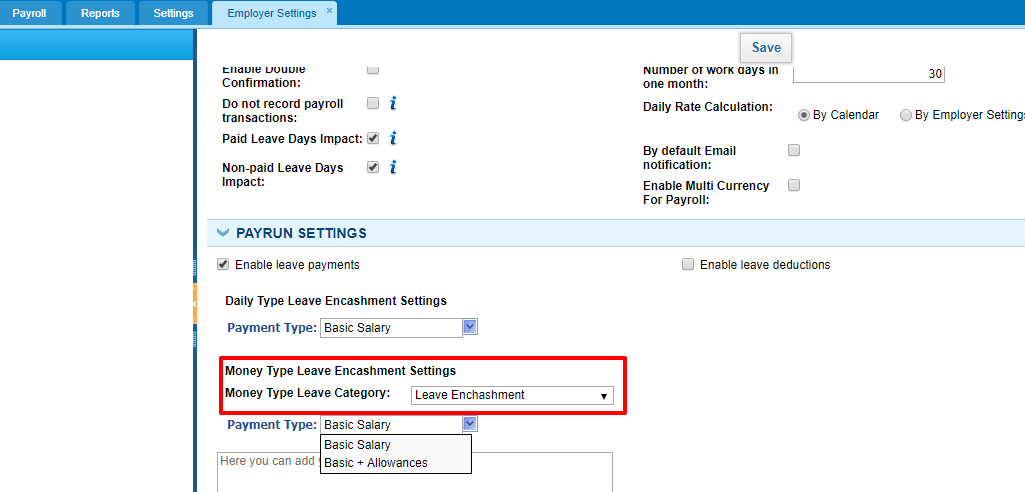
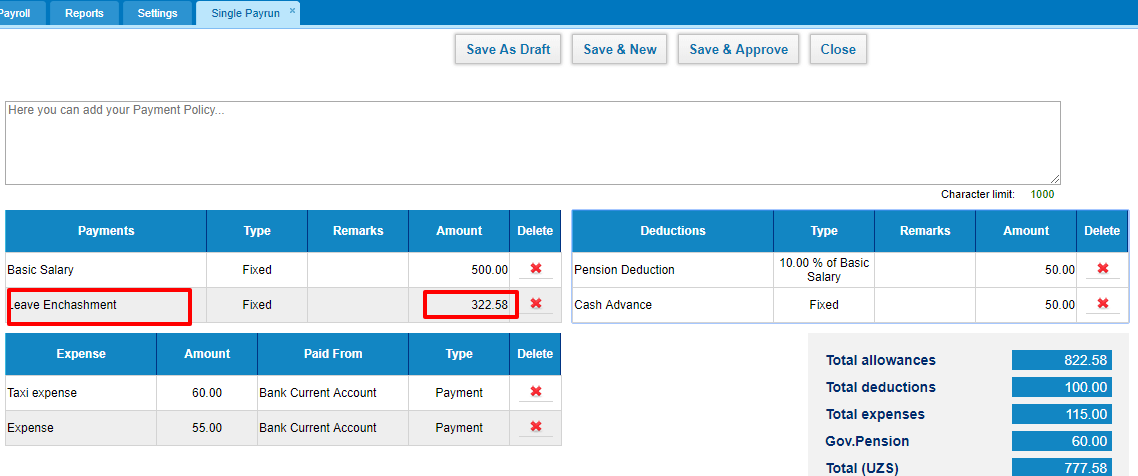
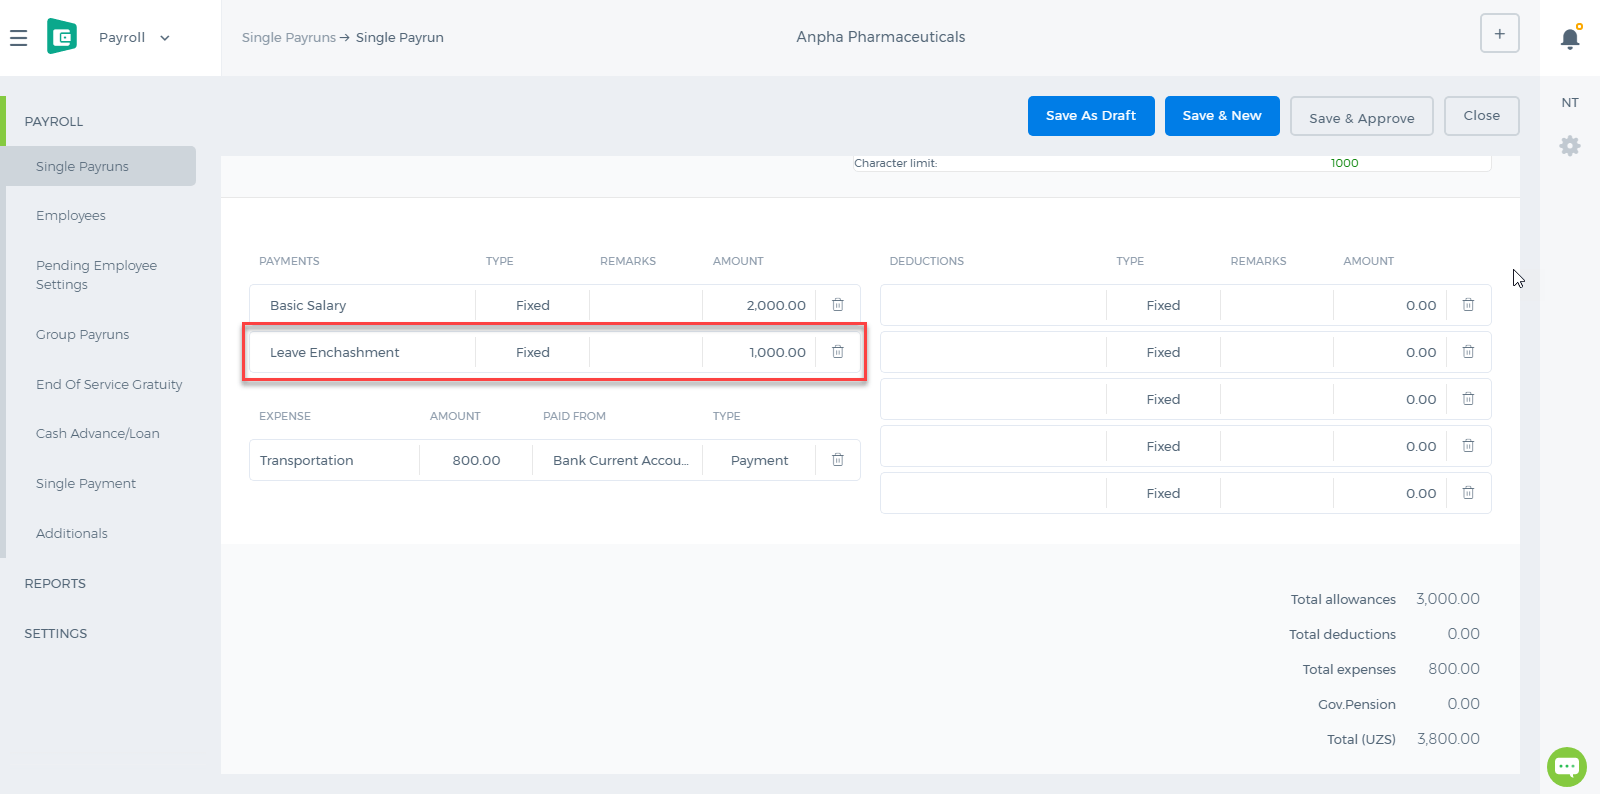
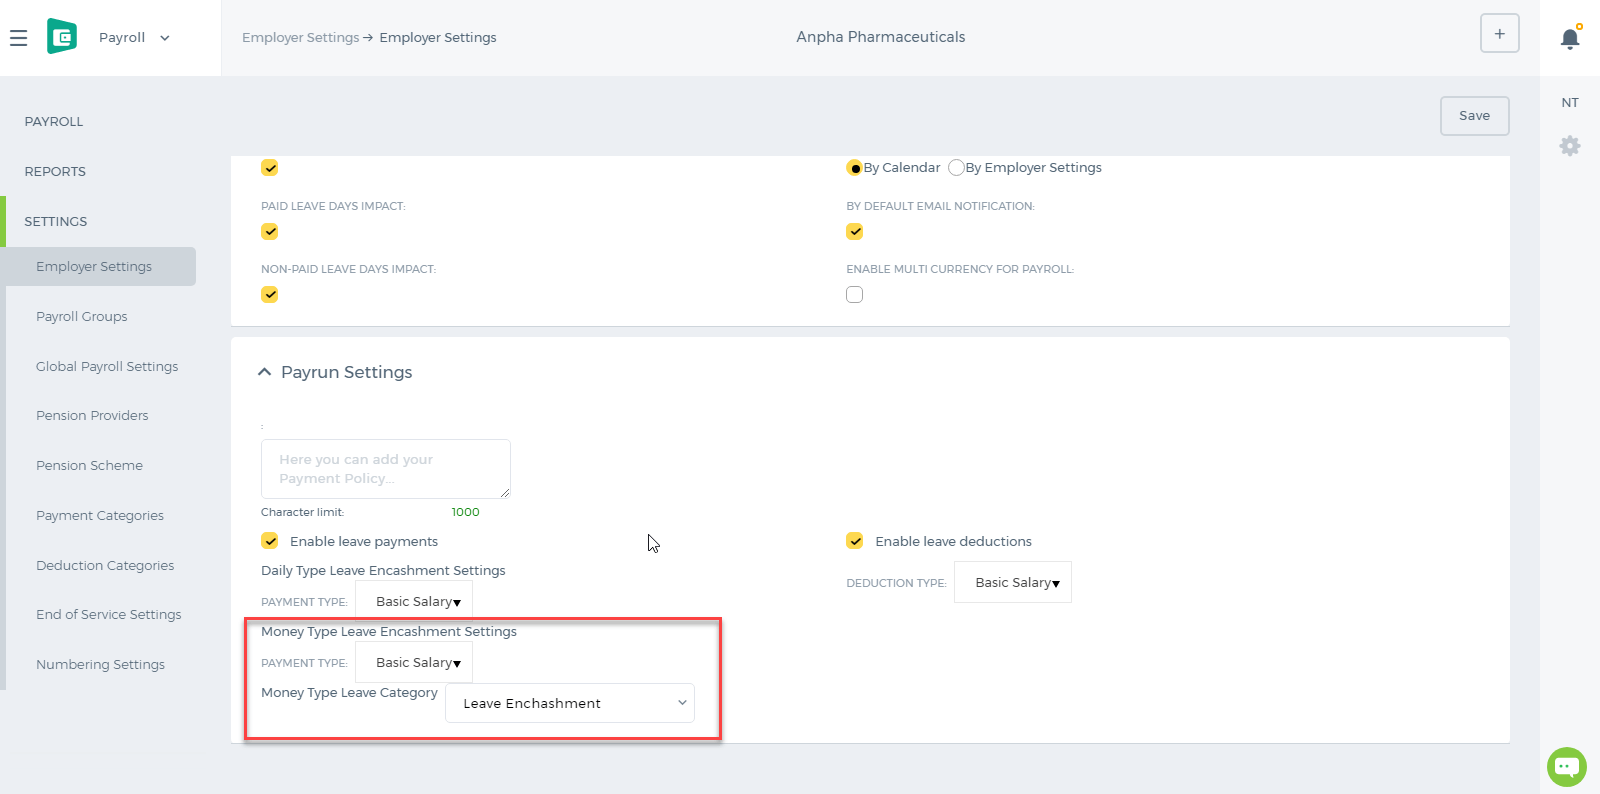 After the changes are saved in the settings, the leave encashment will be added as a payment category in the employee payrun for the period the leave was taken. For example, an employee is allowed to take 30 days as an annual leave, however, 20 days are taken as the money type which means employee is still working for those allowed days.
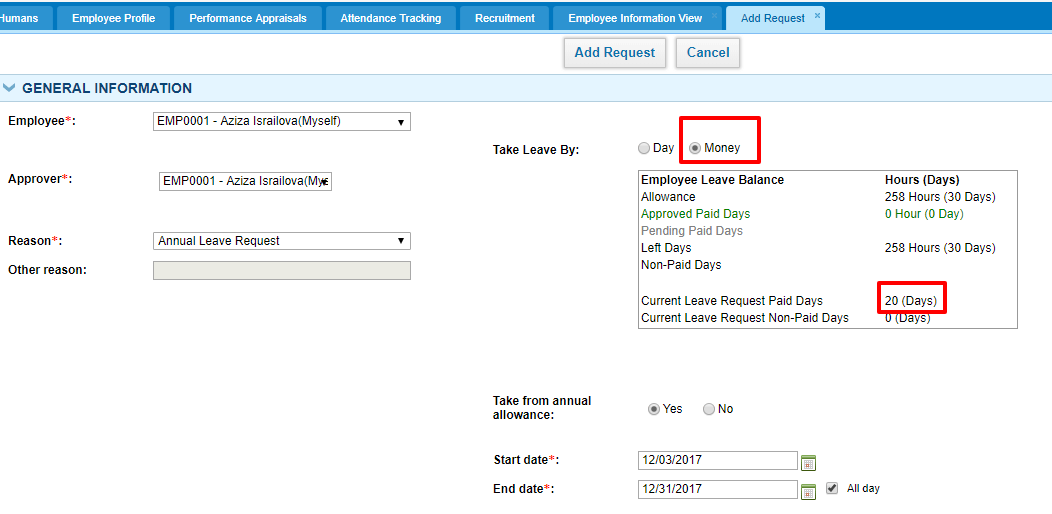
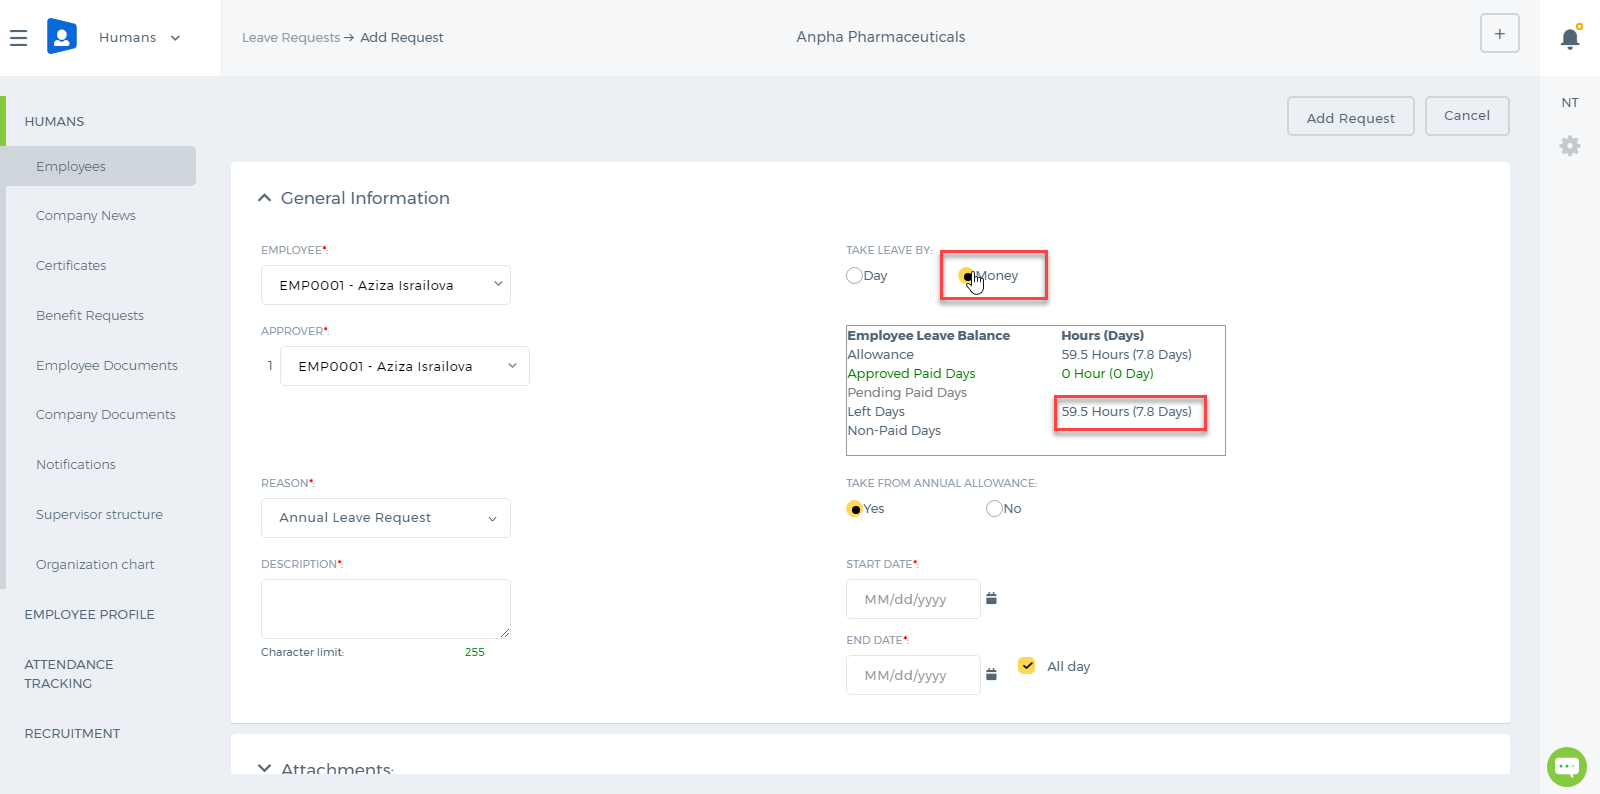 Once the Money type leave request is approved, the employee will be entitled for the leave enchashment in his/her payrun for that month.
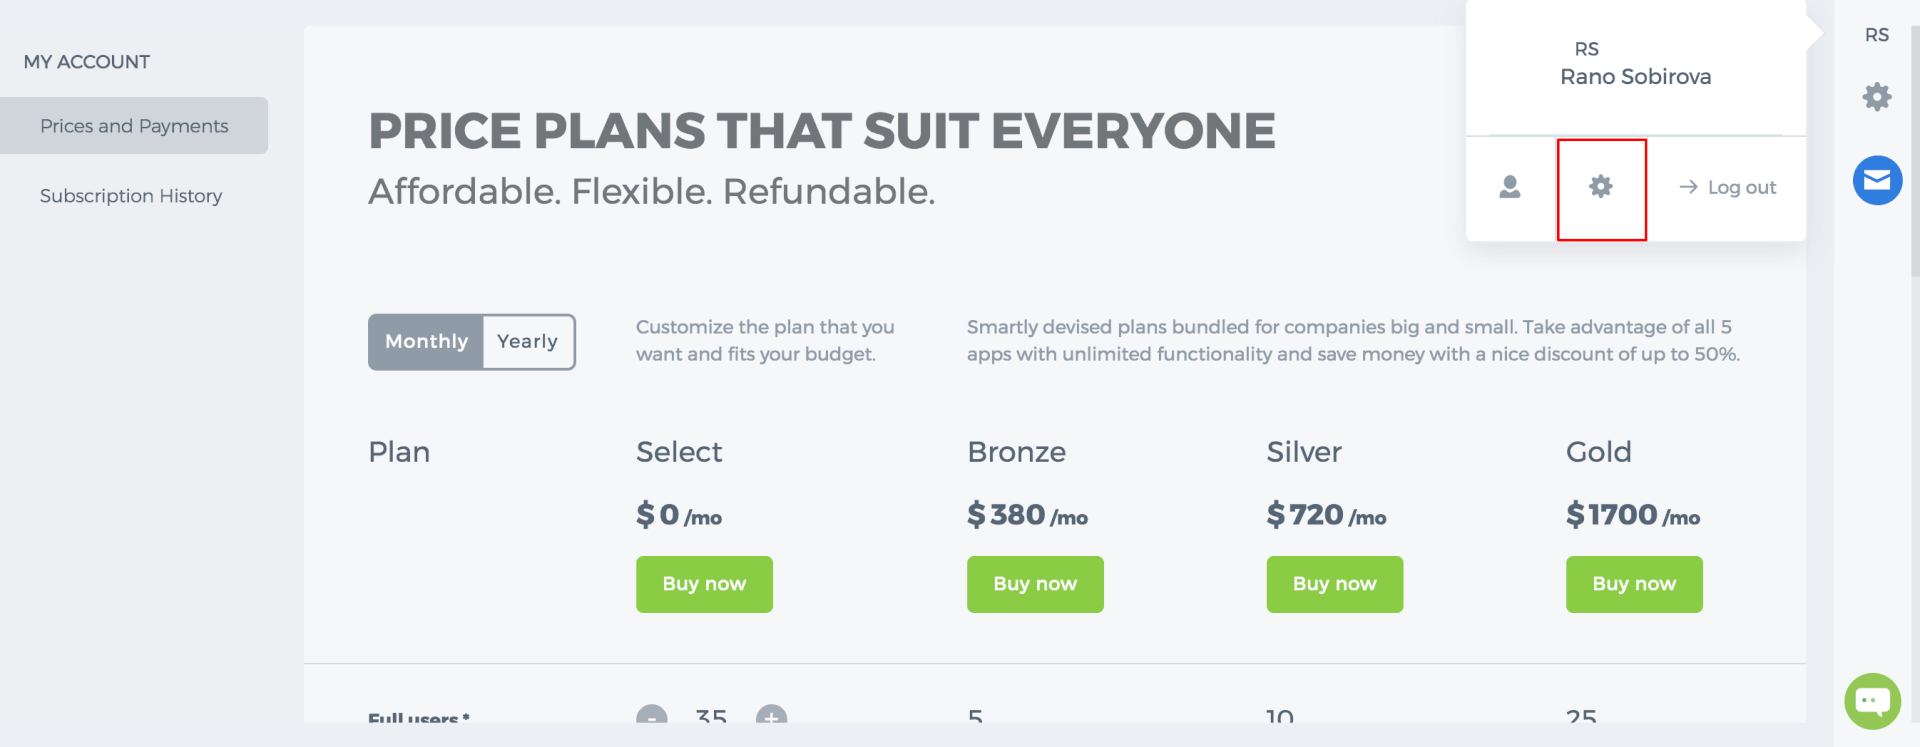
 In new User Interface, to see the price and payment, press on your account and choose the mentioned Setting button.
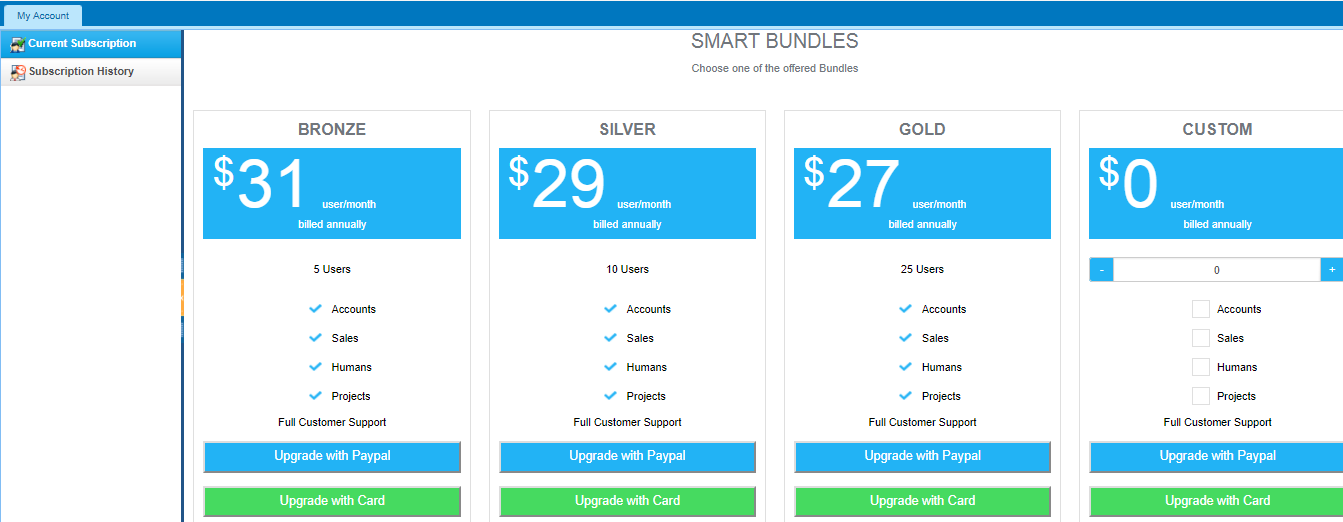
 These prices are used as an example; you can see real prices on this page: https://www.kpi.com/prices/
By choosing Upgrade with PayPal:
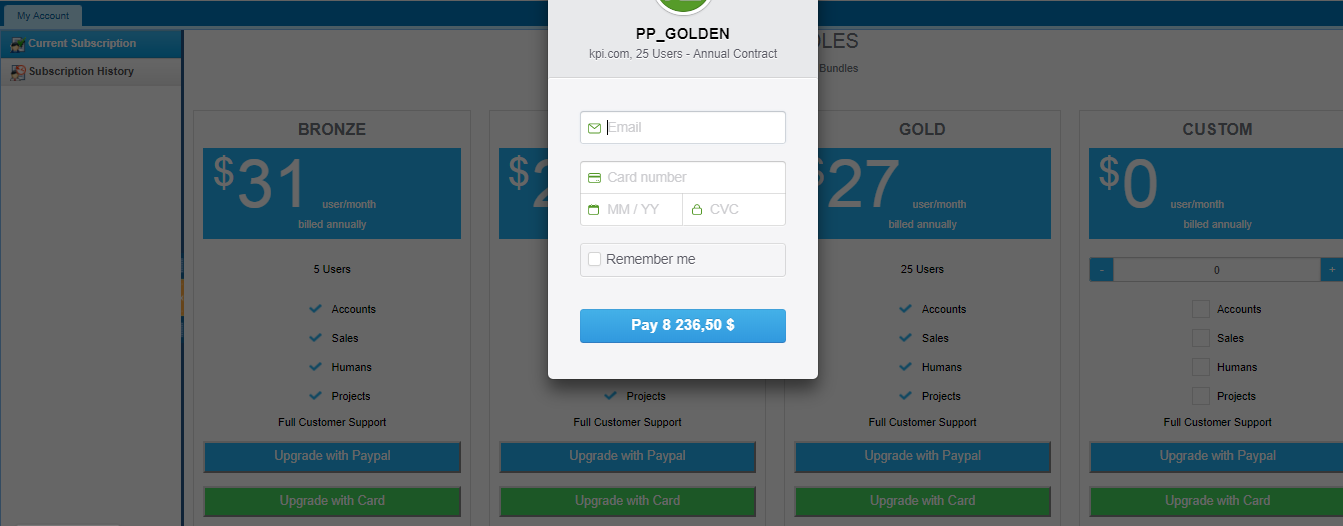
 By Upgrading to Card, if choosing one of the bundles:
 Sales Person will generate an Invoice for bank transactions and the Invoice also includes a PayPal link to make your payment.
Once payment is made, the support team will update your subscription accordingly.
If you have any questions or requests, please contact support@kpi.com.

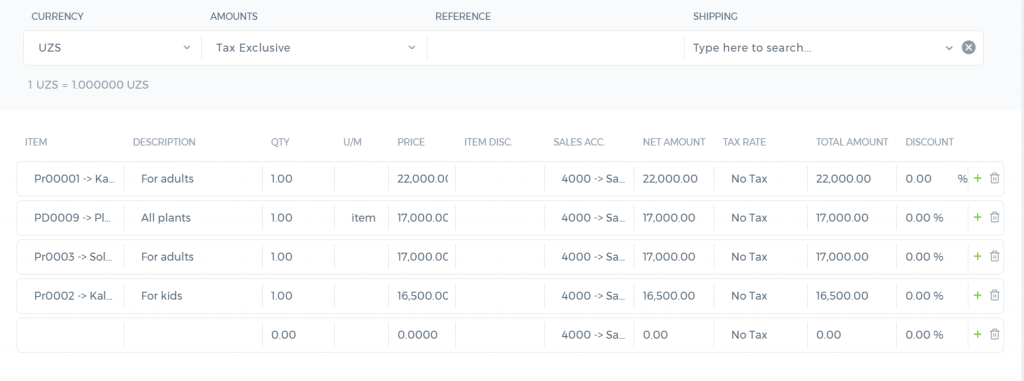 While adding the line items, all the saved products/services will be populated when you type in either the number of the item or the name of the item. Then you can choose the item from the populated results. Other details will be automatically filled up by the system like description, price, unit of measurement (U/M), sales accounts and so on.
All fields are editable there. You can change the description, price, quantity and sales account. You can add discount and tax if applicable.
By default there are 5 line items shown, if there are more than 5 line items which you would like to add, the system will add more lines once you fill the last line.
There are also delete and add icons to the last column labeled as x and +.
Note: there is no order in the items table. When you add new (invoice, quote, order, or others), the order will be the one you see in the table. However, when you try to edit a saved transaction and remove the first, second, or third item and insert a new product name instead, the system will actually place it to the last row (considering it as a new product).
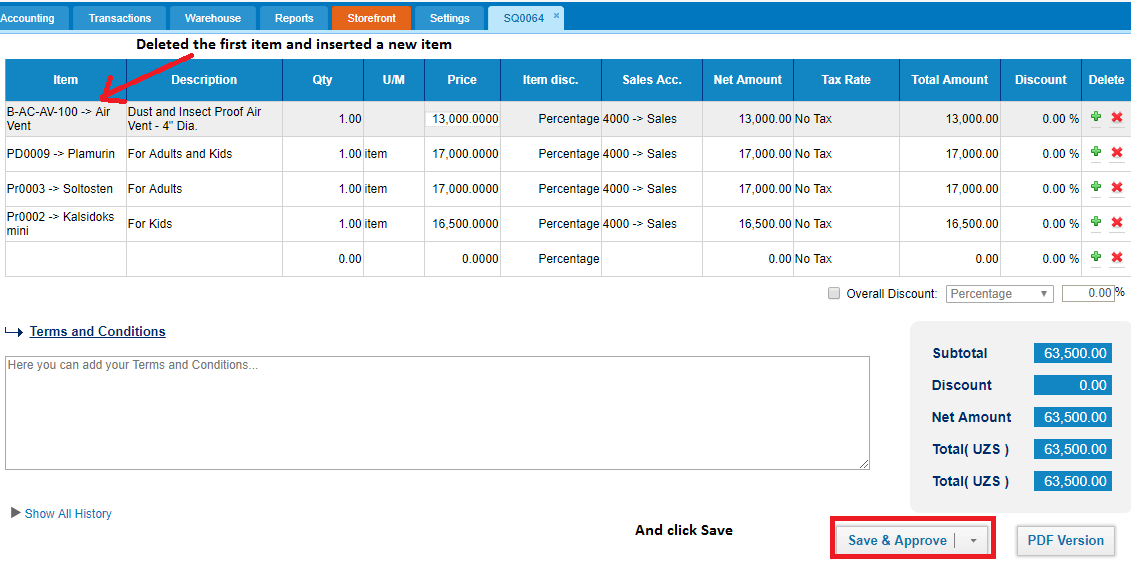
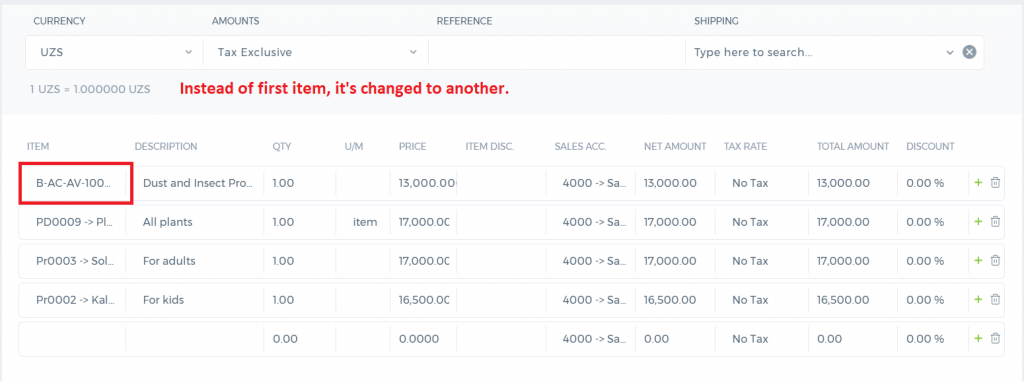 After you save the form, the new item goes to the last line.

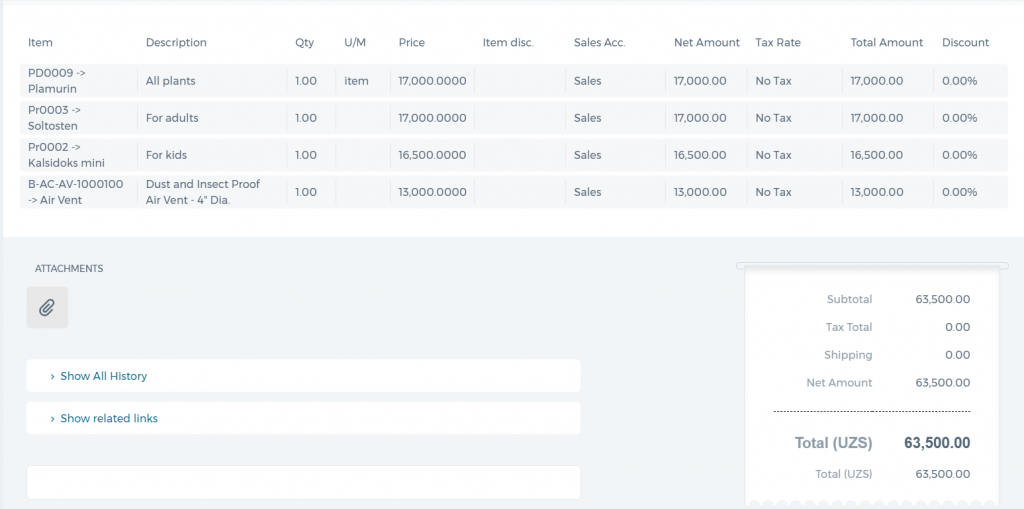 The PDF version of the form also shows the same order you see in the web form.
Detailed explanation for the case 3737-611174